Introduction to Angular 4 and TypeScript- Structure of Angular Projects and Webpack


In this article, you are going to learn about the structure of Angular project and Webpack.
TABLE OF CONTENT
  • Introduction
    • What is Angular?
    • Why do we need Angular?
    • Architecture and Building Blocks of Angular Apps
  • Setting Up the Development Environment
  • Your First Angular App
  • =>Structure of Angular Projects
  • =>Webpack
  • TypeScript Fundamentals
    • What is TypeScript?
    • Creating First TypeScript Program
    • Declaring Variables
    • Types
    • Type Assertions
    • Arrow Functions
    • Interfaces
    • Classes
    • Objects
    • Constructors
    • Access Modifiers
    • Access Modifiers in Constructor Parameters
    • Properties
    • Modules
  • Angular Fundamentals
    • Creating Components
    • Generating Components Using Angular CLI
    • Templates
    • Directives
    • Services
    • Dependency Injection
    • Generating Services Using Angular CLI
  • Exercise
Introduction

This tutorial on angular 4 project directory structure and webpack. Before start working with Angular project we should know about the structure of the project and where are different functional files resides in the directory structure. Along this what compile these project file in background to reflect changes in browser in real time.
webpack is a module bundler. Its main purpose is to bundle JavaScript files for usage in a browser, yet it is also capable of transforming, bundling, or packaging just about any resource or asset.
Project directory structure

According to the documentation, all our source files are under a folder and app lives in the src folder. All Angular components, templates, styles, images, and anything else your app needs go here. Any files outside of this folder are meant to support building your app.
 
Under that folder is an app folder that contains the source files specific for our application. For each major feature in the application we create subfolders under the app folder.
 
File
Purpose
app/app.component.{ts,html,css,spec.ts}
Defines the AppComponent along with an HTML template, CSS stylesheet, and a unit test. It is the root component of what will become a tree of nested components as the application evolves.
app/app.module.ts
Defines AppModule, the root module that tells Angular how to assemble the application. Right now it declares only the AppComponent. Soon there will be more components to declare.
assets/*
A folder where you can put images and anything else to be copied wholesale when you build your application.
environments/*
This folder contains one file for each of your destination environments, each exporting simple configuration variables to use in your application. The files are replaced on-the-fly when you build your app. You might use a different API endpoint for development than you do for production or maybe different analytics tokens. You might even use some mock services. Either way, the CLI has you covered.
favicon.ico
Every site wants to look good on the bookmark bar. Get started with your very own Angular icon.
index.html
The main HTML page that is served when someone visits your site. Most of the time you'll never need to edit it. The CLI automatically adds all js and cssfiles when building your app so you never need to add any <script> or <link> tags here manually.
main.ts
The main entry point for your app. Compiles the application with the JIT compiler and bootstraps the application's root module (AppModule) to run in the browser. You can also use the AOT compiler without changing any code by appending the--aot flag to the ng build and ng serve commands.
polyfills.ts
Different browsers have different levels of support of the web standards. Polyfills help normalize those differences. You should be pretty safe with core-js and zone.js, but be sure to check out the Browser Support guide for more information.
styles.css
Your global styles go here. Most of the time you'll want to have local styles in your components for easier maintenance, but styles that affect all of your app need to be in a central place.
test.ts
This is the main entry point for your unit tests. It has some custom configuration that might be unfamiliar, but it's not something you'll need to edit.
tsconfig.{app|spec}.json
TypeScript compiler configuration for the Angular app (tsconfig.app.json) and for the unit tests (tsconfig.spec.json).


package.json

The other files here are configuration and setup files, often called boilerplate files. To get us going quickly, In the package.json file, we define that   what  libraries need to install to develop and run our application. This file contains a list of all the application's dependencies. The entries start with @angular are Angular system libraries.
If we use the “npm install” on the terminal for the project, then it will check all the dependencies defined in this file and install in the “node_modules” folder.

Note: “node modules” folder contains all of our libraries for application which is installed by npm. This folder is large, so we may want to exclude it when we check-in our files into a source control system.


File/Folder
Purpose
e2e/
Inside e2e/ live the end-to-end tests. They shouldn't be inside src/ because e2e tests are really a separate app that just so happens to test your main app. That's also why they have their own tsconfig.e2e.json.
node_modules/
Node.js creates this folder and puts all third party modules listed inpackage.json inside of it.
.angular-cli.json
Configuration for Angular CLI. In this file you can set several defaults and also configure what files are included when your project is built. Check out the official documentation if you want to know more.
.editorconfig
Simple configuration for your editor to make sure everyone that uses your project has the same basic configuration. Most editors support an .editorconfig file. See http://editorconfig.org for more information.
.gitignore
Git configuration to make sure autogenerated files are not commited to source control.
karma.conf.js
Unit test configuration for the Karma test runner, used when running ng test.
package.json
npm configuration listing the third party packages your project uses. You can also add your own custom scripts here.
protractor.conf.js
End-to-end test configuration for Protractor, used when running ng e2e.
README.md
Basic documentation for your project, pre-filled with CLI command information. Make sure to enhance it with project documentation so that anyone checking out the repo can build your app!
tsconfig.json
TypeScript compiler configuration for your IDE to pick up and give you helpful tooling.
tslint.json
Linting configuration for TSLint together with Codelyzer, used when running ng lint. Linting helps keep your code style consistent.

This is all about the folder structure and now we see the webpack in action.
webpack

Now we going to make changes in the application along site application is already running on “localhost:4200”.
Now open the “app.components.ts” file under the folder src\app. Change the title from ‘app’ to ‘My First Angular App’ and as you change this text it will automatically reflect in the browser.


Web view:
When we change the title and save the file, you see in the command prompt we see the “compiling”.  After completion of the compilation you will see the changes reflect in the browser.
Angular CLI user the tool “webpack” which is a build automation tool.it bundle all out stylesheets, code file and minifies them for optimization. webpack automatically recompile our application and refreshes bundles.
It is the webpack feature “Hot Module Replacement” (HMR). When any source file modifies webpack automatically refreshes the browser to reflect the changes. webpack injects all the bundles in the startup index.html page at runtime.
Conclusion
In this article you have seen through the project folder structure Angular project and webpack for automated compilation


Introduction to Angular 4 and TypeScript- Your First Angular App

clip_image001
In this article, you are going to learn that how to create and run an Angular application using Angular CLI.

TABLE OF CONTENT

  • Introduction
    • What is Angular?
    • Why do we need Angular?
    • Architecture and Building Blocks of Angular Apps
  • Setting Up the Development Environment
  • =>Your First Angular App
  • Structure of Angular Projects
  • Webpack
  • TypeScript Fundamentals
    • What is TypeScript?
    • Creating First TypeScript Program
    • Declaring Variables
    • Types
    • Type Assertions
    • Arrow Functions
    • Interfaces
    • Classes
    • Objects
    • Constructors
    • Access Modifiers
    • Access Modifiers in Constructor Parameters
    • Properties
    • Modules
  • Angular Fundamentals
    • Creating Components
    • Generating Components Using Angular CLI
    • Templates
    • Directives
    • Services
    • Dependency Injection
    • Generating Services Using Angular CLI
  • Exercise

Introduction
Angular CLI is the new approach to work with Angular. It helps to create new projects as well as deployment of the packages through command line interface(CLI). In this article we install Angular CLI using node package manager and then create a new Angular 4 project.


Creating a new Angular Project
To create a new Angular project, first you must setup your development environment and the Angular CLI which can be configured using below command.

npm install -g @angular/cli

Now open the command prompt and go to the directory where you want to create your first Angular application. Now run below command on the command prompt.
ng new Angular4App

clip_image002

After ng new xxxxxx, this xxxxxx is the application name which all depend on you that what you want to name your application.
Now open current project folder in Visual Studio Code by running below command:
code .

clip_image004

Finally, it is the time to check if your newly created application is running or not. To run your first application switch back to command prompt and run “ng server” command within project directory. Below is the command to run the Angular server which package and load the current application on the server so that you can run it in the browser.

ng server

clip_image006

After running this command, you will see in the output window where you will find that Angular live development server is listening on “localhost:4200” So go to the browser and type “localhost:4200” and you will find that your application is running as seen in above image.

Along this you will see a message in last that webpack: compiled successfully. In the next article We will discuss about webpack and project structure.

Conclusion
In this article you have learned to create and run an Angular project using Angular CLI.

Previous: Setting Up the Development Environment Next: Structure of Angular Projects

Introduction to Angular 4 and TypeScript- Setting Up the Development Environment

clip_image001
In this article, you are going to learn that how setup the development environment for Angular and TypeScript.

TABLE OF CONTENT

  • Introduction
    • What is Angular?
    • Why do we need Angular?
    • Architecture and Building Blocks of Angular Apps
  • => Setting Up the Development Environment
  • Your First Angular App
  • Structure of Angular Projects
  • Webpack
  • TypeScript Fundamentals
    • What is TypeScript?
    • Creating First TypeScript Program
    • Declaring Variables
    • Types
    • Type Assertions
    • Arrow Functions
    • Interfaces
    • Classes
    • Objects
    • Constructors
    • Access Modifiers
    • Access Modifiers in Constructor Parameters
    • Properties
    • Modules
  • Angular Fundamentals
    • Creating Components
    • Generating Components Using Angular CLI
    • Templates
    • Directives
    • Services
    • Dependency Injection
    • Generating Services Using Angular CLI
  • Exercise

Introduction

Before we start code with Angular, there are some prerequisites to install first. In this article we set up everything what we need to start work with Angular 4. Before we more further to learn Angular we need to make some decisions related to selection of programming language, Editor and setup our tools to get everything ready.
What Language to select for Angular?
There several languages we could use to build an Angular application. Either we can use JavaScript or TrypeScript.

JavaScript

The JavaScript language specification standard is officially called ECMAScript or ES. Most browsers don't yet support higher version ES 6 named ES 6. So, ES 6 code must first be translated to ES 5. Code developed with ES 6 must be compiled by a tool that converts that ES 5 syntax to comparable ES 5 syntax before the browser executes it. That way we as developers get the benefits of the new ES 6 productivity features and the browsers still get code they understand. Since Angular is a JavaScript library we could use any of the many compile to JavaScript languages to build our Angular application. But the most common language choices for Angular include the ES 5 version of JavaScript. ES 5 code runs in the browser today without translation so no compile step is required. If we want to take advantage of some of the new ES 6 features to improve productivity such as classes, the let statement and arrow syntax, we can write our Angular code using ES 6. We then translate our code to ES 5 before running it.

TypeScript

Another language is TypeScript. TypeScript is a superset of JavaScript and must be translated. One of the key benefits of TypeScript is its strong typing, meaning that everything has a data type. Because of this strong typing, TypeScript has great tooling including inline documentation, syntax checking, code navigation, and advanced refactoring’s so TypeScript helps us better reason about our code. The Angular team itself takes advantage of these benefits and uses TypeScript to build Angular 2. Most of the demo code in the Angular documentation at present also uses TypeScript. For these reasons, TypeScript is the language of choice for many Angular developers and we will also use this throughout entire tutorial.

TypeScript is an open source language that is a superset of JavaScript and compiles to plain JavaScript through translation. It is strongly typed so every variable, every function, and every function parameter can have a data type.

How does TypeScript determine the appropriate types when using JavaScript libraries that are not strongly typed? By using TypeScript type definition files. These files contain the definition of each type in a library. These files are named with the library name .d.ts. TypeScript implements the ES 6 class-based object orientation plus more. It implements classes, interfaces, and inheritance so if you have experience with an object-oriented programming language such as C#, C++, or Java, using TypeScript may feel very natural to you. We will learn TypeScript in detail later in this tutorial.

clip_image001[4]

Dart is another option. It is a non-JavaScript-based language for building Angular applications.
We've selected TypeScript as our Angular language.

Editor or IDE for Angular

Once we've picked a language, we select an editor or IDE that fully supports development in that language. Then we set up the development environment to get started with Angular. In these there are lots of editors and IDEs offer support for TypeScript and we can check the documentation of TypeScript Editor Support, but we only get the clever Intellisense as we type if we use a supported IDE. Initially, this was only Microsoft's Visual Studio.

Some of the support TypeScript out of the box and by including a plugin. Select any one of these supported Editors or whichever suits you best, but keep in mind that working with TypeScript will be much pleasant if you select an editor that understands TypeScript.

We are going to use either Visual Studio or Visual Studio Code throughout the tutorial. It support it much better than other IDEs or Editors because Visual Studio 2017 now has ability to debug the TypeScript code as like C# code.

Setting up Development Environment

Setting up development environment for Angular require to Install npm or Node Package Manager

Install npm or Node Package Manager

First thing you need is the latest version of the Node. Visit the Node.js website and download the latest version of the Node.
clip_image003[4]
It is runtime environment for executing JavaScript code outside the browser. Node provides some tools to build Angular projects.

npm or Node Package Manager is a command line utility that interacts with a repository of open source projects. Now Node Package Manager has become the package manager for JavaScript. Using npm, we can install libraries, packages, and applications along with their dependencies.

We'll need npm to install all the libraries for Angular. Then we help us to execute scripts to compile our code and launch our Angular application.

After installing Node, we can verify it by running command “node –version” on command prompt that it has been install successfully or not.

clip_image001[6]

With npm installed we are ready to install third party libraries e.g. Angular CLI for set up our Angular application and create our first Angular application.

clip_image003[6]

It is the command line tool to create new Angular projects or generate some boiler-plate code and creates deployable packages. Now again move back to the command prompt and write below command to install Angular CLI on the development machine:

npm install -g @angular/cli

clip_image005

To ensure that installation is successful, check it with below command:

ng –version

clip_image007

Conclusion

We have learnt how to setup the environment for Angular development and installation of Angular CLI. If we have installed tools required for development then we good go for creating our first Angular application.

Previous: Introduction Next: Your First Angular App

Introduction to Angular 4 and TypeScript

clip_image001
This tutorial led you to learn the fundamentals of Angular and TypeScript.

TABLE OF CONTENT

  • =>Introduction
    • What is Angular?
    • Why do we need Angular?
    • Architecture and Building Blocks of Angular Apps
  • Setting Up the Development Environment
  • Your First Angular App
  • Structure of Angular Projects
  • Webpack
  • TypeScript Fundamentals
    • What is TypeScript?
    • Creating First TypeScript Program
    • Declaring Variables
    • Types
    • Type Assertions
    • Arrow Functions
    • Interfaces
    • Classes
    • Objects
    • Constructors
    • Access Modifiers
    • Access Modifiers in Constructor Parameters
    • Properties
    • Modules
  • Angular Fundamentals
    • Creating Components
    • Generating Components Using Angular CLI
    • Templates
    • Directives
    • Services
    • Dependency Injection
    • Generating Services Using Angular CLI
  • Exercise

Introduction

What is Angular?
Angular is a JavaScript framework for building client-side applications using HTML, CSS, and a programming language such as JavaScript. It is an open-source front-end web application platform based on TypeScript.

clip_image002

Before start using something new framework; everybody has lots of questions in his mind that What is it and Where does it fit in requirement? At which place it benefits and Why to use if there are lots of JavaScript frameworks out there.

Why do we need Angular? Why to use Angular and not some other JavaScript framework?
clip_image004
Angular makes HTML more expressive. It powers up HTML with language related features such as local variables, for loops, and if conditions.

clip_image006
Angular has powerful data binding. Application can easily display fields from data model, track changes, and process updates from the user so fast. It is built for providing speed. It has faster initial loads, faster change detections, and improved rendering times than other JavaScript frameworks.

clip_image008

Angular encourages modularity in application by design. It led us to create Applications as a set of building blocks, making it easier to create and reuse content. There most of the application build with JavaScript/ jQuery but as far the application gets more complex it is not easy to maintain the JavaScript and jQuery code.
It requires to properly structure the application. There are some JavaScript patterns out there e.g. Revealing Module Pattern, Prototype Pattern but these are must easy to lots beginners for JavaScript.

clip_image010

Angular has built-in support for making communication with a backend service. This makes it easy for web applications to integrate with a back-end service. It is preloaded with set to features to get and post data or execute server-side business logic.

Easily Testable

clip_image011

Picture credit from..

There are most the applications build with JavaScript or jQuery. Over the years various frameworks are build and evolved to make web applications development easier. Angular makes applications with clean structure that easy to understand and easy to maintain loosely coupled code. It makes applications more testable to write automated test to test the various part of the application.

Architecture and Building Blocks of Angular Apps
clip_image013

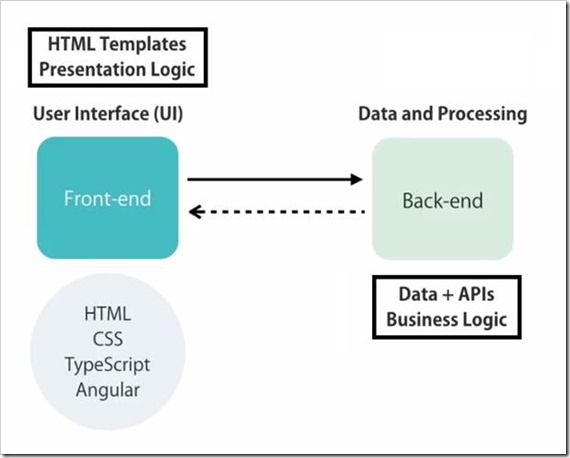
In modern web application, there are at least two parts a Front-end and Back-end. The Front-end is called client, it is the part of the web browser that user sees and interacts with. It includes user interface or UI for the application. It uses HTML, CSS, JavaScript/ TypeScript, Angular to create the Front-end. Front-end contains the HTML Templates and presentation logic to display the data and responding to the user e.g. navigation, listing data.

The Back-end consist of web servers or cloud which responsible for storing the data and doing any kind of processing. Back-end may one or more databases and APIs to make the data available to the client. For a large enterprise level application, it may also implement the business logic of the application like calculating the tax, shipping on various parameters

The Front-end or Client app talks to the Backend-end to get or save the data. At Back-end we create one or multiple HTTP Services / API to make data available to the client. These HTTP Services/ APIs are endpoint that are accessible via HTTP protocol so we call them to through HTTP request to get or save the data.

If we talk about Angular Building Blocks At the heart of every Angular App, we have one or more components. Application developed with Angular is comprised of a set of components and services which facilitates operations/functionality across those angular components.

clip_image015

Angular component

clip_image017
Angular component is comprised of a template which is the HTML for the user interface fragment defining a view for the application. component encapsulates the Data, HTML mark-up and logic for a view.

Along this, a class for the code associated with the view. The class contains the data or properties for use in the view and methods, which perform actions button for the associated view e.g. responding to a button click.

clip_image019

Metadata

A component also has metadata, which provides additional information about the component to Angular. It is this metadata that identifies the class as an Angular component.

Modules

Every Angular application has at least one Angular module which called the application's root Angular module. As Application grows it can have any number of additional Angular modules including feature modules that consolidate the components for a specific application feature to make code maintainable. It is a container for groups of components.

clip_image021

For an example, in real world scenario If we go to a grocery store then it has few shelf's to maintain their products/items to sell but in a big mall we found lots of I/0 to manage different categories of the products. Similarly, to maintain different type of components we can create multiple modules to organize the components.

If we see in Training web application, there are following modules can be created to manage the application:

clip_image023

Each module will manage their specific group of components, sub components to break the application in smaller and maintainable to facilitate a specific area of the application.

Conclusion:
In this section we have learned about the Angular and what/why Angular. Along this we have also tried to know the basic building blocks of the Angular to develop a web application

Next: Setting Up the Development Environment