Introduction
In this article, you will learn to deploy an Angular application to GitHub Pages using npm angular-cli-ghpages package to easily.
Prerequisites:
This command has the following prerequisites for Installation & Setup:
References:
Deploy to GitHub Pages angular-cli-ghpages
Deploying Angular Apps with GitHub Pages
Steps to deploy to GitHub pages
To install the command run the following:
npm install -g angular-cli-ghpages
It is just two command to publish your Angular application to GitHub pages.
Deploying using the Angular npm scripts
You can also automatically publish an application using npm by setting script in package.json. The build and deploy command in one go by following the below approach:
To install the command as your project dependencies run the following:
npm i angular-cli-ghpages --save-dev
Open your package.json and then, in your script section add the following script to deploy an Angular 7 application.
{
  "name": "ng-webgl",
  "version": "0.0.0",
  "scripts": {
    "ng": "ng",
    "start": "ng serve",
    "build": "ng build",
    "test": "ng test",
    "lint": "ng lint",
    "e2e": "ng e2e",
    "deploy:gh": "ng b --prod --base-href https://niranjankala.github.io/ng-webgl/ && npx ngh --dir=dist/"
  },
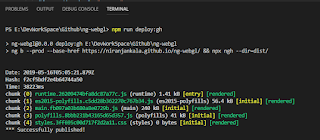
To execute this deploy script. Run npm run deploy:gh on the root of your project directory.

Note: In order to compile images correctly use the relative path './assets/images/image.png'
Conclusion
There are the steps to publish Angular application the GitHub pages.
Introduction
In this article, you will know how to remove TFS workspace mapping for a different user. In a remote environment, multiple users log in to a remote machine and create their workspaces that cause an access conflict for the mapped workspace folder.
Scenario
Today I faced an issue while trying to update a mapped TFS workspace in Visual Studio 2017. Visual Studio stops responding if I try to open “Source Control Explorer” and found that some different TFS user connects to TFS and mapped some folders on my local drive. Now I need to access that mapped workspace folder because I do not want to create another folder for myself.
I tried mapping same remote folder to my existing local folder and I got the following error:
“The working folder ‘Workspace_Folder_Local_Path’ is already in use by the workspace WORKSPACE_NAME:USER_NAME on computer ‘MACHINE_NAME’”
Remove TFS workspace user mapping
Prerequisites:
- You should have administrative rights to the collection.
- TF command. ( it is located at “C:\Program Files (x86)\Microsoft Visual Studio\2017\Professional\Common7\IDE” depend upon your Visual Studio version.
Steps to remove user workspace mapping
- Run “Developer Command Prompt for VS 2017” from the Start menu.
- List the workspaces associated with the user using the below command:
This will return the list of workspaces owned by the user and computer they are associated with. For owner_id, you use the user name e.g. Niranjan Singh
- To remove user workspace mapping, run the below command:
tf workspace /delete workspacename;owner_id
Now it will confirm you to delete the user mapping. Enter 'y' to initiate the process.

Conclusion
These are the steps to delete the TFS workspace mapping for a user.