Dive Deep: Unveiling DevExpress Splash Screen in Your Winforms App

Introduction:

In today's fast-paced digital world, user experience plays a pivotal role in the success of any application. One aspect that significantly contributes to a positive user experience is the loading screen or splash screen. A well-designed splash screen enhances the aesthetic appeal of your application and provides users with visual feedback during the loading process, reducing perceived wait times.

In this tutorial, we'll explore implementing a splash screen in a Winforms application using DevExpress, a powerful suite of UI controls and components. By the end of this tutorial, you'll have a sleek and professional-looking splash screen integrated into your Winforms application, enhancing its overall user experience.

Step 1: Setting Up Your Winforms Project

Before implementing the DevExpress splash screen, let's set up a basic Winforms project in Visual Studio.

  1. Open Visual Studio and create a new Winforms project.
  2. Name your project and choose a location to save it.
  3. Once the project is created, you'll see the default form in the designer view.

Step 2: Installing DevExpress

You must install the DevExpress NuGet package to use the DevExpress controls and components in your Winforms project.

  1. Right-click on your project in Solution Explorer.
  2. Select "Manage NuGet Packages" from the context menu.
  3. In the NuGet Package Manager, search for "DevExpress" and install the appropriate package for your project.

Step 3: Adding a Splash Screen Form

Now, let's create a new form for our splash screen.

  1. Right-click on your project in Solution Explorer.
  2. Select "Add DevExpress Item" from the context menu.
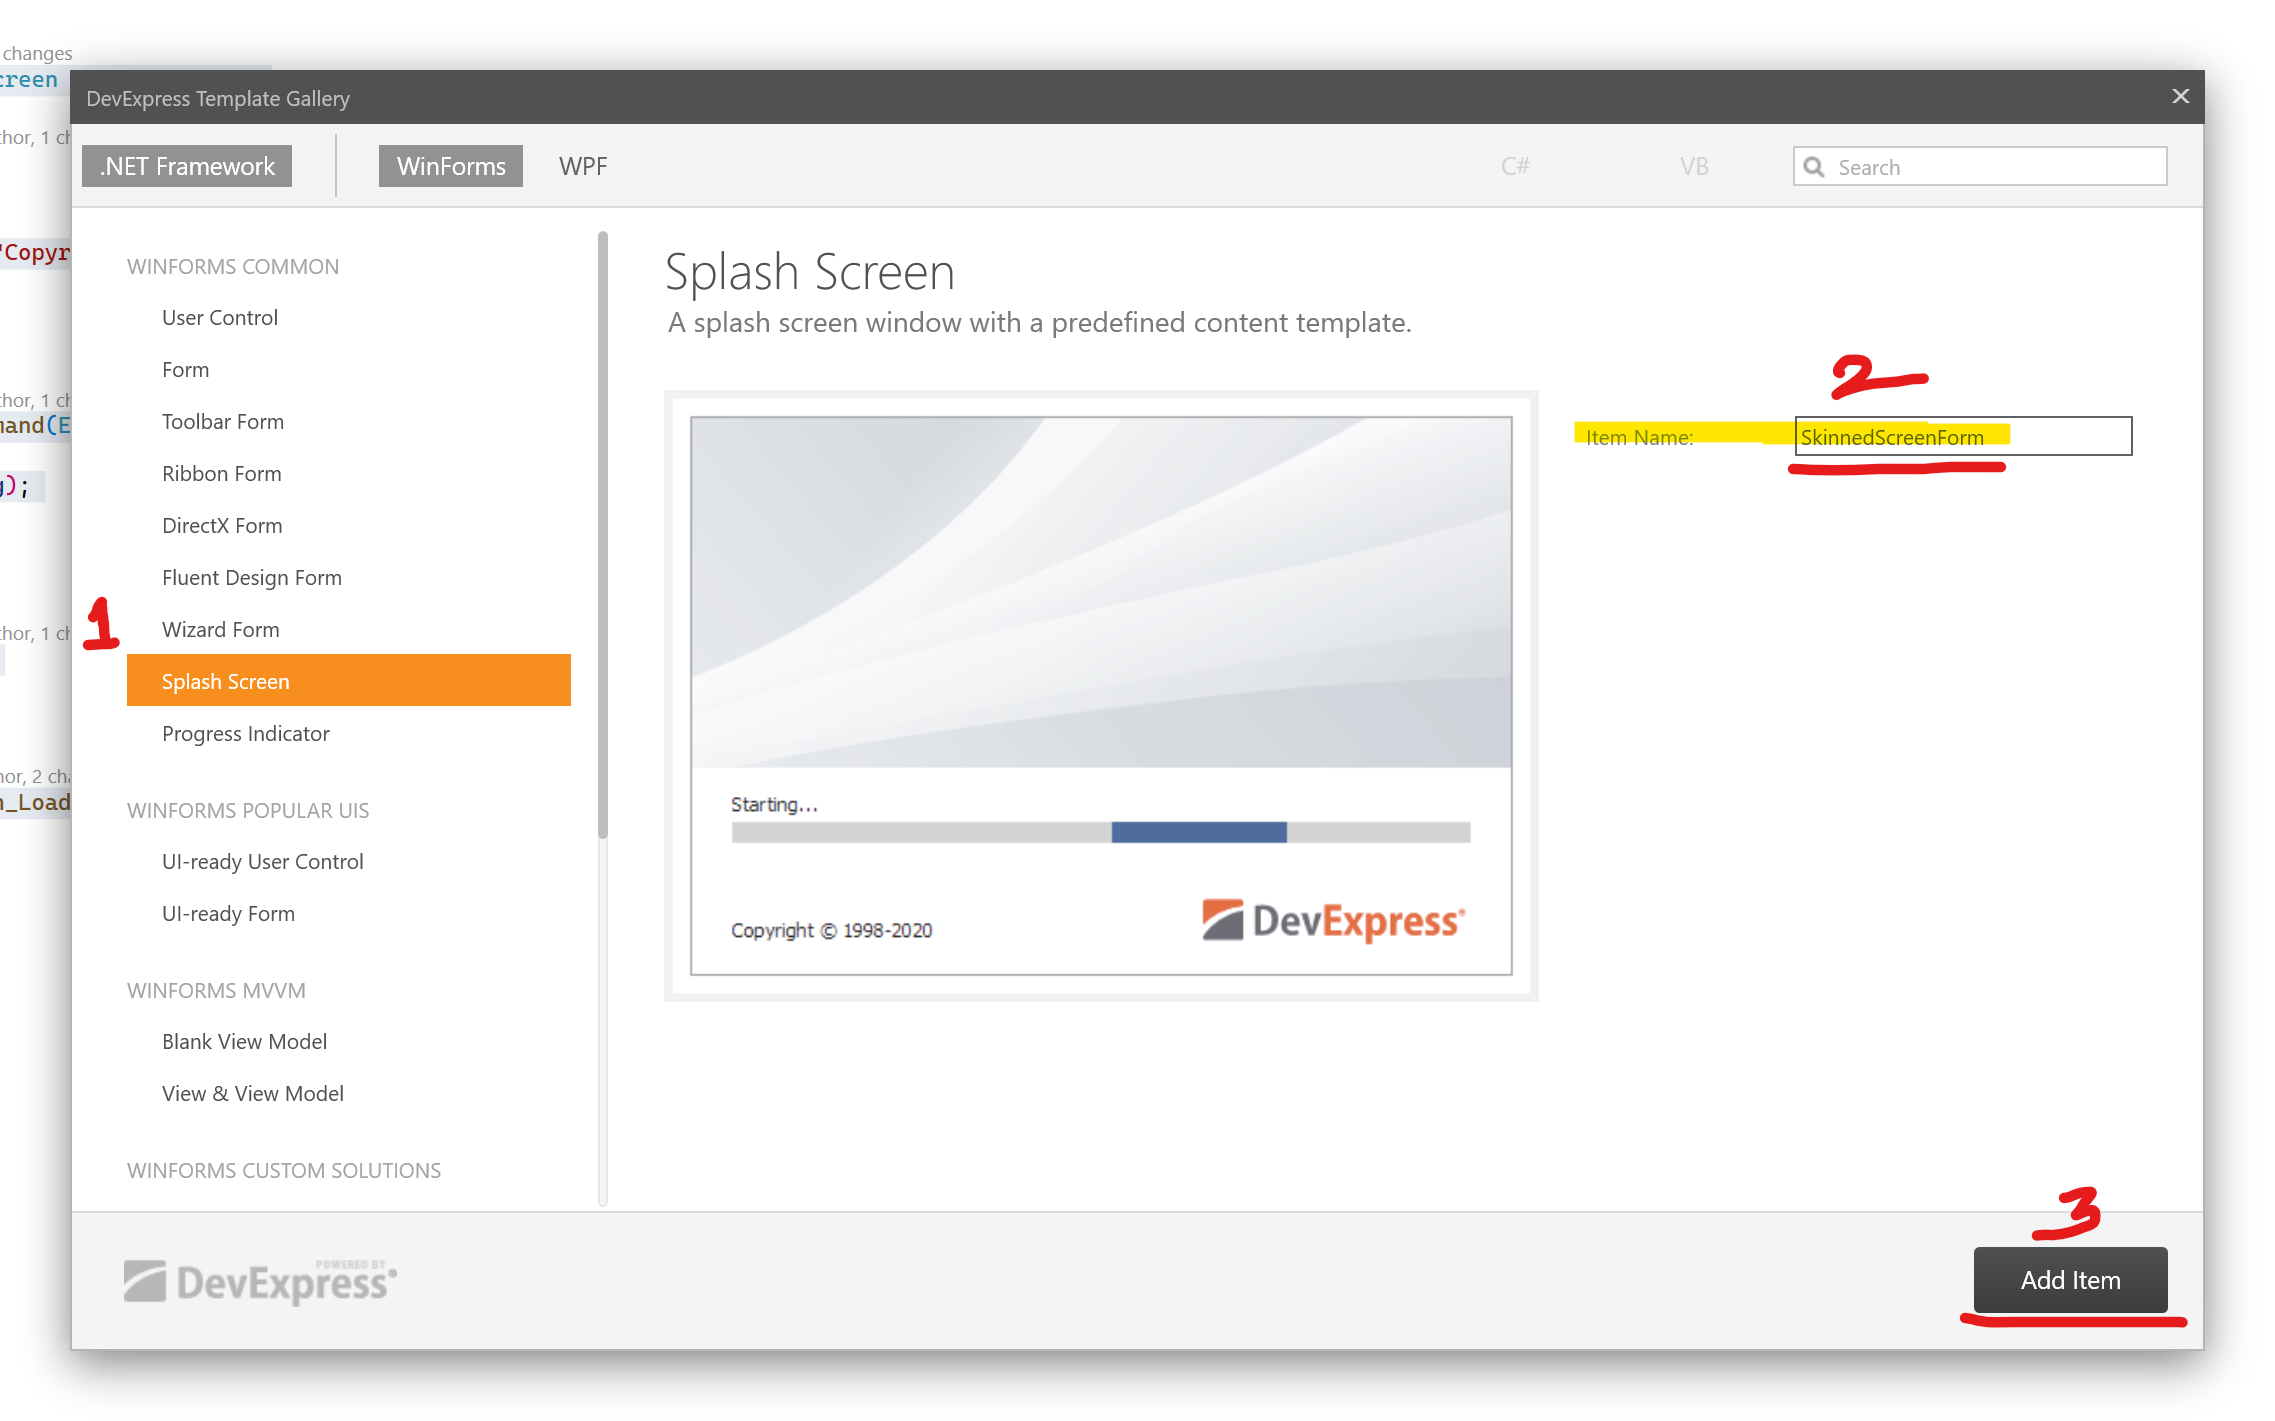
  3. Select "Splash Screen" from the DevExpres Template Gallery.
  4. Name the form "SplashScreenForm" and click "Add Item"
  5. Design your splash screen form using DevExpress controls to customize its appearance according to your preferences. You can add images, animations, and progress indicators to make it visually appealing.

Step 4: Configuring Application Startup

Next, we must configure our application to display the splash screen during startup.

  1. Open the Program.cs file in your project.

  2. Locate the Application.Run method, typically found within the Main method.

  3. Before calling Application.Run, create and display an instance of your splash screen form.

     static void Main()
     {
         Application.EnableVisualStyles();
         Application.SetCompatibleTextRenderingDefault(false);
     
         //Application.Run(new MainFormWithSplashScreenManager());
         var form = new MainForm();
         DevExpress.XtraSplashScreen.SplashScreenManager.ShowForm(form, typeof(SkinnedSplashScreen));
         //...
         //Authentication and other activities here
         Bootstrap.Initialize();                        
     
         DevExpress.XtraSplashScreen.SplashScreenManager.CloseForm();                      
         Application.Run(form);
     }
    
     internal class Bootstrap
     {
         internal static void Initialize()
         {
             // Add initialization logic here
             //Authentication and other activities here
             LoadResources();            
             
         }
         private static void LoadResources()
         {
             // Perform resource loading tasks
             // Example: Load configuration settings, connect to a database, etc.
    
             Thread.Sleep(1000);//For testing
         }
     }
     

Step 5: Adding Splash Screen Logic

Now that our splash screen is displayed during application startup let's add some logic to control its behaviour.

  1. Open the SplashScreenForm.cs file.

  2. Add any initialization logic or tasks that must be performed while the splash screen is displayed. For example, you can load resources, perform database connections, or initialize application settings.

     public partial class SkinnedSplashScreen : SplashScreen
     {
         public SkinnedSplashScreen()
         {
             InitializeComponent();
             this.labelCopyright.Text = "Copyright © 1998-" + DateTime.Now.Year.ToString();
         }
    
         #region Overrides
    
         public override void ProcessCommand(Enum cmd, object arg)
         {
             base.ProcessCommand(cmd, arg);
         }
    
         #endregion
    
         public enum SplashScreenCommand
         {
         }
    
         private void SkinnedSplashScreen_Load(object sender, EventArgs e)
         {
             
         }
     }
     

Step 6: Testing Your Application

With the splash screen implemented, it's time to test your Winforms application.

  1. Build your project to ensure there are no compilation errors.
  2. Run the application and observe the splash screen displayed during startup.
  3. Verify that the application functions correctly after the splash screen closes.

See the following topic for information on how to execute code when your application starts: How to: Perform Actions On Application Startup.

Conclusion:

In this tutorial, we've learned how to implement a splash screen in a Winforms application using DevExpress. By following these steps, you can enhance the user experience of your application by providing visual feedback during the loading process. You can customize the splash screen further to match the branding and style of your application and experiment with different animations and effects to create a memorable first impression for your users.

References
Splash Screen
Splash Screen Manager

Source Code

How to include DevExpress references in ASP.NET projects using NuGet?

Introduction:

DevExpress introduced NuGet packages for some subscriptions and it been a long time that I have not yet tried rather installing full package of DevExpress controls. Now it is much easy to include references through NuGet Package Manager.

Using DevExpress NuGet packages for DevExpress Controls

The brief information about the DevExpress NuGet Packages is described on Mehual Harry’s blog post -
DevExpress NuGet Packages - Now Available

An excellent step-by-step guide to setup Visual Studio for DevExpress NuGet packages available in below QA thread:
DevExpress NuGet Packages: T466415

Setup DevExpress NuGet Feed to Visual Studio

  1. In Visual Studio, select Tools | Options. Under NuGet Package Manager, locate the Package Sources item.
  2. Add new package source using a string in the following format: “https://nuget.devexpress.com/{feed-authorization-key}/api”. This feed-authorization-key is available in your DevExpress account's Download Manager and just replace the copied authorization key in the source url.

    IncludeDevExpressNuGetPackages

Using NuGet Packages in Projects

Right-click a solution and select Manage NuGet Packages for Solution and then Select the newly added package source:

Using DevExpress NuGet Packages

Select the package you want to add to your project and all linked references will be added automatically.

Intall DevExpress Packages to Projects

updated references after adding DevExpress Packages to Projects

Now time to test the project after updating references.

Note: If you face problem with editor controls then follow the documentation of ASP.NET MVC Extensions for Integration into an ASP.NET MVC Project and we are doing Manual Integration into an Existing Project.

Conclusion:

We have added DevExpress references to the projects from Using DevExpress NuGet packages and after that you will be able to configure your project to run the ASP.NET controls.

DevExpress introduces new ASP.NET Bootstrap controls in v17.1

DevExpress introduces new ASP.NET Bootstrap controls in v17.1

DevExpress controls suite now include Bootstrap enabled ASP.NET controls in upcoming release. So far I found these controls well incorporated with Bootstrap framework.

These new  ASP.NET Bootstrap controls are compatible with the Bootstrap version 3.3.7. These provides out-of-the-box Bootstrap framework. Right now all not all DevExpress ASP.NET controls found in DevExpress Bootstrap controls. In DevExpress 17.1 Beta Demo Bootstrap controls are totally a separate category of controls.

DevExpress ASP.NET Bootstrap controls are new line of controls which somewhat gives us similar versions of DevExpress ASP.NET features There controls contains 4 type of controls as a subset of the DevExpress ASP.NET controls:

image

And Visual Studio toolbox also showing them in separate category of controls:

image

Let  check the DevExpress Bootstrap Controls:
Most of the added controls are similar to the standard DevExpress ASP.NET controls because they are derived from them. Editor controls has almost all of these properties and the client side events.

image

These bootstrap enabled controls has new properties section which specifies the bootstrap related properties. In case of button we use SettingsBootstrap.RenderOption  to specifies the button style as shown in the above image.

<%@ Page Language="C#" AutoEventWireup="true" CodeBehind="Default.aspx.cs" Inherits="DevExBootstrapControls.Default" %>

<%@ Register Assembly="DevExpress.Web.Bootstrap.v17.1, Version=17.1.2.0, Culture=neutral, PublicKeyToken=b88d1754d700e49a" Namespace="DevExpress.Web.Bootstrap" TagPrefix="dx" %>

<%@ Register Assembly="DevExpress.Web.v17.1, Version=17.1.2.0, Culture=neutral, PublicKeyToken=b88d1754d700e49a" Namespace="DevExpress.Web" TagPrefix="dx" %>

<!DOCTYPE html>

<html xmlns="http://www.w3.org/1999/xhtml">
<head runat="server">
    <title></title>
    <!-- Latest compiled and minified CSS -->
    <link rel="stylesheet" href="https://maxcdn.bootstrapcdn.com/bootstrap/3.3.7/css/bootstrap.min.css" integrity="sha384-BVYiiSIFeK1dGmJRAkycuHAHRg32OmUcww7on3RYdg4Va+PmSTsz/K68vbdEjh4u" crossorigin="anonymous">

    <!-- Optional theme -->
    <link rel="stylesheet" href="https://maxcdn.bootstrapcdn.com/bootstrap/3.3.7/css/bootstrap-theme.min.css" integrity="sha384-rHyoN1iRsVXV4nD0JutlnGaslCJuC7uwjduW9SVrLvRYooPp2bWYgmgJQIXwl/Sp" crossorigin="anonymous">

    <!-- Latest compiled and minified JavaScript -->
    <script src="https://maxcdn.bootstrapcdn.com/bootstrap/3.3.7/js/bootstrap.min.js" integrity="sha384-Tc5IQib027qvyjSMfHjOMaLkfuWVxZxUPnCJA7l2mCWNIpG9mGCD8wGNIcPD7Txa" crossorigin="anonymous"></script>
</head>
<body>
    <form id="form1" runat="server">
        <div>
            <dx:BootstrapTextBox ID="btnMessage" ClientInstanceName="message" runat="server" Text="Hello, Bootstrap TextBox"></dx:BootstrapTextBox>
            <dx:BootstrapButton ID="btnShowTextMessage" runat="server" AutoPostBack="False" Text="Button">
                <ClientSideEvents Click="function(s, e) {
    alert(message.GetText());
}" />
                <SettingsBootstrap RenderOption="Success" />
            </dx:BootstrapButton>
            <br />
            <br />
            -- Grid --
            <br />
            <dx:BootstrapGridView ID="BootstrapGridView1" runat="server" AutoGenerateColumns="False" DataSourceID="SqlDataSource1" KeyFieldName="AddressID">
                <Columns>
                    <dx:BootstrapGridViewTextColumn FieldName="AddressID" ReadOnly="True" VisibleIndex="0">
                    </dx:BootstrapGridViewTextColumn>
                    <dx:BootstrapGridViewTextColumn FieldName="AddressLine1" VisibleIndex="1">
                    </dx:BootstrapGridViewTextColumn>
                    <dx:BootstrapGridViewTextColumn FieldName="AddressLine2" VisibleIndex="2">
                    </dx:BootstrapGridViewTextColumn>
                    <dx:BootstrapGridViewTextColumn FieldName="City" VisibleIndex="3">
                    </dx:BootstrapGridViewTextColumn>
                    <dx:BootstrapGridViewTextColumn FieldName="StateProvinceID" VisibleIndex="4">
                    </dx:BootstrapGridViewTextColumn>
                    <dx:BootstrapGridViewTextColumn FieldName="PostalCode" VisibleIndex="5">
                    </dx:BootstrapGridViewTextColumn>
                    <dx:BootstrapGridViewTextColumn FieldName="rowguid" VisibleIndex="6">
                    </dx:BootstrapGridViewTextColumn>
                    <dx:BootstrapGridViewDateColumn FieldName="ModifiedDate" VisibleIndex="7">
                    </dx:BootstrapGridViewDateColumn>
                </Columns>
                <CssClasses Table="grid-table-with-template" />
            </dx:BootstrapGridView>
            <asp:SqlDataSource ID="SqlDataSource1" runat="server" ConnectionString="<%$ ConnectionStrings:AdventureWorksConnectionString %>" ProviderName="<%$ ConnectionStrings:AdventureWorksConnectionString.ProviderName %>" SelectCommand="SELECT top 20 * FROM [Person_Address]"></asp:SqlDataSource>
        </div>
    </form>
</body>
</html>

and below is the output of these added controls on the page:

image

Conclusion: DevExpress Bootstrap controls idea is quite good and really decrease the development time rather using the flat table for rendering data and other operations using the editor controls. DevExpress native web form controls rich with the features so these Bootstrap enabled control really make intuitive user interface.

CodeRush for Roslyn is now available RTM Version

CodeRush helps the developers to write, refactor, navigate and debug C# and VB source code faster and more efficiently. Along this CodeRush includes the world's fastest .NET test runner which helps developers to complete software development tasks with less effort (both physical and cognitive), and in less time.

What makes this CR for Roslyn better than Classic version?

This newer version of CodeRush for Roslyn uses significantly less memory, works faster, and lets the Visual Studio to start faster the CodeRush Classic. It leverages Visual Studio's solution-parsing data and automatically supports new C# and VB language features as they become available in Visual Studio.

Features provided by CR for Roslyn:

  1. Visualize Code and Intuitively Debug
  2. Move at Warp Speed
    It helps to find symbols and files quickly in your solution and easily navigate to code constructions related to the current context. CodeRush includes the Quick Navigation and Quick File Navigation features, which make it fast and easy to find symbols and open files.

    Navigation features are available via the Navigation menu, which can be invoked using the Ctrl+Alt+N shortcut.

  3. Validate Quality Faster
    CodeRush lets you create new test cases or new test suites in a single keystroke. CodeRush for Roslyn automatically detects unit tests for NUnit, xUnit, MSpec and MSTest frameworks, and can optionally run tests located across multiple assemblies concurrently. The Test Runner also runs CoreCLR test cases in the DNX environment. The Sessions support makes it very easy to organize tests and run only those that are required.
  4. Code Refactoring
  5. Code Analysis
  6. Code Formatting and Cleanup
  7. many more…

Complete feature comparison matrix between CodeRush editions is available at Download Classic or Roslyn Version.

When to use CodeRush Classic or CodeRush for Roslyn?

Microsoft’s has started new way of development in Open Source world with the  paradigm “Compiler as a service”. Now Microsoft has lots of open source projects including the .NET Compiler Platform (“Roslyn”).NET Compiler Platform (“Roslyn”). The .NET Compiler Platform ("Roslyn") provides open-source C# and Visual Basic compilers with rich code analysis APIs. You can build code analysis tools with the same APIs that Microsoft is using to implement Visual Studio!. According to these dramatic changes in the development on the Microsoft platform lots of tools are adopting ways to move along these. After a while again I got chance to install CodeRush in Visual Studio IDE and I there are two different flavours of CodeRush. This makes me little confuse that which one should i install to work with.

After checking through documentation and ready some blog posts related to my question I got that When to use this newer version of CodeRush for Roslyn or CodeRush Classic. Actually CodeRush Classic work with the prior version of .NET Framework 4.6. With this newer version of .NET framework which is shipped with the Microsoft’s open source projects which based on the Rosyln compiler platform. Below are points which help you to decide that which version suits to your development environment:

  1. If you are using Visual Studio  2015 and .NET framework 4.6 (above) then CodeRush classic does work for you. In this case you should install CodeRush for Roslyn. This does not has all the feature of the CodeRush Classic but newer version will defiantly improve this open source stack.
  2. If you are working with older version of .NET Framework then you’ll need CodeRush Classic. If you need both, you can install both versions simultaneously and defiantly i try this too.
  3. CodeRush Classic supports C# 5.0, VB10, ASP.NET, HTML, JavaScript, XML, and XAML. In this case, for the newer version of language CodeRush for Roslyn is the only option and may be in near future Classic version of CodeRush go obsolete.

Learning and source of information:
CodeRush
.NET Developer Tooling: The Roslyn Revolution
CodeRush on Roslyn

How disable path editing in BreadCrumbEdit control?

Recently I have implemented DevExpress BreadCrumbEdit control in my application and in the implementation I need to disable editing of the path in the control. In technical words, I need BreadCrumbEdit control in only Select mode rather the Edit Mode. Initially it can be set using the BreadCrumbEdit’s BreadCrumbMode property to “Select”.
I found one solution that it is impossible to prevent switching to the Edit mode. The easiest way DevExpress guys suggest that handle the BreadCrumbEdit's PropertiesChanged event and reset it back to “Select” if it try to go in the “Edit” mode. So I did it in the following manner:

C#

private void breadCrumbEdit1_PropertiesChanged(object sender, EventArgs e)
{
    if (breadCrumbEdit1.Properties.BreadCrumbMode == BreadCrumbMode.Edit)
    {
        breadCrumbEdit1.Properties.BreadCrumbMode = BreadCrumbMode.Select;
    }
}

VB

Private Sub breadCrumbEdit1_PropertiesChanged(sender As Object, e As EventArgs)
    If breadCrumbEdit1.Properties.BreadCrumbMode = BreadCrumbMode.Edit Then
        breadCrumbEdit1.Properties.BreadCrumbMode = BreadCrumbMode.Select
    End If
End Sub

DevExpress - Response.Redirect cannot be called in a Page callback

Scenario:

DevExpress Web controls generates callback to refresh the controls and pass data between events. When we using some Callback panel or ASPxGridView callbacks event methods then we cannot call Respose.Redirect method to navigate between pages. If we use these methods then it will raise exception.

Solution:

To avoid these exception use the ASPxWebControl.RedirectOnCallback method to rather than pages.Response.Redirect() because it does not work in a callback. Let you have created a callback with “MYCallback_Callback” event handler method then at the callback method you should use below ASPxWebControl.RedirectOnCallback method to redirect on another page.

DevExpress.Web.ASPxClasses.ASPxWebControl.RedirectOnCallback("~/MyPage.aspx?id="+ e.Parameter);

You will not be able to use Response.Redirect () or Server.Transfer () in a callback to check if the control has a client event can be used instead, if this event can use window.location.replace("MyPage.aspx"), using JavaScript on the client to move to another page.

DevExpress v15.2 Released – What’s is new this version?


I have attended DevExpress Webinars consecutively in last few days and there was lots of features they included in the newer version v15.1. All the technology persons Mehul, Don, Julian and Bukcnall described all these features with much clearly and I found that they are much valuable to increase the productivity of the developers. Here are list of webinars related to DevExpress v15.2 build:

Mehul Harry
Don Wibier

v15.2: What's New for DevExtreme & HTML5

03-Dec-2015

Julian M Bucknall
Paul Usher

v15.2: What's New for Reporting and Dashboards

02-Dec-2015

Julian M Bucknall
Paul Usher

v15.2: What's New for Windows Developers

01-Dec-2015

Mehul Harry
Don Wibier

v15.2: What's New for ASP.NET Developers

30-Nov-2015

The amazing thing that I liked most is “Grid-Based Report Generation”. This release ships with a new WinForms Grid-based report generation option. With only a few lines of code, you can invoke the DevExpress WinForms Report Designer from the Grid Control and create reports based on its data.

clip_image002 

Currently I am working with WinForms controls so I found few new control in the WinForms control suite:

  • Diagram Control
  • Date Editor & Calendar Control
  • Excel Data Source
  • Ring/Line Animations
  • Tabbed Form
  • Tabbed Pane Control
  • Toolbox Control
  • Clipboard Management

    the amazing thing they have included is Clipboard management. It was the desired functionality for us because every time we need to write custom code to implement this functionality. Before that it was not easy to copy the Grid Control content to another program including the formatting rules e.g. cell colors. Check this out.
    clip_image003

More interesting controls also included in the ASP.NET WebForms suite also:

Card View Control:

 It is packed with new features like Batch Editing, Conditional Formatting, Export to PDF, XLS, XLSX and RTF Formats, Selected Records Export, Conditional Formatting Export, Header Panel, Total Summary, Endless Paging, Date Range Header Filter, Ellipsis with tooltips in cell texts, Design-Time Card Layout Editor allows you to build a Microsoft Outlook inspired Contacts View with integrated data shaping and editing capabilities.

clip_image005

ASP.NET QueryBuilder Control

Right now this control is available in CTP, but this DevExpress ASP.NET Query Builder allows you to visually construct SQL queries and return a string containing a SELECT statement. It is enriched with cool features.

clip_image007

This control can automatically obtain and display database schema within the QueryBuilder's UI. It has ability to visually edit 'WHERE', 'ORDER BY' and 'GROUP BY' query clauses. Relationship management is required feature for a query builder and they have availed and relationships between tables are automatically resolved based on foreign keys in the control. Along this we can see the Query results preview also.

There are many more features included in ASPxGridView – Responsive Layout, Adaptive layout, export with Format Conditions, Scheduler Control and others. XAF, DevExtreme & HTML5, Reporting, WPF, CodeRush.

The main improvement what DevExpress bring to the Developer community is that they have improved the performance of the control on each platform. Performance is main concern while using the third party controls and within this release they have focused on it also.

Enjoy new Office 2016 style themes also. Smile

The complete features details are available about the DevExpress v15.2 here. Hope this will help you explorer amazing fast DevExpress controls.

How to use ValueConverter (Decimal Converter) during data binding with control?

Scenario:

While using DevExpress WPF control, sometimes it requires to convert the binding value according to the control’s property. In that case we need use the Value Converters in this case.
Let we require to bind the SpinEdit WPF control edit value property with some object property which require to be converted to decimal value. To do that we need to follow below steps:

  1. Create a custom converter class which implements IValueConverter to convert the value to the decimal.
    namespace DevExWpfApp
    {
        public class DecimalConverter : IValueConverter
        {
            public object Convert(object value, Type targetType, object parameter, System.Globalization.CultureInfo culture)
            {
                return System.Convert.ToDecimal(value);
            }
    
            public object ConvertBack(object value, Type targetType, object parameter, System.Globalization.CultureInfo culture)
            {
                throw new NotImplementedException();
            }
        }
    }
    
  2. Now use it in the XAML by declare it as resources and then call it as below:
    <UserControl.Resources>
    <local:DecimalConverter x:Key="DecimalConverter"/>
    </UserControl.Resources>
    
       <dxe:SpinEdit EditValue="{Binding Entity.MaxValue, Converter={StaticResource DecimalConverter}" />

How to iterate through TileView items in XtraGrid?

This is related to DevExpress question - How to loop through tiles in TileView, which help me to achieve the required functionality in the XtraGrid using the TileView. I require to implement the selection process for TileView similar to GridView in XtraGrid, but I require to iterate through all the TileView items. TileView actually use TileViewControl internally so it require to access under laying  tileview control items to access more information about the TileViewItems. See the below code snippet:

private void HandleTileItemSelection(TileViewItem tileViewItem)
{
    if ((ModifierKeys & Keys.Control) != Keys.Control)
    {
        Dictionary visibleTiles = ((tileView1.GetViewInfo() as ITileControl).ViewInfo as TileViewInfoCore).VisibleItems;
        int alternateCheckedItemsCount = 0;
        foreach (KeyValuePair item in visibleTiles)
        {
            if (item.Value != tileViewItem && item.Value.Checked)
            {
                alternateCheckedItemsCount++;
                item.Value.Checked = false;
                tileView1.SetRowCellValue(item.Value.RowHandle, "CheckedStatus", false);
            }
        }
    }        
}