Securing Your Microservices: Azure B2C Authentication in ASP.NET Core API with Ocelot API Gateway

Introduction:
Microservices architecture offers flexibility and scalability but also presents challenges in managing authentication and authorization across multiple services. In this blog post, we will explore how to secure your microservices using Azure B2C authentication in ASP.NET Core API with Ocelot API Gateway. We’ll start by configuring Azure B2C for authentication and then integrate it with our ASP.NET Core API through Ocelot.

Prerequisites:

  1. Azure Subscription: You’ll need an Azure subscription to create and configure Azure B2C resources.
  2. Create one now if you haven’t already created your own Azure AD B2C Tenant. You can use an existing Azure AD B2C tenant.
  3. Visual Studio or Visual Studio Code: We’ll use Visual Studio or Visual Studio Code to create and run the ASP.NET Core API project.
  4. .NET Core SDK: Ensure that the .NET Core SDK is installed on your development machine.
  5. Azure CLI (Optional): Azure CLI provides a command-line interface for interacting with Azure resources. It’s optional but can help manage Azure resources.

Step 1: App registrations

  1. Sign in to the Azure portal (https://portal.azure.com) using your Azure account credentials.
  2. Navigate to the Azure Active Directory service and select App registrations.
  3. Click on “+ New registration” to create a new application registration.
  4. Provide a name for your application, select the appropriate account type, and specify the redirect URI for authentication callbacks.
  5. After creating the application registration, note down the Application (client) ID and Directory (tenant) ID. 

Step 2: Create a client secret

  1. Once the application is registered, note the Application (client) ID and Directory (tenant) ID.
  2. If you are not on the application management screen, go to the Azure AD B2C—App registrations page and select the application you created.
  3. To access the Certificates & secrets settings, navigate to the Manage option and select it. The Certificates & secrets option can be found in the left menu.
  4. Under “Certificates & secrets”, generate a new client secret by clicking on New client secret.
  5. Enter a description of the client’s secret in the Description box. For example, Ocelotsecret.
  6. Under Expires, select a duration for which the secret is valid, and then click Add.
  7. Copy the secret’s Value for use in your client application code and save it securely.

Step 3: Configure scopes

  1. In the Azure AD B2C - App registrations page, select the application you created if you are not on the application management screen.
  2. Select App registrations. Select the OcelotTutorials application to open its Overview page.
  3. Under Manage, select Expose an API.
  4. Next to the Application ID URI, select the Add link.
  5. I have not changed the default GUID with my API, but you can replace the default value (a GUID) with an API and then select Save. The full URI is shown and should be in the format https://your-tenant-name.onmicrosoft.com/api. When your web application requests an access token for the API, it should add this URI as the prefix for each scope you define for the API.
  6. Under Scopes defined by this API, select Add a scope.

  7. Enter the following values to create a scope that defines read access to the API, then select Add scope:

    Scope name: ocelottutorial.read
    Admin consent display name: Read access to API Gateway API
    Admin consent description: Allows read access to the API Gateway API

Step 4: Grant permissions

  1. Select App registrations and then the web application that should have access to the API, such as OcelotTutorials.
  2. Under Manage, select API permissions.
  3. Under Configured permissions, select Add a permission.
  4. Select the My APIs tab.
  5. Select the API to which the web application should be granted access. For example, webapi1.
  6. Under Permission, expand API Name, and then select the scopes that you defined earlier. For example, ocelottutorial.read and ocelottutorial.write.
  7. Select Add permissions.
  8. Select Grant admin consent for (your tenant name).
  9. If you’re prompted to select an account, select your currently signed-in administrator account, or sign in with an account in your Azure AD B2C tenant that’s been assigned at least the Cloud application administrator role.
  10. Select Yes. 
  11. Select Refresh, and then verify that “Granted for …” appears under Status for both scopes.

Step 5: Enable ID token implicit grant

If you register this app and configure it with https://jwt.ms/ app for testing a user flow or custom policy, you need to enable the implicit grant flow in the app registration:

  1. In the left menu, under Manage, select Authentication.
  2. Under Implicit grant and hybrid flows, select both the Access tokens (used for implicit flows) and ID tokens (used for implicit and hybrid flows) checkboxes.
  3. Select Save. 

Step 6: Set Up Azure B2C Authentication in ASP.NET Core API

  1. Create 3 new ASP.NET Core Web API projects in Visual Studio or Visual Studio Code.
    Accounting.API
    Inventory.API
    ApiGateway

  2. Assign the ports to the API. ApiGateay 9000, Accounting.API 9001, Inventory.API 9002
     {
       "Urls": "http://localhost:9001",
       "Logging": {
         "LogLevel": {
           "Default": "Information",
           "Microsoft.AspNetCore": "Warning"
         }
       },
       "AllowedHosts": "*"
     }
    
  3. Install the necessary NuGet packages for Azure B2C authentication. Install the below packages in the ApiGateway project

     dotnet add package Microsoft.Identity.Web
     dotnet add package Ocelot
    
  4. Configure Azure B2C authentication in your Startup.cs file:

     builder.Services.AddMicrosoftIdentityWebApiAuthentication(builder.Configuration);
    
  5. Add the Azure B2C settings to your appsettings.json file:

     {
       "Urls": "http://localhost:9000",
       "Logging": {
         "LogLevel": {
           "Default": "Information",
           "Microsoft.AspNetCore": "Warning"
         }
       },
       "AllowedHosts": "*",
       "AzureAd": {
         "Instance": "https://login.microsoftonline.com/",
         "Domain": "http://localhost:9000/",
         "TenantId": "",
         "ClientId": ""
       }
     }
    
  6. Ensure that the authentication middleware is added to the request processing pipeline in the Configure method of Startup.cs:

     app.UseAuthentication(); // Place UseAuthentication before UseOcelot
     app.UseAuthorization(); // Place UseAuthorization before UseAuthentication
    
  7. Add the ocelot.json file to the the ApiGateway with the below configuration
     {
       "Routes": [
         {
           "DownstreamPathTemplate": "/api/values",
           "DownstreamScheme": "http",
           "DownstreamHostAndPorts": [
             {
               "Host": "localhost",
               "Port": 9001
             }
           ],
           "UpstreamPathTemplate": "/accounting",
           "UpstreamHttpMethod": [ "GET" ],
           "AuthenticationOptions": {
             "AuthenticationProviderKey": "Bearer",
             "AllowedScopes": []
           }
         },
        
         {
           "DownstreamPathTemplate": "/api/values",
           "DownstreamScheme": "http",
           "DownstreamHostAndPorts": [
             {
               "Host": "localhost",
               "Port": 9002
             }
           ],
           "UpstreamPathTemplate": "/inventory",
           "UpstreamHttpMethod": [ "GET" ],
           "AuthenticationOptions": {
             "AuthenticationProviderKey": "Bearer",
             "AllowedScopes": []
           }
         }    
       ],
       "GlobalConfiguration": {
         "BaseUrl": "http://localhost:9000"
       }
     } 
    
  8. Added ocelot configuration to the services
    // Ocelot configuration
    builder.Configuration.AddJsonFile("ocelot.json", optional: false, reloadOnChange: true);
    builder.Services.AddOcelot(builder.Configuration);
    
  9. Added Ocelot to the middleware pipeline in the end.
    app.UseAuthentication(); // Place UseAuthentication before UseOcelot
    app.UseAuthorization(); // Place UseAuthorization before UseAuthentication
    app.MapControllers();
    app.UseOcelot().Wait();
    app.Run();
    

Step 7: Testing authentication

To Test this, refer to this tutorial OAuth 2.0 authorization code flow in Azure Active Directory B2C

  1. Replace the required fields and use the below URL in the browser to get the code to fetch the token. https://login.microsoftonline.com/{tenant}/oauth2/v2.0/authorize?client_id={client id}&response_type=code&response_mode=query&scope={scope uri}&state=007 

  2. Open Postman and use the returned code to generate the token. See the image below to check the URL and the required fields to get the token.
    https://login.microsoftonline.com/{tenant}/oauth2/v2.0/token

  3. Now we are ready to call our API Gateway with the token. 

Conclusion:
In this blog post, we’ve covered the first part of securing your microservices architecture using Azure B2C authentication. We walked through the process of configuring Azure B2C for authentication, including creating a tenant, setting up user flows (policies), and integrating Azure B2C authentication into an ASP.NET Core API project. In the next part of this series, we’ll explore how to integrate Azure B2C authentication with Ocelot API Gateway for centralized authentication and authorization management across microservices.

References:
Tutorial: Register a web application in Azure Active Directory B2C
Add a web API application to your Azure Active Directory B2C tenant

Source Code

Leveraging RabbitMQ with C# and .NET: A Comprehensive Guide

In today's interconnected world, efficient data transfer between applications is crucial for smooth operations. Whether it's processing large volumes of requests or orchestrating tasks across distributed systems, having a reliable message broker is essential. RabbitMQ, an open-source message broker, provides a robust solution for building scalable and decoupled applications.

Introduction

This comprehensive guide will explore leveraging RabbitMQ with C# and .NET to build resilient and flexible messaging systems. From installation to advanced message routing techniques, we'll cover everything you need to know to get started with RabbitMQ.

Overview of RabbitMQ

RabbitMQ is a powerful message broker that facilitates communication between different components of an application. It implements the Advanced Message Queuing Protocol (AMQP), providing a standardized way for applications to exchange messages. With RabbitMQ, you can decouple your application components, making them more resilient to failures and more accessible to scale.

Why RabbitMQ?

  • Cross-platform Compatibility: RabbitMQ runs on multiple platforms, including Windows and Linux, making it suitable for various environments.
  • Language Agnostic: It supports multiple programming languages, allowing you to build applications in your language of choice.
  • Persistence Options: RabbitMQ offers in-memory and disk-based message storage options, giving you flexibility in managing message durability.
  • Scalability: With support for clustering and high availability, RabbitMQ can handle large volumes of messages and scale horizontally as your application grows.

Installation and Setup

Step 1: Installing Erlang Runtime and RabbitMQ Server

Before using RabbitMQ, we need to install the Erlang runtime and RabbitMQ server. Follow these steps to install RabbitMQ on your system:

  1. Download the latest Erlang runtime from erlang.org and install it on your machine.
  2. Download the latest RabbitMQ server release from rabbitmq.com and unzip the folder to a location on your hard drive. alt text
  3. Set the ERLANG_HOME environment variable to the Erlang installation directory. For example:
    setx ERLANG_HOME "C:\Program Files\erl10.6"
     
  4. Install RabbitMQ as a Windows service by running the following commands in a console:
    rabbitmq-service /install
    rabbitmq-service /enable
    rabbitmq-service /start
     

Step 2: Configuring RabbitMQ

After installing RabbitMQ, you can use the rabbitmqctl command-line tool to manage the server. Start by ensuring that the server is running:

rabbitmqctl status
 

You can secure your RabbitMQ instance by creating a new user with limited permissions and removing the default guest user:

rabbitmqctl add_user myuser mypassword
rabbitmqctl set_permissions myuser ".*" ".*" ".*"
rabbitmqctl delete_user guest


Accessing RabbitMQ 


RabbitMQ Enable Web Management Plugin

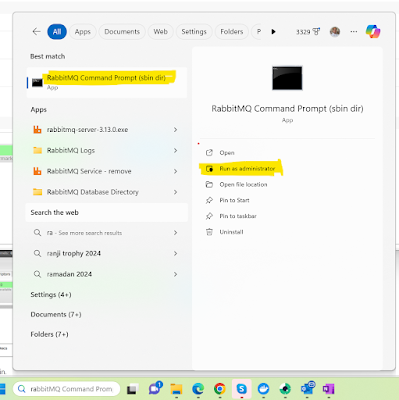
To enable a RabbitMQ web management plugin on Windows, we need to start the RabbitMQ Command Prompt with administrator privileges, enter the command “rabbitmq-plugins enable rabbitmq_management,” and execute it.


 After executing the above web management command, the web management plugins will be enabled, and the enabled list will be shown.


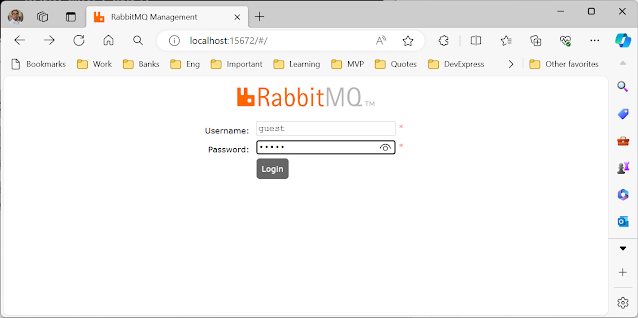
After starting the RabbitMQ Web Management Plugin, enter the following URL in your browser and click 'enter' to open the web management plugin.

http://localhost:15672

After opening the localhost URL in the browser, it will ask you for credentials to access the web management plugin.

To access the RabbitMQ web management dashboard, use the default username and password “guest” (Username: “guest” | Password: “guest”).


You will see an overview screen after logging in with the default credentials.


Working with RabbitMQ in .NET


Let's integrate RabbitMQ with our .NET applications using the RabbitMQ .NET client library and C#.

Setting up RabbitMQ Connection

To establish a connection to RabbitMQ from a .NET application, we'll need to configure a connection factory:

var connectionFactory = new ConnectionFactory
{
    HostName = "localhost",
    UserName = "myuser",
    Password = "mypassword"
};

using (var connection = connectionFactory.CreateConnection())
{
    // Create and configure channel
}
 

Working with Exchanges and Queues

RabbitMQ uses exchanges and queues to route messages between producers and consumers. Let's create an exchange and a queue and bind them together:

using (var model = connection.CreateModel())
{
    // Declare exchange
    model.ExchangeDeclare("MyExchange", ExchangeType.Fanout, true);
    
    // Declare queue
    model.QueueDeclare("MyQueue", true);
    
    // Bind queue to exchange
    model.QueueBind("MyQueue", "MyExchange", "", false, null);
}
 

Publishing and Consuming Messages

Now that we have our exchange and queue set up, let's publish a message to the exchange and consume it from the queue:

// Publish message
string message = "Hello, RabbitMQ!";
var body = Encoding.UTF8.GetBytes(message);
model.BasicPublish("MyExchange", "", null, body);

// Consume message
var consumer = new EventingBasicConsumer(model);
consumer.Received += (sender, args) =>
{
    var messageBody = Encoding.UTF8.GetString(args.Body.ToArray());
    Console.WriteLine($"Received message: {messageBody}");
};
model.BasicConsume("MyQueue", true, consumer);
 

Performance Considerations

RabbitMQ offers impressive performance, even under heavy loads. By optimizing message delivery and consumption, you can achieve high throughput and low latency. You can experiment with different configurations and message persistence options to find the best setup for your use case.

Conclusion

In this guide, we've explored the fundamentals of RabbitMQ and demonstrated how to integrate it with C# and .NET applications. By leveraging RabbitMQ's powerful features, you can build robust and scalable messaging systems that meet the needs of your application. You can experiment with different exchange types, message routing strategies, and deployment configurations to unlock the full potential of RabbitMQ in your projects.