DevExpress - Response.Redirect cannot be called in a Page callback

Scenario:

DevExpress Web controls generates callback to refresh the controls and pass data between events. When we using some Callback panel or ASPxGridView callbacks event methods then we cannot call Respose.Redirect method to navigate between pages. If we use these methods then it will raise exception.

Solution:

To avoid these exception use the ASPxWebControl.RedirectOnCallback method to rather than pages.Response.Redirect() because it does not work in a callback. Let you have created a callback with “MYCallback_Callback” event handler method then at the callback method you should use below ASPxWebControl.RedirectOnCallback method to redirect on another page.

DevExpress.Web.ASPxClasses.ASPxWebControl.RedirectOnCallback("~/MyPage.aspx?id="+ e.Parameter);

You will not be able to use Response.Redirect () or Server.Transfer () in a callback to check if the control has a client event can be used instead, if this event can use window.location.replace("MyPage.aspx"), using JavaScript on the client to move to another page.

DevExpress v15.2 Released – What’s is new this version?


I have attended DevExpress Webinars consecutively in last few days and there was lots of features they included in the newer version v15.1. All the technology persons Mehul, Don, Julian and Bukcnall described all these features with much clearly and I found that they are much valuable to increase the productivity of the developers. Here are list of webinars related to DevExpress v15.2 build:

Mehul Harry
Don Wibier

v15.2: What's New for DevExtreme & HTML5

03-Dec-2015

Julian M Bucknall
Paul Usher

v15.2: What's New for Reporting and Dashboards

02-Dec-2015

Julian M Bucknall
Paul Usher

v15.2: What's New for Windows Developers

01-Dec-2015

Mehul Harry
Don Wibier

v15.2: What's New for ASP.NET Developers

30-Nov-2015

The amazing thing that I liked most is “Grid-Based Report Generation”. This release ships with a new WinForms Grid-based report generation option. With only a few lines of code, you can invoke the DevExpress WinForms Report Designer from the Grid Control and create reports based on its data.

clip_image002 

Currently I am working with WinForms controls so I found few new control in the WinForms control suite:

  • Diagram Control
  • Date Editor & Calendar Control
  • Excel Data Source
  • Ring/Line Animations
  • Tabbed Form
  • Tabbed Pane Control
  • Toolbox Control
  • Clipboard Management

    the amazing thing they have included is Clipboard management. It was the desired functionality for us because every time we need to write custom code to implement this functionality. Before that it was not easy to copy the Grid Control content to another program including the formatting rules e.g. cell colors. Check this out.
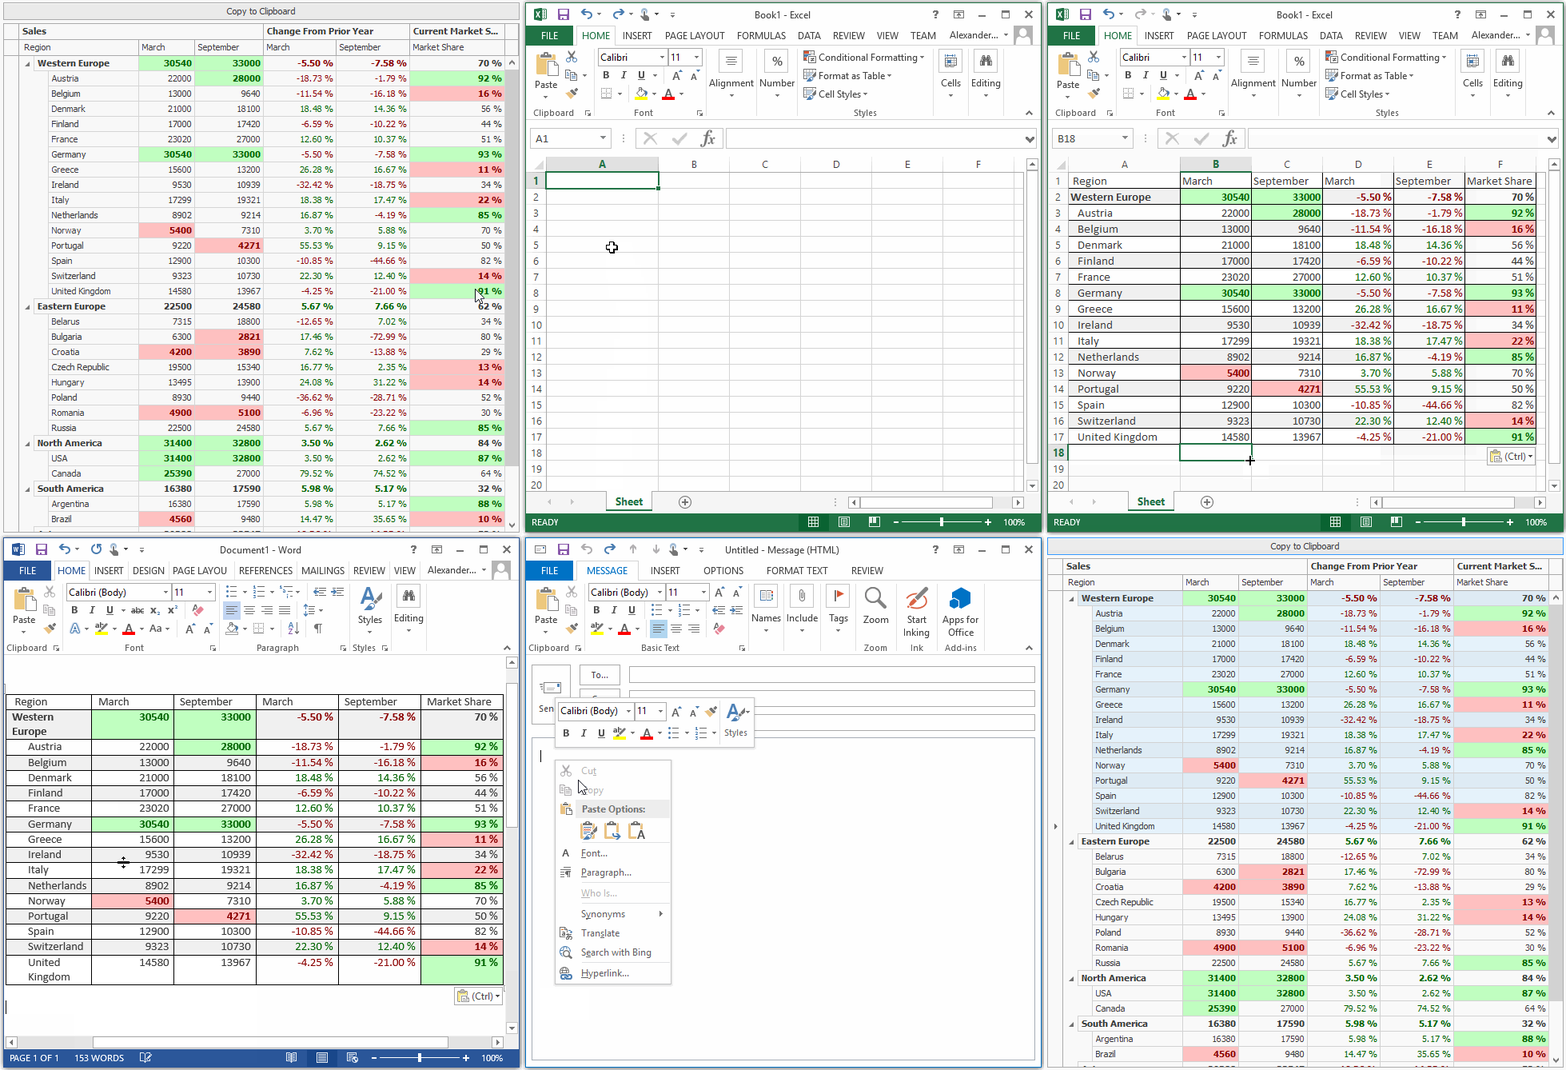
    clip_image003

More interesting controls also included in the ASP.NET WebForms suite also:

Card View Control:

 It is packed with new features like Batch Editing, Conditional Formatting, Export to PDF, XLS, XLSX and RTF Formats, Selected Records Export, Conditional Formatting Export, Header Panel, Total Summary, Endless Paging, Date Range Header Filter, Ellipsis with tooltips in cell texts, Design-Time Card Layout Editor allows you to build a Microsoft Outlook inspired Contacts View with integrated data shaping and editing capabilities.

clip_image005

ASP.NET QueryBuilder Control

Right now this control is available in CTP, but this DevExpress ASP.NET Query Builder allows you to visually construct SQL queries and return a string containing a SELECT statement. It is enriched with cool features.

clip_image007

This control can automatically obtain and display database schema within the QueryBuilder's UI. It has ability to visually edit 'WHERE', 'ORDER BY' and 'GROUP BY' query clauses. Relationship management is required feature for a query builder and they have availed and relationships between tables are automatically resolved based on foreign keys in the control. Along this we can see the Query results preview also.

There are many more features included in ASPxGridView – Responsive Layout, Adaptive layout, export with Format Conditions, Scheduler Control and others. XAF, DevExtreme & HTML5, Reporting, WPF, CodeRush.

The main improvement what DevExpress bring to the Developer community is that they have improved the performance of the control on each platform. Performance is main concern while using the third party controls and within this release they have focused on it also.

Enjoy new Office 2016 style themes also. Smile

The complete features details are available about the DevExpress v15.2 here. Hope this will help you explorer amazing fast DevExpress controls.

How to use ValueConverter (Decimal Converter) during data binding with control?

Scenario:

While using DevExpress WPF control, sometimes it requires to convert the binding value according to the control’s property. In that case we need use the Value Converters in this case.
Let we require to bind the SpinEdit WPF control edit value property with some object property which require to be converted to decimal value. To do that we need to follow below steps:

  1. Create a custom converter class which implements IValueConverter to convert the value to the decimal.
    namespace DevExWpfApp
    {
        public class DecimalConverter : IValueConverter
        {
            public object Convert(object value, Type targetType, object parameter, System.Globalization.CultureInfo culture)
            {
                return System.Convert.ToDecimal(value);
            }
    
            public object ConvertBack(object value, Type targetType, object parameter, System.Globalization.CultureInfo culture)
            {
                throw new NotImplementedException();
            }
        }
    }
    
  2. Now use it in the XAML by declare it as resources and then call it as below:
    <UserControl.Resources>
    <local:DecimalConverter x:Key="DecimalConverter"/>
    </UserControl.Resources>
    
       <dxe:SpinEdit EditValue="{Binding Entity.MaxValue, Converter={StaticResource DecimalConverter}" />

Install .NET Framework 3.5 in Windows 8 and 10

Windows 8 and 10 comes with .NET framework 4 or higher pre-installed, but there are lots of applications require the .NET framework v3.5 installed to install on these newer version of operating systems. These applications will not run unless you will install the required version of .NET framework. When you try to run any such sort of applications then Windows 8 and 10 will prompt you to download and install .NET framework 3.5 from the Internet. However, this will take a lot of time.

Source: MSDN article.
Below are the steps to enable .NET framework 3.5:

  1. Go to Settings. Choose Control Panel then choose Programs.

    clip_image002
  2. Click Turn Windows features on or off, and the user will see window as image below.

    clip_image004

    clip_image006

    You can enable this feature by click on .NET Framework 3.5 (include .NET 2.0 and 3.0) select it and click OK. After this step, it will download the entire package from internet and install the .NET Framework 3.5 feature.

You can save your time and install .NET Framework 3.5 from the Windows 8 and 10 installation media respectively. This method is much faster and does not even require an Internet connection.
Follow below steps to install .NET Framework 3.5 in Windows 8 and 10 using DISM:

  1. Bring your installation media to prepare installation either it is DVD or ISO image. If you are using ISO image then mount it using software e.g. Power ISO, DAEMON Tools so then you will be able to access the files for the installation.
    Packages are located in the drive letter: \sources\sxs directory.
  2. Open CMD.EXE with Administrative Privileges. Right click on the start button (or press “Win + X”) to popup the system menu. There you will find a menu item titled “Command Prompt (Admin)”. Click on this to launch the command prompt in admin mode.
    image
  3. Run the following command and hit Enter.
    Dism.exe /online /enable-feature /featurename:NetFX3 /All /Source:E:\sources\sxs /LimitAccess

    clip_image009
    Please make sure to change the source path:
    e.g.
    If you have Windows setup at “D:” drive, replace “E:” with “d:”
    If you have Windows setup at “F:\Win10Setup” folder path, replace “x:” with “f:\Win10Setup”
    When run from the command prompt, it will start installing the .NET framework. It will take a while to complete the whole process. Once done, restart your system for the changes to take effect.

Details on command line parameters of DISM:

  • /Online targets the operating system you're running (instead of an offline Windows image).
  • /Enable-Feature /FeatureName:NetFx3 specifies that you want to enable the .NET Framework 3.5.
  • /All enables all parent features of the .NET Framework 3.5.
  • /LimitAccess prevents DISM from contacting Windows Update.
  • /Source specifies the location of the files needed to restore the feature (in this example, the x:\sources\sxs directory).

After completion of this process .NET Framework 3.5 feature enabled. Restart and then you good to go for the installation of your application.