In this article, you are going to learn that how setup the development environment for Angular and TypeScript.
TABLE OF CONTENT
- Introduction
- What is Angular?
- Why do we need Angular?
- Architecture and Building Blocks of Angular Apps
- => Setting Up the Development Environment
- Your First Angular App
- Structure of Angular Projects
- Webpack
- TypeScript Fundamentals
- What is TypeScript?
- Creating First TypeScript Program
- Declaring Variables
- Types
- Type Assertions
- Arrow Functions
- Interfaces
- Classes
- Objects
- Constructors
- Access Modifiers
- Access Modifiers in Constructor Parameters
- Properties
- Modules
- Angular Fundamentals
- Creating Components
- Generating Components Using Angular CLI
- Templates
- Directives
- Services
- Dependency Injection
- Generating Services Using Angular CLI
- Exercise
Introduction
Before we start code with Angular, there are some prerequisites to install first. In this article we set up everything what we need to start work with Angular 4. Before we more further to learn Angular we need to make some decisions related to selection of programming language, Editor and setup our tools to get everything ready.
What Language to select for Angular?
There several languages we could use to build an Angular application. Either we can use JavaScript or TrypeScript.
JavaScript
The JavaScript language specification standard is officially called ECMAScript or ES. Most browsers don't yet support higher version ES 6 named ES 6. So, ES 6 code must first be translated to ES 5. Code developed with ES 6 must be compiled by a tool that converts that ES 5 syntax to comparable ES 5 syntax before the browser executes it. That way we as developers get the benefits of the new ES 6 productivity features and the browsers still get code they understand. Since Angular is a JavaScript library we could use any of the many compile to JavaScript languages to build our Angular application. But the most common language choices for Angular include the ES 5 version of JavaScript. ES 5 code runs in the browser today without translation so no compile step is required. If we want to take advantage of some of the new ES 6 features to improve productivity such as classes, the let statement and arrow syntax, we can write our Angular code using ES 6. We then translate our code to ES 5 before running it.
TypeScript
Another language is TypeScript. TypeScript is a superset of JavaScript and must be translated. One of the key benefits of TypeScript is its strong typing, meaning that everything has a data type. Because of this strong typing, TypeScript has great tooling including inline documentation, syntax checking, code navigation, and advanced refactoring’s so TypeScript helps us better reason about our code. The Angular team itself takes advantage of these benefits and uses TypeScript to build Angular 2. Most of the demo code in the Angular documentation at present also uses TypeScript. For these reasons, TypeScript is the language of choice for many Angular developers and we will also use this throughout entire tutorial.
TypeScript is an open source language that is a superset of JavaScript and compiles to plain JavaScript through translation. It is strongly typed so every variable, every function, and every function parameter can have a data type.
How does TypeScript determine the appropriate types when using JavaScript libraries that are not strongly typed? By using TypeScript type definition files. These files contain the definition of each type in a library. These files are named with the library name .d.ts. TypeScript implements the ES 6 class-based object orientation plus more. It implements classes, interfaces, and inheritance so if you have experience with an object-oriented programming language such as C#, C++, or Java, using TypeScript may feel very natural to you. We will learn TypeScript in detail later in this tutorial.
![clip_image001[4] clip_image001[4]](https://lh3.googleusercontent.com/-XVj6m_ivRR4/WebDb4imu-I/AAAAAAAABT0/jNtMLZPlxd0hojuDMU25icH6h6PXAL7BACHMYCw/clip_image001%255B4%255D_thumb%255B2%255D?imgmax=800)
Dart is another option. It is a non-JavaScript-based language for building Angular applications.
We've selected TypeScript as our Angular language.
Editor or IDE for Angular
Once we've picked a language, we select an editor or IDE that fully supports development in that language. Then we set up the development environment to get started with Angular. In these there are lots of editors and IDEs offer support for TypeScript and we can check the documentation of TypeScript Editor Support, but we only get the clever Intellisense as we type if we use a supported IDE. Initially, this was only Microsoft's Visual Studio.
Some of the support TypeScript out of the box and by including a plugin. Select any one of these supported Editors or whichever suits you best, but keep in mind that working with TypeScript will be much pleasant if you select an editor that understands TypeScript.
We are going to use either Visual Studio or Visual Studio Code throughout the tutorial. It support it much better than other IDEs or Editors because Visual Studio 2017 now has ability to debug the TypeScript code as like C# code.
Setting up Development Environment
Setting up development environment for Angular require to Install npm or Node Package Manager
Install npm or Node Package Manager
First thing you need is the latest version of the Node. Visit the Node.js website and download the latest version of the Node.
![clip_image003[4] clip_image003[4]](https://lh3.googleusercontent.com/-EKe5IUH3mxY/WebDdVt6LXI/AAAAAAAABT8/O2MVkZZri7MfKZCRRivU_McE_IXClzWmQCHMYCw/clip_image003%255B4%255D_thumb%255B3%255D?imgmax=800)
It is runtime environment for executing JavaScript code outside the browser. Node provides some tools to build Angular projects.
npm or Node Package Manager is a command line utility that interacts with a repository of open source projects. Now Node Package Manager has become the package manager for JavaScript. Using npm, we can install libraries, packages, and applications along with their dependencies.
We'll need npm to install all the libraries for Angular. Then we help us to execute scripts to compile our code and launch our Angular application.
After installing Node, we can verify it by running command “node –version” on command prompt that it has been install successfully or not.
![clip_image001[6] clip_image001[6]](https://lh3.googleusercontent.com/-7U2RgJwNL3g/WebK_pv6EJI/AAAAAAAABUU/du8h-KOXoYc7SFCJSZLsehKTSQeoc5qHQCHMYCw/clip_image001%255B6%255D_thumb%255B2%255D?imgmax=800)
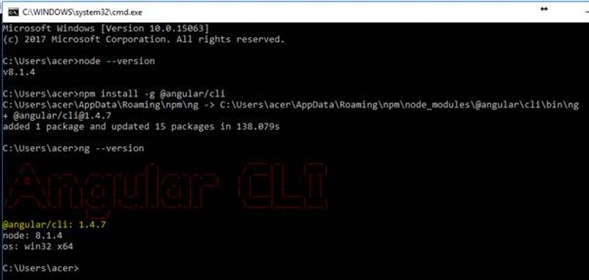
With npm installed we are ready to install third party libraries e.g. Angular CLI for set up our Angular application and create our first Angular application.
![clip_image003[6] clip_image003[6]](https://lh3.googleusercontent.com/-6M7U3Lmgtww/WebLBDmZWMI/AAAAAAAABUg/OoYQ8dWQn7AAuvJsrDRMdpjg3vsJiUW2gCHMYCw/clip_image003%255B6%255D_thumb%255B1%255D?imgmax=800)
It is the command line tool to create new Angular projects or generate some boiler-plate code and creates deployable packages. Now again move back to the command prompt and write below command to install Angular CLI on the development machine:
npm install -g @angular/cli

To ensure that installation is successful, check it with below command:
ng –version

Conclusion
We have learnt how to setup the environment for Angular development and installation of Angular CLI. If we have installed tools required for development then we good go for creating our first Angular application.