What's new in NDepend v2017.1

After my first article “Analyzing the Quality of your code with NDepend” on NDepend, I found few new interesting feature in it’s new release. Microsoft has introduced new version of the Visual Studio which my first choice for development. New Roslyn platform heading us to the Open source development using the Microsoft tools that making things easier to learn and get knowledge about the new tools. But we are going to explorer new features of the NDepend. Few of them are as below:
Support for Visual Studio 2017

  • NDepend 2017.1 supports Visual Studio 2017.
  • NDepend 2017.1. It also supports Visual Studio 2015, 2013, 2012 and 2010.

    NDepend_7_VS_Integration

.NET Core support

  • NDepend can now analyze any .NET Core assembly and its associated PDB and source files.
  • The new .NET Core Portable PDB file format is now also supported.
  • Support for inferring code to analyze from a project.json file, which about to completely come in the first quarter of this year. All .NET Core assemblies you need to analyze can be easily found through Analyze .NET assemblies in directory (recursive).

Dashboard Improvements

  • Dashboards have been improved in the NDepend UI in Visual Studio, in the generated reports section and in the Team Services web portal.
  • It now contains technical debt estimations, quality gates, rules and issues data.
  • For each data, a visual indicator shows the progression since baseline. Red and green coloured values are used to pinpoint progress or regression.
  • Clicking any value generates a query that drills down through corresponding data, which can be a list of code elements, debt estimations, quality gates, rules or issues.

    NDepend_Deshboard

Visual Studio Team Services VSTS and TFS 2017 Advanced Extension
A new Visual Studio Team Services extension is available. It consists of a build task that analyses code and code coverage yielded by the build process.
A web portal presents the results which embeds the NDepend dashboard and makes data actionable by drilling down anything with a single click.

A new Visual Studio Team Services extension is available. It consists of a build task that analyses code and code coverage yield by the build process. A web portal presents analysis results.clip_image004[4]

  • The web portal has a dashboard that presents the most relevant data including technical debt, code size, quality gates, rules and issues numbers.
  • A TFS build can be used as a baseline. All dashboard data is then diff-ed since the baseline.
  • Each data presented in the dashboard is clickable to view more information.
    clip_image006[4]
  • A detailed summary of quality gates is available.
    clip_image008[4]
  • Technical debt can be drilled down till the issue level. Clicking an issue allows it to be edited in the Rules panel.
    The datagrid is interactive: issues can be grouped, ordered and filtered by rule name.
    clip_image010
  • Rules details can be explored. Clicking a rule violation redirects the user to the VSTS Code Search extension, displaying the source code of the culprit code element.
    clip_image012
  • The VSTS extension logs trend metrics for each build, and Trend charts are shown.
    clip_image014
  • A panel shows a code metrics recap for each code element. The datagrid is interactive: elements can be grouped, ordered and filtered by name.
    clip_image016

Report Improvements

  • The new improved report dashboard now contains information on debt and issues.
    clip_image018
  • The report main section contains Quality Gates status summary.
    clip_image020
  • The report Rules Summary now shows the number of issues added and fixed per rule.
    clip_image021[4]
  • A green/red colour scale is now shown on code coverage values.
    clip_image022[4]

Code Querying Improvements

  • Thanks to the new queryable domains QualityGates, Issues, IssuesInBaseline, Rules queries can be written to match IQualityGate, IIssue, IRule objects according to any criteria (rule violated or not, quality gate status that went from pass to fail, issues added since baseline, issues severity or debt...).
    clip_image023[4]
  • New syntax to write quality gates.
  • A new button lets you run the currently edited code query against the baseline.
    clip_image024[4]
  • A code query can now return code elements of various kinds such as assemblies, namespaces, types, methods and fields.
    This new queryable domains are available including CodeElements ANTMF ; CodeElementParents ANT ; TypesAndMembers TMF ; Members MF ; CodeContainersANTM ; AttributeTargets ATMF ; where Assemblies, Namespaces, Types, Methods, Fields.
  • A query can now return values of technical debt through new types Debt, AnnualInterest, DebtRating, Severity, TrendIcon and can also return System.Version and System.TimeSpan values.
    clip_image025[4]
  • A colour scale is now shown on query result metric values making it easier to compare them at a glance.
  • You can now write very simple queries like Methods or JustMyCode.CodeElements or codebase.PercentageCoverage. This syntax simplifies writing quality gates and trend metrics queries.
  • Trend metrics used to only be defined with queries that return a scalar. A trend metric can now also be defined with a query that returns rows. In such situation the trend metric value is equals to the row count.
  • Improved query edit experience including:
    - PageUp/PageDown and dot supported on completion items list
    - smart query results column width auto-adjustment
    - no more flickering on query result row sorting.

Smart Technical Debt Estimation

NDepend v2017 is the only VS extension that can tell the developer that, for example, since this morning the code just written has introduced debt that would cost about 30 minutes should it have to be repaid later.
Knowing this, the developer can fix the code before even committing it to the source control.

  • An NDepend rule can now assign a technical debt and annual interest values to its issues.
  • The technical-debt is the estimated man-time that would take to fix the issue.
  • The annual-interest is the estimated man-time consumed per year if the issue is left unfixed. This provides an estimate of the business impact of the issue.
  • Issues of a rule now have a severity level in the blocker, critical, major, minor, info range.
    The annual-interest is a measure of an issues severity. The severity and the annual-interest represent the same concept where the annual-interest is a continuous measure while the severity is a discrete measure.
  • For example the rule below matches methods which are too complex. The technical debt is linear to the methods excessive complexity and the annual-interest is linear to the methods code coverage by tests (10 minutes per year for 100% coverage, 2 hours per year for 0% coverage).
    All default rules now have these debt/interest formulas which offer real-world estimations, out of the box. If needed, these formulas can be easily customized.
    clip_image026[4]
  • The dashboard now shows estimated Debt values and evolution since baseline.
    This dashboard is available in the NDepend UI in Visual Studio, in generated reports and in the Team Services web portal.
    clip_image027[4]
  • Many facilities are proposed from the dashboard to query/sort/filter/group... the debt estimated values and the issues set.
    These facilities include sorting debt and issues per rule or per code element, focusing on new and fixed debt since baseline and issues to fix by priority heuristics.
    Customizable Quality Gates are now available to define excessive thresholds over debt estimations that might induce build failure and prevent check-in.
    Customizable trend metrics are now available to measure debt trending. The key is to offer comprehensive sets of actionable results.
  • The NDepend project properties now has a Debt and Issues panel to customize all technical debt computation aspects.
    This includes estimated Debt and Interest values conversion from man-time to cost estimation.
    This also includes Debt Ratio and SQALE Debt Rating on a code element (as defined by the SQALE method). These are expressed in percentage of the estimated technical-debt compared to the estimated effort it would take to rewrite the code element from scratch.
    Debt settings can also be shared among different NDepend projects.
    clip_image029
  • More info on Smart Technical Debt Estimation here

Quality Gates

A Quality Gate is a check on a code quality fact that must be enforced before releasing and eventually, before committing to source control.
Quality Gates for example can forbid issues with a certain severity introduced since the baseline, enforce particular code coverage by tests ratio on new and refactored code or enforce thresholds on any Technical Debt criteria.

  • CQLinq can now be used to write quality gates. Technically a quality gate is like a trend metric. It's a code query that returns a scalar or rows (in which case the value is the row count). In practice a quality gate is used to fail a build when some thresholds are violated. A warn threshold, a fail threshold and a unit can be provided.
  • Thanks to the new CQLinq capabilities, quality gates can be use to measure and monitor any fact concerning code, but also any fact concerning technical-debt, rules and issues.
  • Quality gates can also rely on differences since baseline (diff), which means that they can monitor progression like new technical debt since baseline or % code coverage on new code written since baseline.
    clip_image030[4]
  • 11 quality gates are provided per default and LINQ queries can be written to query the quality gates status.
    clip_image031[4]
  • In previous NDepend versions, a build used to fail upon critical rules failures. Now the build fails upon any quality gate failure. The critical rule concept has been kept and the default quality gate Critical Rules Violated mimics the build fail behavior of previous NDepend versions.

Issues Management

  • A new Issues menu offers actionable options to list issues to be fixed by priority, and browse debt and issues per rule or per code element.
    clip_image032[4]
  • Quality gates, rules and issues numbers are shown from the dashboard. All these numbers are clickable to get lists of quality gates, rules or issues.
    clip_image033
  • A single click allows to list issues with a particular severity, added or fixed, since baseline.
    clip_image034
  • New menu to list issues concerning a code element.
    clip_image035
  • Hovering an issue with the mouse displays a complete description.
    clip_image036
  • Code element tooltip now shows debt and issues related data.
    clip_image037

Enhanced Baseline Experience

Do you want to measure progress since this morning, last week or since the last release?
Choose the baseline in a single click from the Dashboard and harness the updated results in just a few seconds.

  • Any stored baseline can be applied from the dashboard through a single click.
    Code base diff, rules, issues and quality gates are then recomputed in a few seconds.
  • Any newly created project now has the baseline settings set to 30 days ago per default.
    As a consequence, the stored baseline with the date closest to 30 days ago is applied.
    The first analysis result of a project is compared with itself since no other result can be used as the baseline.
  • Rules and Quality Gates are now executed against both current and baseline analysis results. Debt estimation, issues and status differences can then be queried.
    clip_image039
  • The search panel can now match all code elements added, refactored or removed since baseline.
    The results also show debt and issues information.
    This perspective is ideal to browse changes and issues introduced since baseline.
    clip_image041

Default Rules-Set Improvements

  • All default rules now include debt/interest estimation formulas that offer real-world estimations of the technical-debt, out of the box. If needed, these formulas can be easily customized.
    Typically rules related to poor coverage, poor quality and poor structure are the highest source of technical-debt.
  • The new CQLinq capabilities 52 existing rules have been improved to offer less false positives and more relevant data.
  • For example the rule Avoid namespaces mutually dependent has been improved to offer actionable results. It now lists all dependencies to remove at type and method level to reach a clean layered code structure.
    clip_image043
  • New rule Assemblies should have the same version lists application assemblies that have a different version than most other application assemblies.
  • New rule Avoid non-readonly static fields.
  • New notmycode query Discard generated Namespaces from JustMyCode matches the VB.NET generated namespace My.
  • The notmycode query Discard generated Types from JustMyCode now also matches anonymous types.

Enhanced Visual Studio Integration

  • NDepend analysis can be started after a build to automatically refresh NDepend results. New settings are provided to avoid starting the NDepend analysis when the builds purpose is to provide up-to-date compiled bits for a run session, a debug session or a unit-test session. In such a situation, it might be preferable to avoid starting the NDepend analysis to avoid both consuming CPU cycles and distracting the developer's focus.
  • Minimal interval between NDepend results being refreshed automatically after a build in VS which can now also be expressed in minutes.

NDepend.API Improvements

  • Possibility to compute an issues-set and an issues-set-diff through a single method call thanks to the new methods ComputeIssues() and ComputeIssuesDiff() declared in ExtensionMethodsProjectAnalysis.
  • Possibility to compile a code query once and resolve it against multiple code bases. This facility represents a significant optimization when multiple resolutions are needed, because query compilation is way slower than query resolving.
    Related method ExtensionMethodsQuery.CompileNoResolve() which returns a IQueryCompiledUnresolved that presents two Resolve() methods, against a ICodeBase and an ICompareContext.
  • The new method ExtensionMethodsQuery.GenerateCompletionItems() provides completion items in code query edition context.
  • The new method ExtensionMethodsQuery.CompileMany(IEnumerable<IQuery>) takes an enumerable of IQuery and returns a dictionary of IQueryCompiled indexed by IQuery.
Conclusion
NDepend is again loaded with more improvements and features from it’s last version. NDepend team introduced above valuable feature and enhancements.
Note: Information and Images are taken from NDepend documentation.

Run CSharp “Hello World!” program on Developer Command prompt

To start writing your first program without using the Visual Studio or other tools, you just need to open “Command Prompt”. Just type command on the search in Start menu either you are using Windows 7 or any higher.

image_thumb[10]_thumb[3][4]

Visual Studio installs few command line tools to do some operation using command tools and these can be invoked using the “Developer Command Prompt for VS2015”(For Visual Studio 2015). If someone has not installed Visual Studio then just install .NET Framework on the computer.

After this we are ready to create and compile our “Hello World!” program using the .NET Framework compilers.

Now create a file “hello.cs” using the “notepad”. We are going to write our code to print “Hello World!” on the screen for this example. “.cs” is the common extension for the C# file and “.vb” for Visual Basic. So now we going to create a C# program now so this file will contain C# code.

image_thumb[16]_thumb[1][4]

After running this command a prompt will appear with message “Do you want to create a new file?”. Click on “Yes” to create a new file.

In this we are going to create a class with a static method “Main”. In a Console application that would run on command prompt, CLR look for class named “Program” with a “Main” method to run the program.

image_thumb[8][3]

Now save this file and come back to the command prompt.

Now one of the tool “csc.exe” exists in the “Windows” directory in the .NET framework installation paths. It can be located at the path “C:\Windows\Microsoft.NET\Framework\{.NET Framework}”. Under the Framework folder you will find installation of .NET Framework multiple version. Below is the path of the latest one on my system. It is the “Visual C# Command Line Compiler” which compiles the C# code.

image_thumb[24][4]

Now we are going to compile the C# code then execute the program. After compiling the program C# compiler produce a executable file(.exe).

To compile the created C# code file, use the below command line on command prompt. Just pass the created “hello.cs” as parameter.

  1. csc hello.cs

image_thumb[29][4]

On windows we can run exe. Now run the hello.exe to view the result of our example program.

image_thumb[32][4]

That’s all done. We have created an example program run on the command prompt using the C# command line compiler.

Actually it transforms C# code into Microsoft Intermediate Language. This can either an exe or dynamic link library. We specify the assembly format to the csc.exe using the /target:library option. See below image for various target options:

image_thumb[37][4]

  Happy Coding!

New feature “Add a reference to a NuGet package” in Visual Studio 2015 Update 3

Microsoft announced the release of Visual Studio 2015 Update 3 two days ago. They have addressed issues from previous update and improved few things. In the list of improvements, I found an interesting thing that you can now quickly include NuGet packages by just using the resolve reference method. You can say it An option to add a reference to a NuGet package as a quick fix.
nugetbulb_thumb[1]

You can enable this option from Tools > Options > Text Editor > C# > Advanced, under "Using Directives":

nuget_thumb[1]

Visual Studio is improving in most of the expects for the development of the Universal Application development. There kind of improvements can make you more productive..

How to solve roslyn compiler issue on shared hosting?

Scenario:
I have created a web application using Visual Studio 2015 and .NET 4.6. When I have compiled and uploaded my project files to the hosting server, it showed the exception of related to permission. After checking for a while I found that application is trying to execute the CSC.exe file within the Bin\roslyn\ folder, but IIS user account does not permission to do that.

Solution:
If you are trying to publish Roslyn on shared hosting then you should know that it runs on Full Trust mode. Shared hosting companies does not allow Full Trust applications automatically , they override this globally with Medium Trust due to security restrictions as they are hosting multiple customers website and they don’t want one application affects another by any chance. Some hosting provider provide you the control to run your application on Full trust and provide setting to do that in these days.

Roslyn compilation will only work with Full Trust so on some shared hosting you might face challenges. I would suggest ask your hosting provider if they support Full Trust mode or not.

If shared hosting does not support Full Trust you should not deploy application with Roslyn, this will display you some sort of .exe file missing errors. Even you can’t upload .exe files to FTP on shared server, but you can somehow able to upload these exe files through their control using the zip package and then unzip on the hosting folder.

Below are the steps to deploy without Roslyn:

  1. Open NuGet Package Manager from tools menu or Use Manage NuGet Packages for Solution it will give you graphical way to uninstall packages from the solution project in which you are using that package.

    clip_image002_thumb[1]
  2. Now uninstall Microsoft.CodeDom.Providers.DotNetCompilerPlatform package using the below command line in Package Manager console:

    Uninstall-package Microsoft.CodeDom.Providers.DotNetCompilerPlatform <Your Web project name>

    clip_image004_thumb[2]
  3. Now rebuild & republish. This uninstallation also removes CodeDom configuration from web.config file. This will solve your purpose. Basically this will not generate any csc.exe, vbc.exe files inside bin folder of your project.

    In your web project publish profile settings, uncheck "Allow precompiled site to be updatable". You can find this under Settings > Precompile during publishing > configure.

    clip_image005_thumb[3]

Solution from - Roslyn CSC.exe, Web API 2 on Hosting Server
Hope this help others to solve the issue.
Cheers!

Analyzing the Quality of your code with NDepend

Throughout my carrier I have worked on various projects in different environment. Few of them are completed solo and few are with small or big teams. As per my opinion and learning till now “Writing a good and clean code is an art”. This is improved with experience and learning about the “Design Patterns”.

When you are doing project as one man army then you are good to write better code and refactor it maximum as per your understanding and knowledge, but when it done with in a large project and team then a project manager or Architect will definitely worry about the quality and success of the project.

In starting days of my carrier, One day my manager asked me to learn about the Cohesion and Coupling. I was not able to understand it much at that time and tried so many time to implement it in my coding practices. After continuously taking care of such factors and knowing about the “Design Patterns” e.g. SOLID, FAÇADE etc. what I have realized that all of these things redirect the programmers to make “Quality Code”.

After this when it comes to manage a big project then you require some tools which help to find issues in a large project. It makes an architect to keep free from these below question for some instance:

  • Is the code looking good?
  • What about its complexity and test coverage?
  • Can you consider the code as maintainable with a good scalability?
  • Are there instances of copy and paste code smells?
  • How loosely and tightly coupled is the architecture? (In terms of cohesion and coupling etc.)

Doing this task manually is a time consuming process because checking and running every module will definitely consume some time. Without running the project it is possible in manually compiling and inspecting but with the tools it is much time saving process.

To check the quality of the code and analyze, I put my hands on Visual Studio inbuilt tools e.g. Unit Test Runner, Code Metrics, and Static Code Analyzes. These tools are good to work but there are few third party tools available to do some task with high precision analyzes e.g. FxCop, JustCode, ReSharper, and NDepend.

In this article, I am going to explorer the features and benefits of NDepend.


What is NDepend and its use??

NDepend is a static code analyzes for .NET. NDepend can be used in both standalone and Visual Studio integrated mode (Through Visual Studio extension). This nice tool is create by Patrick Smacchia for the developer community.

NDepend Visual Studio extension performs a range of analyzes across a solution, either during design time or retrospectively across an existing project. Current version of NDepend 6 provides 82 Code Metrics which are analyzed and reported on by the tool either in GUI or html format.

Right now I have used it in Visual Studio Integration mode. I prefer to use in integrated environment rather than doing application switch for doing same thing in different window and NDepend provide most of its functionality in Visual Studio while working with the project through a separate menu.
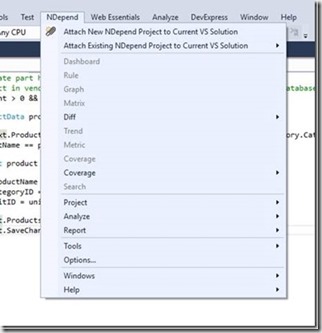
clip_image001

Setting NDepend Integration with Visual Studio:

To enable work NDepend in Visual Studio, NDepend guys provides an extension installer “NDepend.VisualStudioExtension.Installer.exe”. Check highlighted file in the below image.
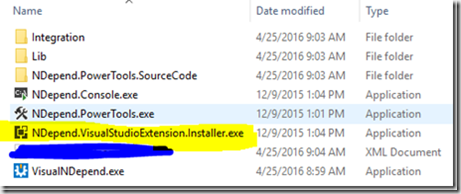
clip_image002

Once you run this extension installer it will pop up an installation dialog which let us to integrate NDepend in our desired version of Visual Studio. Right now I am using Visual Studio 2015, so I installed for my IDE.

clip_image003[6]

After completing installation, you can access to various metrics, rules, graph, reports, analyzer results and tools at one place to analyze the project for different aspect of the quality measures.

NDepend is mainly a static analyzes tool and more. It provide out of the box rule and customizability of rule through CQLinq, Visual Dependency representation, Build Integration and Change tracking. NDepend allow us to write own custom rules and you can visualize your code base and its dependencies with series of matrices and graphs as well.

It does more than providing snapshot of the code base at moment some times. It integrates in to Build process and allows us to monitor the evolution of the code and decide whether you making progress towards quality or not.

Start analyzing my first project with NDepend

After installing NDepend in Visual Studio, I found it very user friendly and quite intuitive. You can just select project from the NDepend menu to start analyzing it. Let see how its start screen looks like in first glance.
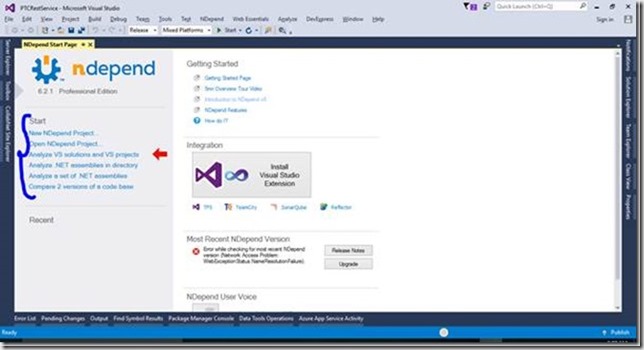
clip_image004

Here you can select specific menu to start working with NDepend. Now my solution is open so I am just going attach a new NDepend project to current solution. Just click on the circle in status bar of the Visual Studio and you have access to NDepend here also. See below image.
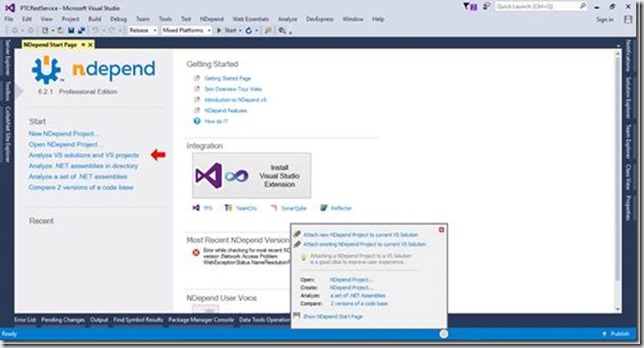
clip_image005

Now select “Attach new NDepend project to current VS Solution”. Now it prompt to select the assembly to analyze and you can also add another assemblies on below screen.

clip_image006[6]

Just click on “Analyze a single .NET Assembly”. Now it start analyzing the assembly and after completion of process it will pop up a dialog and along this generates html report about the analyze results.
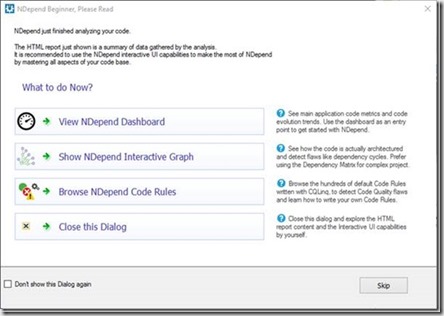
clip_image007

I am going to click on the View NDepend Dashboard and it redirected me to dashboard.

clip_image008[6]

  And html generated report is shown as below:
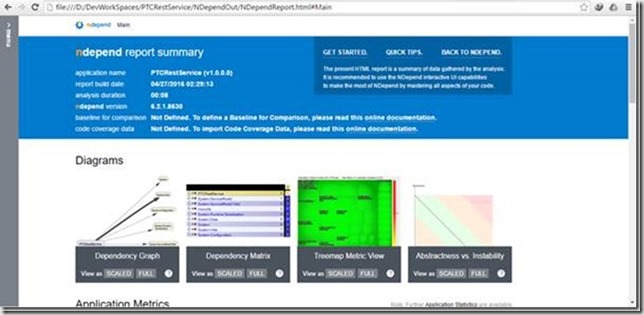
clip_image009

In Visual Studio, there are lots of windows available through NDepend to analyze quality of the code base and even you can customize these. I am going through main features of the NDepend one by one. See below screen shot with Queries and Rules Explorer, Dependency Graph and Queries editor. 

clip_image010[6]

Code Rule and Code Query over LINQ (CQLinq)

NDepend project provides build-in metrics when you create a new project to analyze an assembly. As I saw in Queries and Rules Explorer, there are more than 200 default project rules and their queries.

These rules are made up using the CQLinq. CQLinq is default scripting for NDepend to create rule queries. So in this way you can create our own queries and customize them too. CQLinq editor provides code completion and intellisense with live error description.
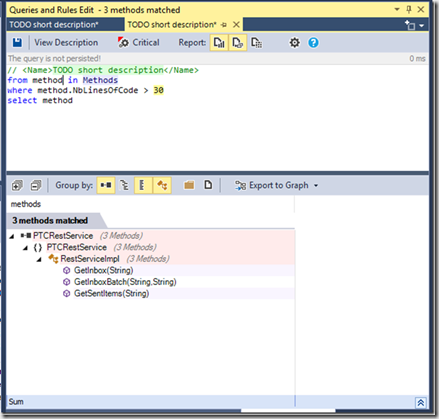
clip_image011

Dependency Matrix

Dependency Matrix shows dependency and coupling between the projects and their module. NDepend must responsive and easy navigate through the dependencies between the projects. When you click on any cell then it shows graph and information in tooltip manner. I liked this behavior because I do not need to switch between dependency graph and dependency matrix. They are shown in a synchronized way and easy to visualize and analyze the results.

clip_image012[6]

Dependency Graph

It is an interactive way to represent coupling between the code base elements. Actually NDepend provide this graph for various code exploration scenarios. You can find full description about these in documentation - Exploring Existing Code Architecture in Visual Studio through Dependency Graph.

  • Dependency Graph
  • Call Graph
  • Class Inheritance Graph
  • Coupling Graph
  • Path Graph
  • All Paths Graph
  • Cycle Graph

These various type of graphs are accessible from NDepend->Graph menu items.
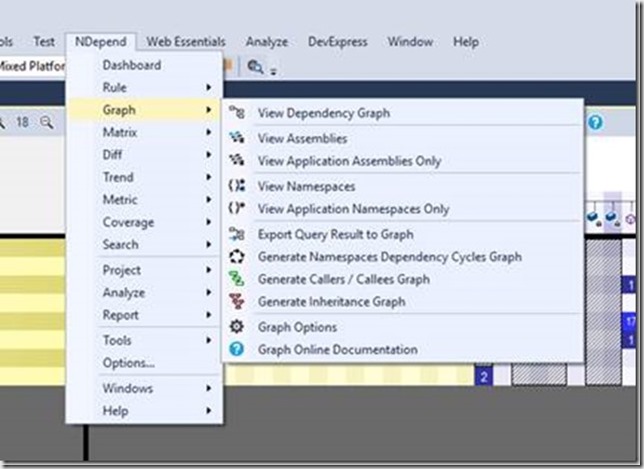
clip_image013

clip_image014[6]

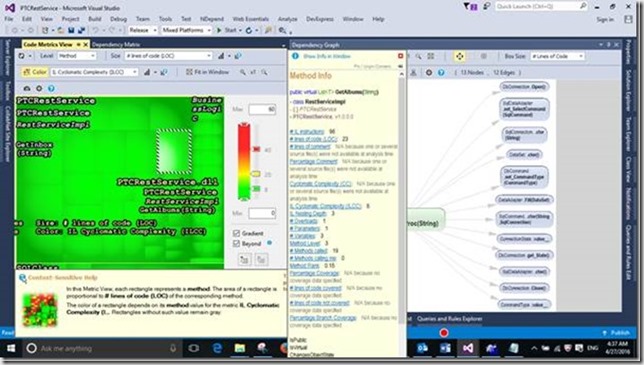
Code Metrics View

Code metrics view represents tree-structured data in rectangular blocks format.
clip_image015

Continuous Integration Reporting

These feature matter much analyzing a huge code base. Along with CQLinq, I like NDepend for this feature. NDepend integrate with TFS, Team city etc. in build process to check for the violation of CQLinq rules continuously and these are reported to the development teams to improve the code.

NDepend can analyze source code and .NET assemblies through NDepend.Console.exe. Each time it analyzes a code base, NDepend yields a report that can inform you about the status of our development. As I described in the starting of article about the html document which generated during the analyzing process is generated during build process.

This exe is located in the installation folder and the file name is “NDepend.Console.exe”. It is integrated in the building process by specifying command line arguments.

Conclusion

These are the few features which I have used so far but NDepend is loaded with lots features. In my opinion NDepend is light weight, powerful and intuitive application. Customization with the rules and metrics is an additional advantage using its best part CQLinq. It also integrate with Reflector and other tools which improves the productivity. I found it much better tool for maintaining quality of the application so far. Hope NDepend will continue improving this tool in future and let development process to improvise in easy way.

Task.WaitAll freezes UI with Control.Invoke() method.

Parallel tasks are important to complete the independent operation simultaneously. It makes us completely very heavy and time taking processes in less time when these operations run in multi-core environment but we have to follow the rules to make this multi-tasking to work.

Today I experienced such a case where my written code put me in a condition of “Dead Lock”. It is a situation more than one task that want to acquire the same resource and one is already holding this resource but another also wants to access it. If no task able to complete its operation then it creates a deadlock situation.

When we creating application, in some cases it may be possible to update the UI in various threads. E.g. Progress reporting. I found a case that let our application put into a situation which freezes the application. Let there was few tasks that are independent of each other but we need to merge the result all of these tasks with some required condition.

List<Task> tasks = new List<Task>();
//Create and start independent tasks
tasks.Add(Task.Factory.StartNew<List<string>>(() => CreateInitialData()));
tasks.Add(Task.Factory.StartNew<List<string>>(() => CreateValidationData()));
tasks.Add(Task.Factory.StartNew<List<string>>(() => CreateGUILookup()));

Now we need to complete these tasks to get the results so that we can merge it. To do this, the Task Parallel Library has Task.WaitAll method which takes array of task as a parameter. It waits until all the operations do not complete. In other words, it hold the UI and waits to complete all the tasks.

Task.WaitAll(tasks.ToArray());
//Merge result of all task on completion

In one of the thread, some subtask is done which make a call to the UI. It was working fine for a while until I made some changes. I was trying to get one property of the progress bar and it was accessed in an asynchronous way using the “BeginInvoke” method. It was a bug in the application which does not return the correct results so I replace it with the “Invoke” method.

“Control.Invoke()” method waits and returns the results immediately while BeginInvoke method is an asynchronous approach. It leaves control from the current statement without returning the values and we are not able to get returned results until we call AsynResult.EndInvoke().

//At some instance code by mistake try to access 
// the properties of the any control and made dead lock
// 
int progress = (int)this.Invoke((Func<int>)delegate 
{ return progressBar1.Value; });
System.Diagnostics.Debug.Write(progress);

Now what WaitAll does, it blocks until all tasks have finished. The tasks can't finish because Invoke will run its action on the UI thread, which is already blocked by WaitAll. It is creating deadlock because Invoke waits for the UI thread to unblock.

Complete example:

namespace ParallelWaitDeadLock
{
    public partial class Form1 : Form
    {
        public Form1()
        {
            InitializeComponent();
        }
 
        private void button1_Click(object sender, EventArgs e)
        {
            List<Task> tasks = new List<Task>();
            //Create and start indepenet tasks
            tasks.Add(Task.Factory.StartNew<List<string>>(() => CreateInitialData()));
            tasks.Add(Task.Factory.StartNew<List<string>>(() => CreateValidationData()));
            tasks.Add(Task.Factory.StartNew<List<string>>(() => CreateGUILookup()));
 
            Task.WaitAll(tasks.ToArray());
            //Merge result of all task on completion
       
        }
 
        private List<string> CreateInitialData()
        {
            //
            Task.Delay(1000);
            return new List<string>();
        }
 
        private List<string> CreateGUILookup()
        {
            //
            Task.Delay(1000);
            //At some instance code by mistake try to access 
            // the properties of the any control and made dead lock
            // 
            int progress = (int)this.Invoke((Func<int>)delegate 
            { return progressBar1.Value; });
            System.Diagnostics.Debug.Write(progress);
            return new List<string>();
        }
 
        private List<string> CreateValidationData()
        {
            //
            Task.Delay(1000);
            return new List<string>();
        }
    }
}

We need to take care to avoid such a situation when subtask tries to do UI relation operations even the parent task holds the UI and waits to complete the task.

It is causing a deadlock. The UI thread is waiting for the all tasks to be completed. UI resources are already locked by the Task.WaitAll and then we are trying to invoke code on the UI thread which is causing "Deadlock".

Task.WhenAll() method will return a new task that will be marked as completed when all tasks have completed. If we await this task, UI thread will be freed, and so the routine will be able to invoke code on the UI thread, avoiding a deadlock.

We should use Task.WhenAll() instead.  

await Task.WhenAll(tasks.ToArray());

Install .NET Framework 3.5 in Windows 8 and 10

Windows 8 and 10 comes with .NET framework 4 or higher pre-installed, but there are lots of applications require the .NET framework v3.5 installed to install on these newer version of operating systems. These applications will not run unless you will install the required version of .NET framework. When you try to run any such sort of applications then Windows 8 and 10 will prompt you to download and install .NET framework 3.5 from the Internet. However, this will take a lot of time.

Source: MSDN article.
Below are the steps to enable .NET framework 3.5:

  1. Go to Settings. Choose Control Panel then choose Programs.

    clip_image002
  2. Click Turn Windows features on or off, and the user will see window as image below.

    clip_image004

    clip_image006

    You can enable this feature by click on .NET Framework 3.5 (include .NET 2.0 and 3.0) select it and click OK. After this step, it will download the entire package from internet and install the .NET Framework 3.5 feature.

You can save your time and install .NET Framework 3.5 from the Windows 8 and 10 installation media respectively. This method is much faster and does not even require an Internet connection.
Follow below steps to install .NET Framework 3.5 in Windows 8 and 10 using DISM:

  1. Bring your installation media to prepare installation either it is DVD or ISO image. If you are using ISO image then mount it using software e.g. Power ISO, DAEMON Tools so then you will be able to access the files for the installation.
    Packages are located in the drive letter: \sources\sxs directory.
  2. Open CMD.EXE with Administrative Privileges. Right click on the start button (or press “Win + X”) to popup the system menu. There you will find a menu item titled “Command Prompt (Admin)”. Click on this to launch the command prompt in admin mode.
    image
  3. Run the following command and hit Enter.
    Dism.exe /online /enable-feature /featurename:NetFX3 /All /Source:E:\sources\sxs /LimitAccess

    clip_image009
    Please make sure to change the source path:
    e.g.
    If you have Windows setup at “D:” drive, replace “E:” with “d:”
    If you have Windows setup at “F:\Win10Setup” folder path, replace “x:” with “f:\Win10Setup”
    When run from the command prompt, it will start installing the .NET framework. It will take a while to complete the whole process. Once done, restart your system for the changes to take effect.

Details on command line parameters of DISM:

  • /Online targets the operating system you're running (instead of an offline Windows image).
  • /Enable-Feature /FeatureName:NetFx3 specifies that you want to enable the .NET Framework 3.5.
  • /All enables all parent features of the .NET Framework 3.5.
  • /LimitAccess prevents DISM from contacting Windows Update.
  • /Source specifies the location of the files needed to restore the feature (in this example, the x:\sources\sxs directory).

After completion of this process .NET Framework 3.5 feature enabled. Restart and then you good to go for the installation of your application.

Debugging Threads with Concurrency Visualizer

Features of Concurrency Visualizer:

  • Shift+Alt+F5
  • Fast processing, faster loading
           o Supports big traces
  • Supports big traces
  • Support s EventSource and custom markers
            o Built-in support for TPL, PLINQ, Sync Data Structures, and Dataflow
            o Built-in support for your own EventSource types
                    § Also provides Visual Studio markers API
  • New Visualizations
             o e.g. defender view

Demo:

Here are few steps to know that how to utilize “Concurrency Visualizer” for multithreaded applications.

  1. Create a Console project.
  2. Create custom EventSource to trace in the visualizer as below:
    [EventSource(Guid = "7BBB4E52-7DA7-45EB-B6C2-C01D460A087C")]
    class MyEventSource : EventSource
    {
        internal static MyEventSource log = new MyEventSource();
    
        [Event(1)]
        public void SomeEventHandled(int data)
        {
            WriteEvent(1, data);
        }
    }

    To provide GUID to the event source use “guidgen” and copy newly generated GUID. Then put it in the attribute of the EventSource class.


  3. Now complete the test code to proceed the demo.

    Full code snippet:
    using System.Threading;
    using System.Threading.Tasks;
    
    namespace ConcurrencyVisualizerDemo
    {
        class Program
        {
            static void Main(string[] args)
            {
                var list = new List<Task>();
                for (int i = 0; i < 10; i++)
                {
                    list.Add(Task.Run(() =>
                        {
                            //Loging here
                            MyEventSource.log.SomeEventHandled(21);
                            Thread.SpinWait(1000000);
                        }));
                }
                Task.WaitAll(list.ToArray());
            }
    
            [EventSource(Guid = "7BBB4E52-7DA7-45EB-B6C2-C01D460A087C")]
            class MyEventSource : EventSource
            {
                internal static MyEventSource log = new MyEventSource();
    
                [Event(1)]
                public void SomeEventHandled(int data)
                {
                    WriteEvent(1, data);
                }
            }
        }
    }
  4. There is optional extension “Concurrency Visualizer” for visual studio, which visual all the data to debug the concurrency between the treads. After installing this, you can find the option under Analyze menu. See image below:

    clip_image004
  5. Now copy the GUID  of MyEventSource and go to the Concurrency Visualizer’s settings. Then add new provider and put this copied guid in the provider.
    Analyze->Concurrency Visualizer->Advance Settings->Markers

    image

    Provide name and paste copied guid in the Privider GUID field. Click ok to complete provider addition.
  6. Now start Concurrency Visualizer by pressing Shift+Alt+F5 and it will start Shift+Alt+F5. Now it will start generating reports. See the below images:

    image

    image

    image

    image


What is the use of AsyncCallback in Client server programs and GUI improvements? why should we use it?

When the async method finishes processing, the AsyncCallback method is automatically called, where post processing statements can be executed. With this technique there is no need to poll or wait for the asyn thread to complete.

This is some explanation on Aynsc Call back usage:

Callback Model: The callback model requires that we specify a method to callback on and include any state that we need in the callback method to complete the call. The callback model can be seen in the following example:

static byte[] buffer = new byte[100];

static void TestCallbackAPM()
{
    string filename = System.IO.Path.Combine (System.Environment.CurrentDirectory, "mfc71.pdb");

    FileStream strm = new FileStream(filename,
        FileMode.Open, FileAccess.Read, FileShare.Read, 1024,
        FileOptions.Asynchronous);

    // Make the asynchronous call
    IAsyncResult result = strm.BeginRead(buffer, 0, buffer.Length,
        new AsyncCallback(CompleteRead), strm);
}

In this model, we are creating a new AsyncCallback delegate, specifying a method to call (on another thread) when the operation is complete. In addition, we are specifying some object that we might need as the state of the call. For this example, we are sending the stream object in because we will need to call EndRead and close the stream.

The method that we create to be called at the end of the call would look somewhat like this:

static void CompleteRead(IAsyncResult result)
{
    Console.WriteLine("Read Completed");

    FileStream strm = (FileStream) result.AsyncState;

    // Finished, so we can call EndRead and it will return without blocking
    int numBytes = strm.EndRead(result);

    // Don't forget to close the stream
    strm.Close();

    Console.WriteLine("Read {0} Bytes", numBytes);
    Console.WriteLine(BitConverter.ToString(buffer));
}

Other techniques are wait-until-done and pollback

Wait-Until-Done Model The wait-until-done model allows you to start the asynchronous call and perform other work. Once the other work is done, you can attempt to end the call and it will block until the asynchronous call is complete.

// Make the asynchronous call
strm.Read(buffer, 0, buffer.Length);
IAsyncResult result = strm.BeginRead(buffer, 0, buffer.Length, null, null);

// Do some work here while you wait

// Calling EndRead will block until the Async work is complete
int numBytes = strm.EndRead(result);

Or you can use wait handles.

result.AsyncWaitHandle.WaitOne();

Polling Model The polling method is similar, with the exception that the code will poll the IAsyncResult to see whether it has completed.

// Make the asynchronous call
IAsyncResult result = strm.BeginRead(buffer, 0, buffer.Length, null, null);

// Poll testing to see if complete
while (!result.IsCompleted)
{
    // Do more work here if the call isn't complete
    Thread.Sleep(100);
}

IN clause With Linq To Sql

There is no direct equivalent in LINQ. Instead you can use contains () or any other trick to implement them. Here's an example that uses Conains ().:

String [] s = new String [5];
s [0] = "34";
s [1] = "12";
s [2] = "55";
s [3] = "4";
s [4] = "61";
 
var = RESULT1 from the day context.TableName
                        where s.Contains (d.fieldname)
                        select d;

Eg:

int[] productList = new int[] { 1, 2, 3, 4 };   

var myProducts = from p in db.Products

                 where productList.Contains(p.ProductID)

                select p;

Start with the Order (pretend my order is ID=44):

AdventureWorks.DB db=new DB();

var itemQuery = from orders in db.SalesOrder

              where orders.SalesOrderID == 44

              select orders.ProductID;

Next we need to get the products, but only those that are in the cart. We do this by using our first query, inside the second:

var myProducts = from p in db.Products

                where itemQuery.Contains(p.ProductID)

                select p;