Enable code preview with the Visual Studio enhanced scroll bar

Introduction

This is the first time that I saw code preview through scrollbar in Visual Studio. I have use most of the Visual Studio IDE starting from Visual Studio 2002 and scrolling of code files done using the classic scrollbar.

Starting from Visual Studio 2013, an enhanced scrollbar feature is enabled but I was not aware of it till now. Recently I saw below code preview features through a wide scrollbar:

Enabling Visual Studio scrollbar code preview mode

By default, this feature is not enabled so that I have not used this cool feature before. Actually, it requires to switch the scrollbar mode and below are the steps to switch scrollbar mode:

  1. Open option using Tools menu and select “Options”
  2. In the options dialog select the Text Editor | All Languages | Scroll Bars node from left side menu
  3. Now change the scrollbar behavior to map mode and check the “Show Preview Tooltip” checkbox as shown in below image.

I found it a cool feature which enables the developer to view the see the code in tooltip by hovering on the scrollbar without scrolling down to the bottom of the code file.

You can find detailed information at Visual Studio scroll bar customization documentation.

Create/Update an offline installation of Visual Studio 2017

Introduction

In this article we learn that how to create an offline installer for Visual Studio 2017. Recently Visual Studio 2017 version 15.8 Released and then i have updated Visual Studio 2017 on my laptop. I have another machine which does not connect with high speed internet so I need to install Visual Studio through offline installer (ISO).

Microsoft designed Visual Studio 2017 installer to install specific modules (workload-based model) and allows to install minimal set of features to start development using Visual Studio.

Create Visual Studio 2017 offline installation media

Step 1 – Download the Visual Studio installer setup

It is recommended to use Visual Studio web installer because it will always install/ update to the latest version of the Visual Studio 2017.

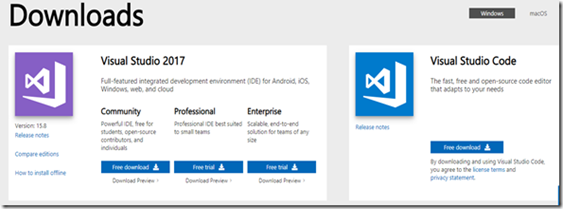
Download the latest version of Visual Studio 2017 Web installer by clicking below links
Visual Studio Community 2017 | Visual Studio Professional 2017 | Visual Studio Enterprise 2017


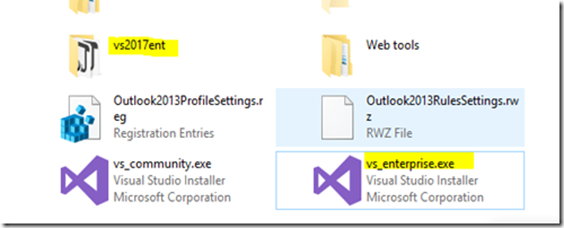
Step 2 – Create/ Download installation setup files

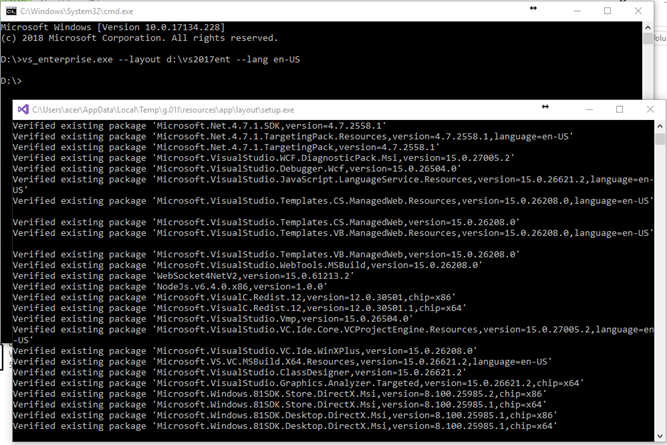
To create updated version installation for Visual Studio, use the below command create or update the existing installation layout to a newer version. You don't have to specify any additional command-line parameters.

vs_enterprise.exe --layout d:\vs2017ent

It will create a complete local installation media for Visual Studio 2017 with all features and definitely it will take lots of time to download all the work loads.

You can also specify the language at the Visual Studio to download so that it will download installation files for the specified set of languages only

vs_enterprise.exe --layout d:\vs2017ent --lang en-US

In my case, I have already downloaded Visual Studio 2017 installation files earlier. This time I need to update this installation layout to transfer update on my offline computers.

Once the offline installation files saved at the specified location then transfer it on another computer and ready to install the Visual Studio 2017.

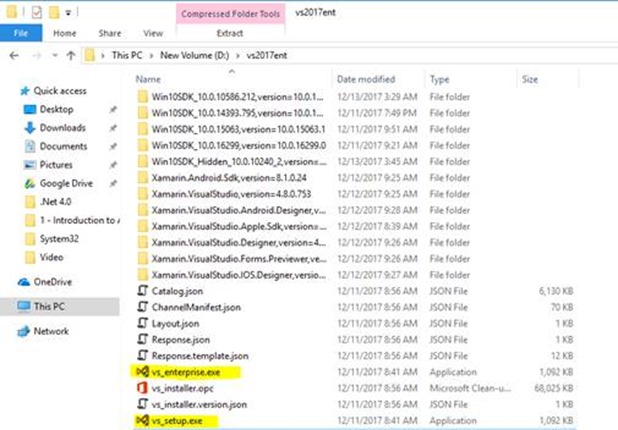
Click the vs_setup.exe file to start the installer then install the Visual Studio after selecting the required development environment features you want to install.

Clean up previous version obsolete package


During the update process of existing Visual Studio installation files, my computer drive gets full and some of the packages failed to download. I checked the installation layout folder and found that there are previous version packages also exists. I have removed few of them manually to complete the download process.

Visual Studio installations files folder size incrementally increase whenever we update the existing installation files. Visual Studio installation folder may have some obsolete packages that are no longer needed by the latest Visual Studio installation.

You can use the --clean option to remove obsolete packages from an offline cache folder.

Source of information: How to remove older versions from a layout

Step 1 – Find file path(s) to catalog manifest(s) that contain those obsolete packages

You can find the catalog manifests in an "Archive" folder in the offline layout cache. They are saved there when you update a layout. In the "Archive" folder, there is one or more "GUID" named folders, each of which contains an obsolete catalog manifest. The number of "GUID" folders should be the same as the number of updates made to your offline cache.

Step 2 - Run the “—clean” command by supplying the files paths to these catalogs

vs_enterprise.exe --layout d:\vs2017ent --lang en-US --clean d:\vs2017ent\Archive\d88a0497-7bee-42ad-8ea5-3361cd52e075\catalog.json


References:

Create an offline installation of Visual Studio 2017
Install Visual Studio 2017 on low bandwidth or unreliable network environments
Update a network-based installation of Visual Studio

How to setup Proxy settings in Visual Studio Code?

I ran into problem that when I try to find extensions in the VS Code, it does not display anything and even not able to check for updates. In this scenario, I have downloaded newer version of VS Code but it was not the permanent solution to solve this problem.

In such type of issues, I found that our enterprise proxy block the request which sent to the respective software vendors. Finally I decided to get to know that how can I setup proxy settings in VS Code as I did with tortoiseSVN and other tools.

I found reference in VS Code documentation - Proxy server support

Many enterprises require that their computers run behind a proxy server and don't allow direct access to the Internet. A proxy server intermediary can limit access to the VS Code Extension Marketplace and prevent installing VS Code extensions.

Follow the below steps to setup proxy settings:

  1. File > Preferences > Settings
    clip_image002
  2. Navigate to the HTTP settings section and you will find settings for proxy as shown in below image:
    clip_image004
  3. Now change the proxy settings as per your environment, If you proxy does not require authentication then just simply enter proxy details:
    "http.proxy": http://172.28.57.20:8080/
    If proxy require authentication then you have to provide user details:
    "http.proxy": "http://niranjan:password@172.28.57.20:8080/"
Complete Settings which works in my case:

// VSCode: Place your settings in this file to overwrite the default settings
{
  "http.proxy": "http://user:pass@proxy.com:8080",
  "https.proxy": "http://user:pass@proxy.com:8080",
  "http.proxyStrictSSL": false
}
From documentation:
Additionally, use "http.proxyStrictSSL": false if your proxy server uses a self-signed certificate.
Note: VS Code supports http and https proxies, but not SOCKS proxies.

How to add Intellisense to Visual Studio Code for bootstrap

Peoples who are habitual of using intellisense in Visual Studio and suddenly it is found missing then they really get mad during the work. Today I am trying to create some html pages with bootstrap for learning. I was feeling little hard to do code with bootstrap, because I am not able remember all of the class names of the bootstrap.

There are lots of glyphicon classes which is hard to remember. Visual Studio has this nice feature by adding JavaScript library path to the “_references.js” file and after that everything available in autosuggest mode.

What happened with me, I am not able to find the correct gylphicon class name without intellisense. Regarding this I have googled and found that this feature is not currently available in VS Code right now. However, it has been added as a feature request for upcoming updates.

Do not disappoint, There is also hope to do work with intellisense in VSCode. You can use extension"HTML CSS Class Completion".

Open Command Palette by press ctrl+ship+p Then run  “ext install HTML CSS Class Completion” to install this extension. Check the results in below image to see after enabling this extension.

image

Happy coding!

How to create Node.js development environment in Visual Studio?

Now Visual studio is enriched with the tools that turn Visual Studio into a powerful Node.js development environment. Node.js Tools for Visual Studio is free and open source plug-in built on top of Visual Studio 2012, 2013, or 2015. This tool has enable following feature for Node.js development:

  • Intelligent code completion
  • Advanced debugging and profiling
  • Integration with other Visual Studio features and 3rd party tools
  • Node.js, io.js, JavaScript, Typescript, HTML, CSS, and JSON support

Installation:
To create Node.js development environment in Visual Studio follow the below steps:

  1. Install Visual Studio
    Node.js Tools for Visual Studio supports Visual Studio 2012 Update 4, Visual Studio 2013 Update 4 and higher. It also support community version of Visual Studio. Visual Studio Community is a free, fully featured, and extensible IDE for individual developers, open source projects, academic research, education, and small professional teams. Create applications for Windows, Android, and iOS as well as web applications and cloud services. Build apps for any platform. Use designers, editors, debuggers, and profilers in a single tool. Access thousands of extensions and more. Go to Visual Studio download page and download which flavor of Visual Studio application you want to use.
  2. Install Node.js Tools for Visual Studio
    Node.js Tools for Visual Studio installs via msi installer and takes few minutes. Just download the appropriate version of the tools according to the Visual studio that you have installed. The latest release of tools is Node.js Tools 1.1.1 and if you have installed Visual Studio 2012 or 2013 then download tools that relevant to your Visual Studio installation.
    clip_image002_thumb[2]
    After downloading the tools follow the installation wizard to complete the installation. Currently I am using Visual Studio 2013 so I am using tools compatible with Visual Studio 2013.

    clip_image003_thumb[1]
    Click next and then accept License agreement to complete the installation.
  3. Install Node.js and Get Started with Node Tools for VS
    in last step, we need to install Node.js interpreter and Azure tools (for deployment). Actually Node.js Tools for Visual Studio requires a Node.js interpreter to be installed to work with Node.js. Node.js is built for 32-bit and 64-bit architectures.
    Node.js (x86): https://nodejs.org/dist/v0.12.7/node-v0.12.7-x86.msi
    Node.js (x64): https://nodejs.org/dist/v0.12.7/x64/node-v0.12.7-x64.msi
    Azure Tools:
    Azure Tools for VS 2015: http://go.microsoft.com/fwlink/?LinkId=534216
    Azure Tools for VS 2013: http://go.microsoft.com/fwlink/p/?linkid=323510
    Azure Tools for VS 2012: http://go.microsoft.com/fwlink/p/?linkid=323511

Now we are ready to start working with Node.js in Visual Studio and going to see the installed temples for the Node.js projects.
To create a project, Select New Project from File menu. You will find Node.js templates in Installed Templates under JavaScript section. Click on Node.js and you will find several template to create Node.js projects.

clip_image005_thumb[2]

Select “Blank Node.js Web Application”. Enter a project name “NodejsWebAppTest” and location and click OK.

Once Visual Studio completes the process to create the project then it opens “server.js” file in the editor. It is just like a program which prints “Hello world” on the console.

var http = require('http');
var port = process.env.port || 1337;
http.createServer(function (req, res) {
    res.writeHead(200, { 'Content-Type': 'text/plain' });
    res.end('Hello World\n');
}).listen(port);

Now press F5 to run the application in browser. In my case what happened, I missed the step 3 – Installing Node.js. Due to this reason an Information dialog appear on my screen telling that you have not installed Node.js.
clip_image006_thumb[1]

Then I have to download Node.js and install it before running this application again. Here are the steps to install Node.js:

  1. Run the downloaded application and it will popup below welcome screen. Click Next.
    clip_image007_thumb[1]
  2. Accept License agreement to complete this step and then click Next.
    clip_image009_thumb[1]
  3. After this step it will ask you to specify the destination folder where it should be installed.
    clip_image011_thumb[1]
    This is global installation of Node.js which is referenced in the projects. We can specify the path to a local interpreter in each of your Node.js projects.
  4. After that click next and at last step, click install to start installation process.
    clip_image013_thumb[1]

When this process complete then again try to run the application. Just press F5 and you will see the results in the browser.

clip_image015_thumb[1]

Conclusion:
Now we have a Node.js development environment up and running in Visual Studio. There are lots features included in the IDE for development of Node.js as we are debugging a C# code. E.g. Debugging, IntelliSense, Profiling and Interactive windows also.