Real-Time Speech Translation with Azure: A Quick Guide

Introduction

The Azure Speech Translation service enables real-time, multi-language speech-to-speech and speech-to-text translation of audio streams. In this article, you will learn how to run an application to translate speech from one language to text in another language using Azure’s powerful tools.

Objective

By the end of this article, you will be able to create and deploy an application that translates speech from one language to text in another language.

Step 1: Creating a New Azure Cognitive Services Resource Using Azure Portal

Task 1: Create Azure Cognitive Speech Service Resource

  1. Open a tab in your browser and go to the Speech Services page. If prompted, sign in with your Azure credentials.

  2. On the Create page, provide the following information and click on Review + create:

    • Subscription: Select your subscription (this will be selected by default).
    • Resource group: Create a new group named azcogntv-rg1. Click on OK.
    • Region: East US
    • Name: CognitiveSpeechServicesResource
    • Pricing tier: Free F0

    Create Speech Service

    Create Speech Service

  3. Once the validation passes, click on Create.

    Validation Passed

  4. Wait for the deployment to complete, then click on Go to resource.

    Deployment Complete

  5. Click on Keys and Endpoint from the left navigation menu. Copy and save Key 1 and Endpoint values in a notepad for later use.

    Keys and Endpoint

Task 2: Create Azure Cognitive Language Service Resource

  1. Open a new browser tab and go to the Language Services page. Sign in with your Azure credentials.

  2. Without selecting any option on the page, click on Continue to create your resource.

    Continue to Create Resource

  3. Update with the following details and then click on Review + Create:

    • Subscription: Your Azure subscription
    • Resource Group: Select azcogntv-rg1
    • Region: East US
    • Name: CognitivelanguageResourceXX (Replace XX with any random number)
    • Pricing tier: Free (F0)
    • Select checkbox: By checking this box, I certify that I have reviewed and acknowledged the Responsible AI Notice terms.

    Create Language Service Create Language Service

  4. Review the resource details and then click on Create.

    Review and Create

  5. Wait for the deployment to complete, and once successful, click on Go to resource group.

    Deployment Successful

  6. Click on CognitiveLanguageResource.

    Cognitive Language Resource

  7. Click on Keys and Endpoints > Show keys. Copy Key 1 and endpoint values and save them in a notepad for later use.

    Keys and Endpoints

Step 2: Recognizing and Translating Speech to Text

Task 1: Set Environment Variables

Your application must be authenticated to access Cognitive Services resources. Use environment variables to store your credentials securely.

  1. Open Command Prompt and run mkdir Speech-to-Text to create a directory. Then run cd Speech-to-Text to navigate into it.

    mkdir Speech-to-Text
    cd Speech-to-Text
    
  2. To set the SPEECH_KEY environment variable, replace your-key with one of the keys for your resource saved earlier.

    setx SPEECH_KEY your-key
    setx SPEECH_REGION eastus
    

    Set Environment Variables

  3. After adding the environment variables, restart any running programs that need to read the environment variable, including the console window. Close the Command Prompt and open it again.

Task 2: Translate Speech from a Microphone

  1. Open Command Prompt, navigate to your directory (cd Speech-to-Text), and create a console application with the .NET CLI.

    dotnet new console
    

    Create Console App

  2. Install the Speech SDK in your new project with the .NET CLI.

    dotnet add package Microsoft.CognitiveServices.Speech
    

    Install Speech SDK

  3. Open the Program.cs file in Notepad from the Speech-to-Text project folder. Replace the contents of Program.cs with the following code:

    using System;
    using System.IO;
    using System.Threading.Tasks;
    using Microsoft.CognitiveServices.Speech;
    using Microsoft.CognitiveServices.Speech.Audio;
    using Microsoft.CognitiveServices.Speech.Translation;
    
    class Program
    {
        // This example requires environment variables named "SPEECH_KEY" and "SPEECH_REGION"
        static string speechKey = Environment.GetEnvironmentVariable("SPEECH_KEY");
        static string speechRegion = Environment.GetEnvironmentVariable("SPEECH_REGION");
    
        static void OutputSpeechRecognitionResult(TranslationRecognitionResult translationRecognitionResult)
        {
            switch (translationRecognitionResult.Reason)
            {
                case ResultReason.TranslatedSpeech:
                    Console.WriteLine($"RECOGNIZED: Text={translationRecognitionResult.Text}");
                    foreach (var element in translationRecognitionResult.Translations)
                    {
                        Console.WriteLine($"TRANSLATED into '{element.Key}': {element.Value}");
                    }
                    break;
                case ResultReason.NoMatch:
                    Console.WriteLine($"NOMATCH: Speech could not be recognized.");
                    break;
                case ResultReason.Canceled:
                    var cancellation = CancellationDetails.FromResult(translationRecognitionResult);
                    Console.WriteLine($"CANCELED: Reason={cancellation.Reason}");
    
                    if (cancellation.Reason == CancellationReason.Error)
                    {
                        Console.WriteLine($"CANCELED: ErrorCode={cancellation.ErrorCode}");
                        Console.WriteLine($"CANCELED: ErrorDetails={cancellation.ErrorDetails}");
                        Console.WriteLine($"CANCELED: Did you set the speech resource key and region values?");
                    }
                    break;
            }
        }
    
        async static Task Main(string[] args)
        {
            var speechTranslationConfig = SpeechTranslationConfig.FromSubscription(speechKey, speechRegion);
            speechTranslationConfig.SpeechRecognitionLanguage = "en-US";
            speechTranslationConfig.AddTargetLanguage("it");
    
            using var audioConfig = AudioConfig.FromDefaultMicrophoneInput();
            using var translationRecognizer = new TranslationRecognizer(speechTranslationConfig, audioConfig);
    
            Console.WriteLine("Speak into your microphone.");
            var translationRecognitionResult = await translationRecognizer.RecognizeOnceAsync();
            OutputSpeechRecognitionResult(translationRecognitionResult);
        }
    }
    
  4. Run your new console application to start speech recognition from a microphone:

    dotnet run
    
  5. Speak into your microphone when prompted. What you speak should be output as translated text in the target language:

    Speak this: The Speech service provides speech-to-text and text-to-speech capabilities with an Azure Speech resource and then press Enter.
    

    Speak Into Microphone

Conclusion

In this article, you translated speech from a microphone to a different language by updating the code in the Program.cs file. This powerful feature of Azure Cognitive Services allows for seamless and real-time translation, making it a valuable tool for various applications and industries.

Source Code

Unleashing the Power of Azure AI: A Comprehensive Guide to Text-to-Speech Applications

Introduction:

In the dynamic landscape of application development, efficiency and cost-effectiveness are paramount. For developers working on projects that involve video narration, traditional methods of hiring vocal talent and managing studio resources can be both cumbersome and expensive. Enter Microsoft’s Azure AI services, offering a suite of APIs that empower developers to integrate cutting-edge text-to-speech capabilities into their applications. In this comprehensive guide, we’ll delve into the intricacies of Azure AI, providing step-by-step instructions and code snippets to help you harness its full potential for creating text-to-speech applications.

Objective:

  • Establish an Azure AI services account
  • Develop a command-line application for text-to-speech conversion using plain text
  • Provide detailed insights and code snippets for each stage of the process

Creating a Text-to-Speech Application using a Text File

Step 1: Creating an Azure AI Services Account

  1. Begin by navigating to the Azure portal and signing in with your credentials.
  2. Once logged in, locate the Azure AI services section and proceed to create a new account.

  3. In the Create Azure AI window, under the Basics tab, enter the following details and click on the Review+create button.

  4. In the Review+submit tab, once the Validation is Passed, click on the Create button.

  5. Wait for the deployment to complete. The deployment will take around 2-3 minutes.
  6. After the deployment is completed, click on the Go to resource button.

  7. In your AzureAI-text-speechXX window, navigate to the Resource Management section and click on Keys and Endpoints.

  8. Configure the account settings according to your requirements.In the Keys and Endpoints page, copy KEY1, Region, and Endpoint values and paste them into a notepad as shown in the below image, then Save the notepad for later use.

Step 2: Create your text to speech application

  1. In the Azure portal, click on the [>_] (Cloud Shell) button at the top of the page to the right of the search box. A Cloud Shell pane will open at the bottom of the portal. The first time you open the Cloud Shell, you may be prompted to choose the type of shell you want to use (Bash or PowerShell). Select Bash. If you don’t see this option, then you can go ahead and skip this step.

    6wavjic5.jpg

  2. In You have no storage mounted dialog box, click on the Create storage.

    i8pikt8d.jpg

  3. Ensure the type of shell indicated on the top left of the Cloud Shell pane is switched to Bash. If it’s PowerShell, switch to Bash by using the drop-down menu.

    qbb1qkgf.jpg

  4. In the Cloud Shell on the right, create a directory for your application, then switch folders to your new folder. Enter the following command

    mkdir text-to-speech
    cd text-to-speech
    

    s1xdm90b.jpg

  5. Enter the following command to create a new .NET Core application. This command should take a few seconds to complete.

    dotnet new console

    lfvq8jtr.jpg

  6. When your .NET Core application has been created, add the Speech SDK package to your application. This command should take a few seconds to complete.

    dotnet add package Microsoft.CognitiveServices.Speech

    0wp2tdec.jpg

Step 3:Add the code for your text to speech application

  1. In the Cloud Shell on the right, open the Program.cs file using the following command.

        code Program.cs
    
  2. Replace the existing code with the following using statements, which enable the Azure AI Speech APIs for your application:

    using System.Text;
    using Microsoft.CognitiveServices.Speech;
    using Microsoft.CognitiveServices.Speech.Audio;
    

    uo6fzs9i.jpg

  3. Below the using statements, add the following code, which uses Azure AI Speech APIs to convert the contents of the text file you’ll create into a WAV file with the synthesized voice. Replace the azureKey and azureLocation values with the ones you copied in the last task 1.

    string azureKey = "ENTER YOUR KEY FROM THE FIRST EXERCISE";
    string azureLocation = "ENTER YOUR LOCATION FROM THE FIRST EXERCISE";
    string textFile = "Shakespeare.txt";
    string waveFile = "Shakespeare.wav";
        
    try
    {
        FileInfo fileInfo = new FileInfo(textFile);
        if (fileInfo.Exists)
        {
            string textContent = File.ReadAllText(fileInfo.FullName);
            var speechConfig = SpeechConfig.FromSubscription(azureKey, azureLocation);
            using var speechSynthesizer = new SpeechSynthesizer(speechConfig, null);
            var speechResult = await speechSynthesizer.SpeakTextAsync(textContent);
            using var audioDataStream = AudioDataStream.FromResult(speechResult);
            await audioDataStream.SaveToWaveFileAsync(waveFile);       
        }
    }
    catch (Exception ex)
    {
        Console.WriteLine(ex.Message);
        
    }
    

    nq1qs7oa.jpg

  4. This code uses your key and location to initialize a connection to Azure AI services, then reads the contents of the text file you\‘ll create, then uses the SpeakTextAsync() method of the speech synthesizer to convert the text to audio, then uses an audio stream to save the results to an audio file.
  5. To save your changes, press Ctrl+S to save the file, and then press Ctrl+Q to exit the editor

Step 4: Create a text file for your application to read

  1. In the Cloud Shell on the right, create a new text file that your application will read:

    code Shakespeare.txt

  2. When the code editor appears, enter the following text.

    The following quotes are from act 2, scene 7, of William Shakespeare's play "As You Like It."
        
    Thou seest we are not all alone unhappy:
    This wide and universal theatre
    Presents more woeful pageants than the scene
    Wherein we play in.
        
    All the world's a stage,
    And all the men and women merely players:
    They have their exits and their entrances;
    And one man in his time plays many parts,
    His acts being seven ages.
    

    dbjulb6c.jpg

  3. To save your changes, press Ctrl+S to save the file, and then press Ctrl+Q to exit the editor

Step 5:Run your application

  1. To run your application, use the following command in the Cloud Shell on the right:

    dotnet run

  2. If you don’t see any errors, your application has run successfully. To verify, you can just run the following command to get a list of files in the directory.

    ls -l

  3. You should get a response like the following example, and you should have the Shakespeare.wav file in the list of files

    ru8br6zg.jpg

Step 6: Listen to WAV file

To listen to the WAV file that your application created, you’ll first need to download it. To do so, you can just use the following steps.

  1. In the Cloud Shell on the right, use the following command to copy the WAV file to your temporary cloud drive:

    cp Shakespeare.wav ~/clouddrive

    dputtw5l.jpg

  2. In the Azure portal search box, type Storage account, then click on Storage account under Services.

    shyvtngw.jpg

  3. In the Storage accounts page, navigate and click on cloud storage account .

    eq320wdc.jpg

  4. In the Storage account page left-sided navigation menu, navigate to the Data storage section, then click on the File shares.

    p1b7cwn3.jpg

  5. Then select your cloudshellfilesXXX file share.

    xzj0kvaf.jpg

  6. When your cloudshellfilesXXX file shares page is displayed, select Browse, then select the Shakespeare.wav file, then select the Download icon.

    0yl4iwyw.jpg

    7godv6yk.jpg

  7. Download the Shakespeare.wav file to your computer, where you can listen to it with your operating system’s audio player.

    b1e0awv0.jpg

    w2pcp960.jpg

Conclusion:
Following the comprehensive instructions and the provided code snippets, you can seamlessly leverage Azure AI services to integrate text-to-speech capabilities into your applications. Azure AI empowers developers to enhance user experiences and streamline workflow processes. Embrace the power of Azure AI and unlock new possibilities for your projects.

Securing Your Microservices: Azure B2C Authentication in ASP.NET Core API with Ocelot API Gateway

Introduction:
Microservices architecture offers flexibility and scalability but also presents challenges in managing authentication and authorization across multiple services. In this blog post, we will explore how to secure your microservices using Azure B2C authentication in ASP.NET Core API with Ocelot API Gateway. We’ll start by configuring Azure B2C for authentication and then integrate it with our ASP.NET Core API through Ocelot.

Prerequisites:

  1. Azure Subscription: You’ll need an Azure subscription to create and configure Azure B2C resources.
  2. Create one now if you haven’t already created your own Azure AD B2C Tenant. You can use an existing Azure AD B2C tenant.
  3. Visual Studio or Visual Studio Code: We’ll use Visual Studio or Visual Studio Code to create and run the ASP.NET Core API project.
  4. .NET Core SDK: Ensure that the .NET Core SDK is installed on your development machine.
  5. Azure CLI (Optional): Azure CLI provides a command-line interface for interacting with Azure resources. It’s optional but can help manage Azure resources.

Step 1: App registrations

  1. Sign in to the Azure portal (https://portal.azure.com) using your Azure account credentials.
  2. Navigate to the Azure Active Directory service and select App registrations.
  3. Click on “+ New registration” to create a new application registration.
  4. Provide a name for your application, select the appropriate account type, and specify the redirect URI for authentication callbacks.
  5. After creating the application registration, note down the Application (client) ID and Directory (tenant) ID. 

Step 2: Create a client secret

  1. Once the application is registered, note the Application (client) ID and Directory (tenant) ID.
  2. If you are not on the application management screen, go to the Azure AD B2C—App registrations page and select the application you created.
  3. To access the Certificates & secrets settings, navigate to the Manage option and select it. The Certificates & secrets option can be found in the left menu.
  4. Under “Certificates & secrets”, generate a new client secret by clicking on New client secret.
  5. Enter a description of the client’s secret in the Description box. For example, Ocelotsecret.
  6. Under Expires, select a duration for which the secret is valid, and then click Add.
  7. Copy the secret’s Value for use in your client application code and save it securely.

Step 3: Configure scopes

  1. In the Azure AD B2C - App registrations page, select the application you created if you are not on the application management screen.
  2. Select App registrations. Select the OcelotTutorials application to open its Overview page.
  3. Under Manage, select Expose an API.
  4. Next to the Application ID URI, select the Add link.
  5. I have not changed the default GUID with my API, but you can replace the default value (a GUID) with an API and then select Save. The full URI is shown and should be in the format https://your-tenant-name.onmicrosoft.com/api. When your web application requests an access token for the API, it should add this URI as the prefix for each scope you define for the API.
  6. Under Scopes defined by this API, select Add a scope.

  7. Enter the following values to create a scope that defines read access to the API, then select Add scope:

    Scope name: ocelottutorial.read
    Admin consent display name: Read access to API Gateway API
    Admin consent description: Allows read access to the API Gateway API

Step 4: Grant permissions

  1. Select App registrations and then the web application that should have access to the API, such as OcelotTutorials.
  2. Under Manage, select API permissions.
  3. Under Configured permissions, select Add a permission.
  4. Select the My APIs tab.
  5. Select the API to which the web application should be granted access. For example, webapi1.
  6. Under Permission, expand API Name, and then select the scopes that you defined earlier. For example, ocelottutorial.read and ocelottutorial.write.
  7. Select Add permissions.
  8. Select Grant admin consent for (your tenant name).
  9. If you’re prompted to select an account, select your currently signed-in administrator account, or sign in with an account in your Azure AD B2C tenant that’s been assigned at least the Cloud application administrator role.
  10. Select Yes. 
  11. Select Refresh, and then verify that “Granted for …” appears under Status for both scopes.

Step 5: Enable ID token implicit grant

If you register this app and configure it with https://jwt.ms/ app for testing a user flow or custom policy, you need to enable the implicit grant flow in the app registration:

  1. In the left menu, under Manage, select Authentication.
  2. Under Implicit grant and hybrid flows, select both the Access tokens (used for implicit flows) and ID tokens (used for implicit and hybrid flows) checkboxes.
  3. Select Save. 

Step 6: Set Up Azure B2C Authentication in ASP.NET Core API

  1. Create 3 new ASP.NET Core Web API projects in Visual Studio or Visual Studio Code.
    Accounting.API
    Inventory.API
    ApiGateway

  2. Assign the ports to the API. ApiGateay 9000, Accounting.API 9001, Inventory.API 9002
     {
       "Urls": "http://localhost:9001",
       "Logging": {
         "LogLevel": {
           "Default": "Information",
           "Microsoft.AspNetCore": "Warning"
         }
       },
       "AllowedHosts": "*"
     }
    
  3. Install the necessary NuGet packages for Azure B2C authentication. Install the below packages in the ApiGateway project

     dotnet add package Microsoft.Identity.Web
     dotnet add package Ocelot
    
  4. Configure Azure B2C authentication in your Startup.cs file:

     builder.Services.AddMicrosoftIdentityWebApiAuthentication(builder.Configuration);
    
  5. Add the Azure B2C settings to your appsettings.json file:

     {
       "Urls": "http://localhost:9000",
       "Logging": {
         "LogLevel": {
           "Default": "Information",
           "Microsoft.AspNetCore": "Warning"
         }
       },
       "AllowedHosts": "*",
       "AzureAd": {
         "Instance": "https://login.microsoftonline.com/",
         "Domain": "http://localhost:9000/",
         "TenantId": "",
         "ClientId": ""
       }
     }
    
  6. Ensure that the authentication middleware is added to the request processing pipeline in the Configure method of Startup.cs:

     app.UseAuthentication(); // Place UseAuthentication before UseOcelot
     app.UseAuthorization(); // Place UseAuthorization before UseAuthentication
    
  7. Add the ocelot.json file to the the ApiGateway with the below configuration
     {
       "Routes": [
         {
           "DownstreamPathTemplate": "/api/values",
           "DownstreamScheme": "http",
           "DownstreamHostAndPorts": [
             {
               "Host": "localhost",
               "Port": 9001
             }
           ],
           "UpstreamPathTemplate": "/accounting",
           "UpstreamHttpMethod": [ "GET" ],
           "AuthenticationOptions": {
             "AuthenticationProviderKey": "Bearer",
             "AllowedScopes": []
           }
         },
        
         {
           "DownstreamPathTemplate": "/api/values",
           "DownstreamScheme": "http",
           "DownstreamHostAndPorts": [
             {
               "Host": "localhost",
               "Port": 9002
             }
           ],
           "UpstreamPathTemplate": "/inventory",
           "UpstreamHttpMethod": [ "GET" ],
           "AuthenticationOptions": {
             "AuthenticationProviderKey": "Bearer",
             "AllowedScopes": []
           }
         }    
       ],
       "GlobalConfiguration": {
         "BaseUrl": "http://localhost:9000"
       }
     } 
    
  8. Added ocelot configuration to the services
    // Ocelot configuration
    builder.Configuration.AddJsonFile("ocelot.json", optional: false, reloadOnChange: true);
    builder.Services.AddOcelot(builder.Configuration);
    
  9. Added Ocelot to the middleware pipeline in the end.
    app.UseAuthentication(); // Place UseAuthentication before UseOcelot
    app.UseAuthorization(); // Place UseAuthorization before UseAuthentication
    app.MapControllers();
    app.UseOcelot().Wait();
    app.Run();
    

Step 7: Testing authentication

To Test this, refer to this tutorial OAuth 2.0 authorization code flow in Azure Active Directory B2C

  1. Replace the required fields and use the below URL in the browser to get the code to fetch the token. https://login.microsoftonline.com/{tenant}/oauth2/v2.0/authorize?client_id={client id}&response_type=code&response_mode=query&scope={scope uri}&state=007 

  2. Open Postman and use the returned code to generate the token. See the image below to check the URL and the required fields to get the token.
    https://login.microsoftonline.com/{tenant}/oauth2/v2.0/token

  3. Now we are ready to call our API Gateway with the token. 

Conclusion:
In this blog post, we’ve covered the first part of securing your microservices architecture using Azure B2C authentication. We walked through the process of configuring Azure B2C for authentication, including creating a tenant, setting up user flows (policies), and integrating Azure B2C authentication into an ASP.NET Core API project. In the next part of this series, we’ll explore how to integrate Azure B2C authentication with Ocelot API Gateway for centralized authentication and authorization management across microservices.

References:
Tutorial: Register a web application in Azure Active Directory B2C
Add a web API application to your Azure Active Directory B2C tenant

Source Code

Containerizing a .NET application

What is Docker?

From Wikipedia:
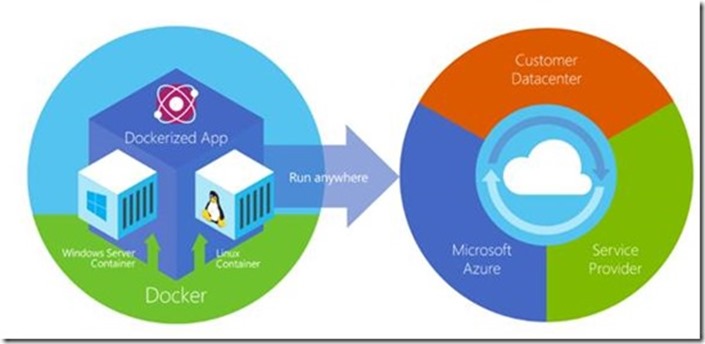
Docker is a computer program that performs operating-system-level virtualization, also known as "containerization". It was first released in 2013 and is developed by Docker, Inc.

Docker is used to run software packages called "containers". Containers are isolated from each other and bundle their own application, tools, libraries and configuration files; they can communicate with each other through well-defined channels.

All containers are run by a single operating system kernel and are thus more lightweight than virtual machines. Containers are created from "images" that specify their precise contents. Images are often created by combining and modifying standard images downloaded from public repositories.

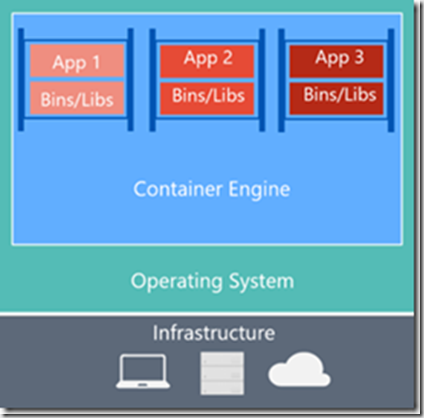
Unification of container technology

  1. A set of command-line tools to work with containers
  2. A unified way to build Container images
  3. A unified way of maintaining images in a registry
  4. A daemon process that manages the images & networking on a host machine
clip_image001

from: Microsoft doc

What Is a Container?

A container is an isolated, resource controlled, and portable operating environment. A container provides a place where an application can run without affecting the rest of the system and without the system affecting the application.

If you were inside a container, it looks very much like you are inside a freshly installed physical computer or a virtual machine.

Containers are compared to virtual machines, but they are completely different technology.

Below are the benefits of containers over Virtual machines:

  1. Containers provide the isolation of a virtual machine with the lightweight process. Container provides almost the same level of isolation as you see in a virtual machine but is very lightweight in terms of overhead and start-up time.
  2. You can see inside a container and also make changes to it but in case of Virtual machines you have to first start the VM to the Virtual machine architecture and data. You can even make changes in your container, and then the isolation will ensure that nobody else but you can see the changes that you've made.
  3. The container will enable you to fully utilize the host machine resources e.g. CPU, memory, disk, and networking.
  4. Containers does not pre-allocate any resources. It is very light weight comparable to a process. If you run multiple containers on the same host machine, then these are fully isolated from each other and the host.

Containers vs. Virtual Machines

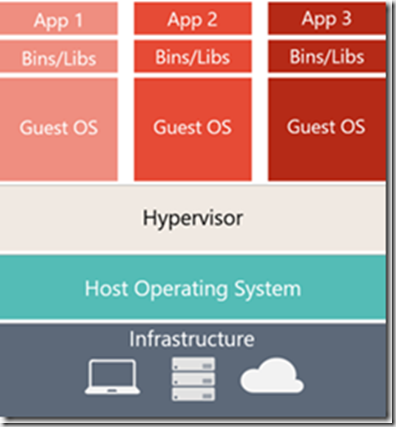
At first look containers and Virtual machines look similar because both uses the hardware and the host operating system. You can run applications on the host operating system, and we can have virtual machines and Containers on the host as well.

Virtual machine has its own operating system and separate application on it. On another hand still have the hardware and, of course, the host operating system interact with the kernel which is responsible for interacting with the hardware handling scheduling of different processes and managing resources like virtual management and CPU cycles.

Containers let us to run our application by sharing the operating system kernel. This kernel has edit capabilities to create isolation between the different containers and never share anything else between the containers. Although Virtual machine provide isolation but using Hypervisor. Virtual machine has its own operating system and applications.

Setting up the Virtual machine operating system and application is a long task but setting up the containers using the images is a faster process. It just requires an image and configure your application on container using these predefined container images.

Container provide faster bootup time rather than the virtual machine. They are up and running within few seconds.

Containers

Virtual Machines

clip_image002

clip_image003

Source: Run Windows Containers

Containerise a .NET application

To create custom image for your application, we require docker tools. In this article, you will know that how to push your containerized application to the docker repository and to Azure App Service.

You can also deploy your application’s container from Visual Studio to Azure Container Registry, and then run it in App Service.

Now it is time to start creating a container image for ASP.NET MVC application using the windows containers.

Prerequisites

To create a .NET application container image, we require below prerequisites tools:

o Install the latest updates in Visual Studio by clicking Help > Check for Updates.

o Add the workloads in Visual Studio by clicking Tools > Get Tools and Features

Note: In this article, Visual Studio 2019 Preview is used to create to the ASP.NET MVC application.

Create/Open an ASP.NET web app


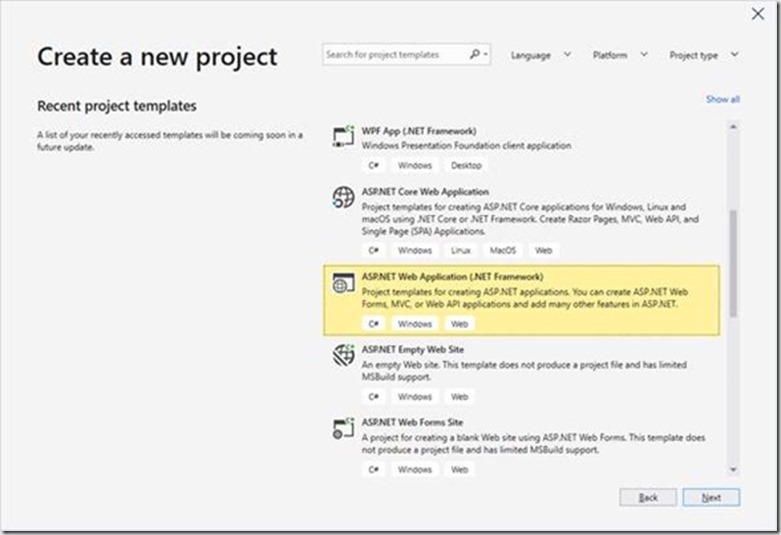
In Visual Studio, create a ASP.NET MVC project by selecting File > New > Project.

In the New Project dialog, select the template Visual C# > Web > ASP.NET Web Application (.NET Framework).
clip_image005

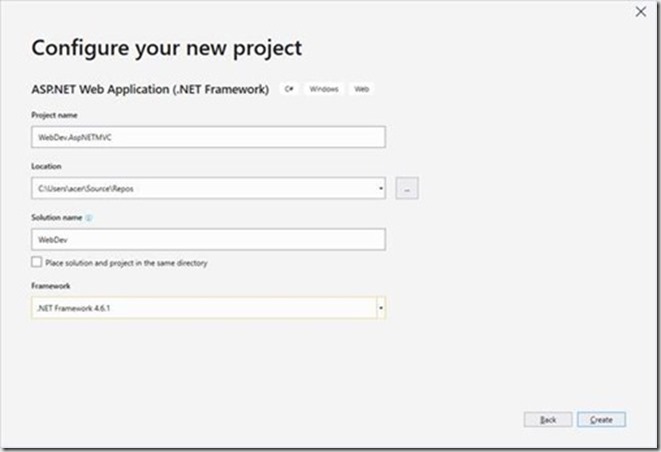
Define the solution and the project name then press create.
clip_image006

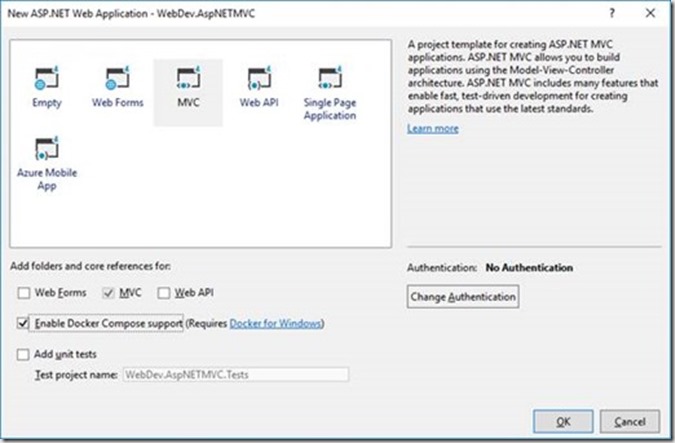
select the MVC template and do not forgot to select Enable Docker Compose support.

Select OK to continue.
clip_image007

Once the project is setup then you will find Dockerfile under the project. It defines the structure of the container and which base image will be used to host your application.
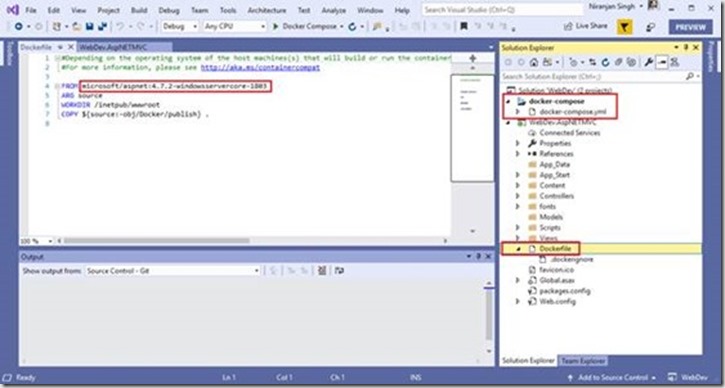
clip_image008

Update the docker file with Azure App Server supported base image so the update docker file would be as below:

FROM microsoft/aspnet:4.7.1
ARG source
WORKDIR /inetpub/wwwroot

COPY ${source:-obj/Docker/publish} .

Here is the list of  supported base image.

Create and Publish to Docker Hub

In the Solution Explorer, right-click the created project and select Publish.
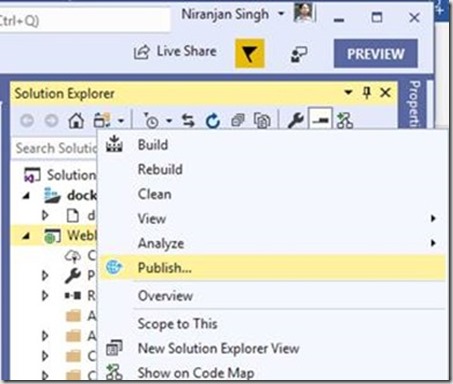
clip_image009

Select Container Registry > Docker Hub > Publish. There is another option also available. You can directly publish this application to Azure App Server or Azure Container registry. Although, we took the publish path from docker registry to Azure App service.
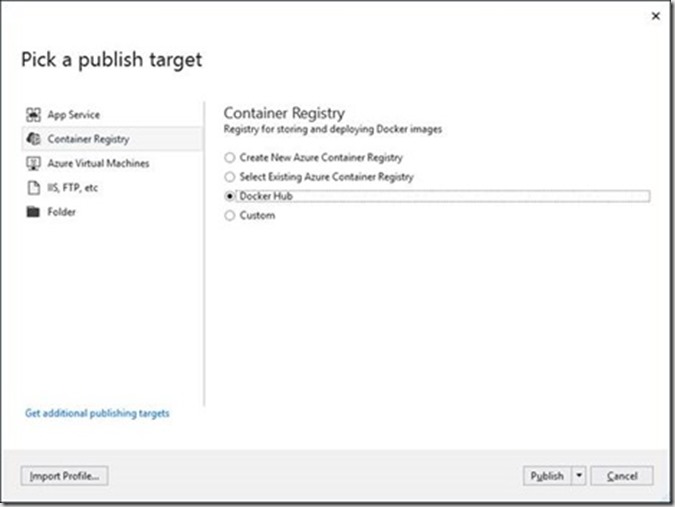
clip_image010

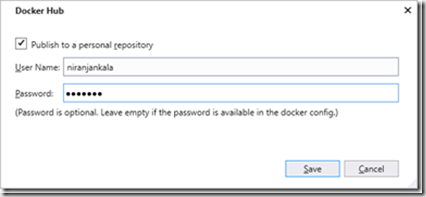
Enter your docker credentials:

clip_image011

Now publish process create the docker image using the base image and bundle your application in to the image.
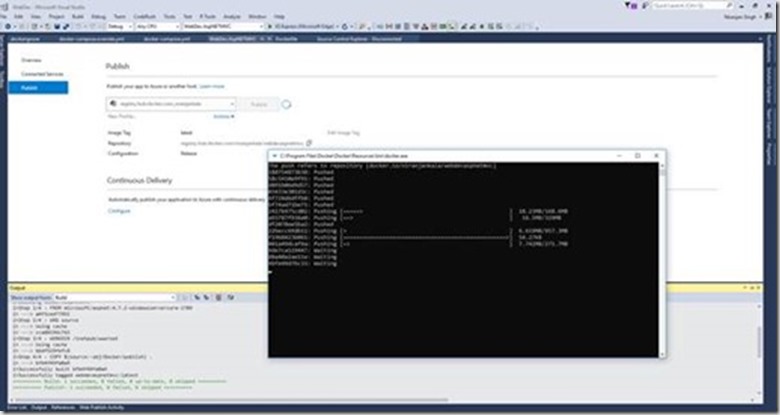
clip_image012

When process complete you will be able to see the pushed docker image in the docker registry at docker hub.
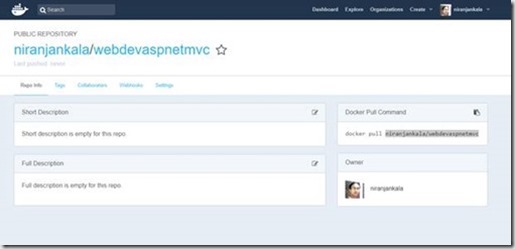
clip_image013

Now setup the Azure Container service to use this docker image.

Create a Windows container app

Sign in to the Azure portal at https://portal.azure.com with your account.

  1. Choose Create a resource in the upper left-hand corner of the Azure portal.
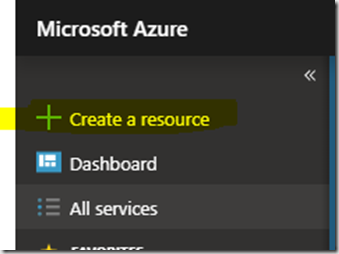
    clip_image014
  2. In the search box above the list of Azure Marketplace resources, search Containers and then select Web App for Containers.
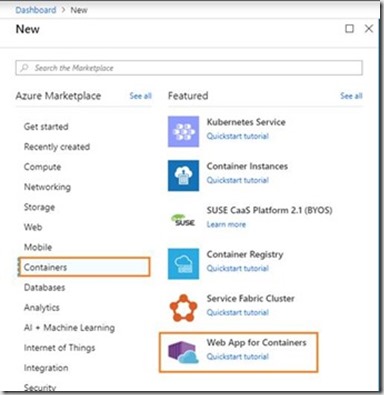
    clip_image015
  3. Provide an app name and let the default option create a new resource group selected, and click Windows in the OS box.
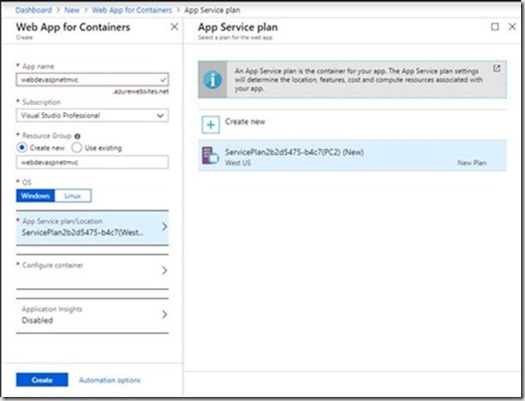
    clip_image016
  4. By default, wizard Create an App Service plan but you can create your custom by clicking App Service plan/Location > Create new. Give the new plan a name, accept the defaults, and click OK.
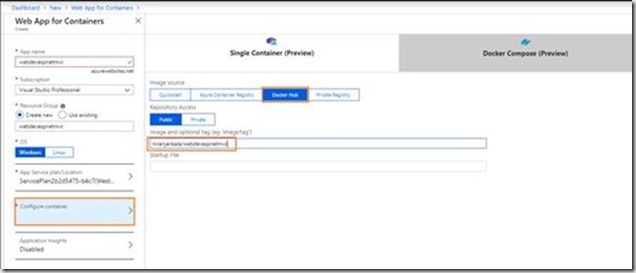
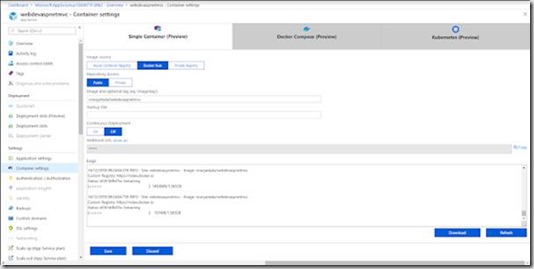
  5. Now you will configure the container and provide the detail of the create docker image in the step. Click Configure container. In Image and optional tag, use the repository name you created in Publish to Docker Hub step, then click OK. In previous step I have create repository with name “niranjankala\webdevaspnetmvc” as you can see in above docker hub image.clip_image017
    There is an option for the Kubernetes but Kubernetes is only supported on Linux operating system-based applications.
  6. Click Create and wait for Azure to create the required resources.

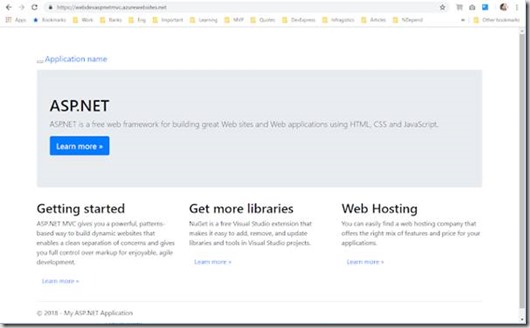
Once the deployment complete you are ready to browse your containerized application. Now browse “webdevaspnetmvc.azuresites.net” or whatever application name you chosen during the web app service setup process.
clip_image019

clip_image021

Now your containerized application is up and running.