Containerizing a .NET application

What is Docker?

From Wikipedia:
Docker is a computer program that performs operating-system-level virtualization, also known as "containerization". It was first released in 2013 and is developed by Docker, Inc.

Docker is used to run software packages called "containers". Containers are isolated from each other and bundle their own application, tools, libraries and configuration files; they can communicate with each other through well-defined channels.

All containers are run by a single operating system kernel and are thus more lightweight than virtual machines. Containers are created from "images" that specify their precise contents. Images are often created by combining and modifying standard images downloaded from public repositories.

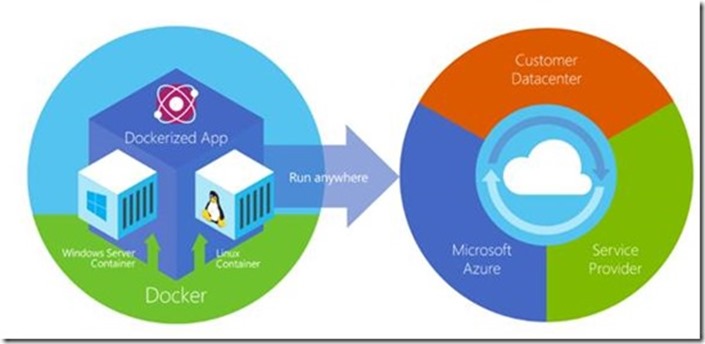
Unification of container technology

  1. A set of command-line tools to work with containers
  2. A unified way to build Container images
  3. A unified way of maintaining images in a registry
  4. A daemon process that manages the images & networking on a host machine
clip_image001

from: Microsoft doc

What Is a Container?

A container is an isolated, resource controlled, and portable operating environment. A container provides a place where an application can run without affecting the rest of the system and without the system affecting the application.

If you were inside a container, it looks very much like you are inside a freshly installed physical computer or a virtual machine.

Containers are compared to virtual machines, but they are completely different technology.

Below are the benefits of containers over Virtual machines:

  1. Containers provide the isolation of a virtual machine with the lightweight process. Container provides almost the same level of isolation as you see in a virtual machine but is very lightweight in terms of overhead and start-up time.
  2. You can see inside a container and also make changes to it but in case of Virtual machines you have to first start the VM to the Virtual machine architecture and data. You can even make changes in your container, and then the isolation will ensure that nobody else but you can see the changes that you've made.
  3. The container will enable you to fully utilize the host machine resources e.g. CPU, memory, disk, and networking.
  4. Containers does not pre-allocate any resources. It is very light weight comparable to a process. If you run multiple containers on the same host machine, then these are fully isolated from each other and the host.

Containers vs. Virtual Machines

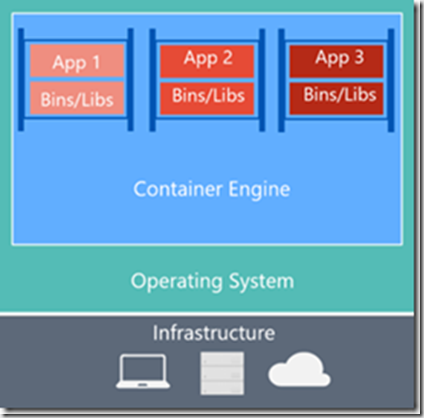
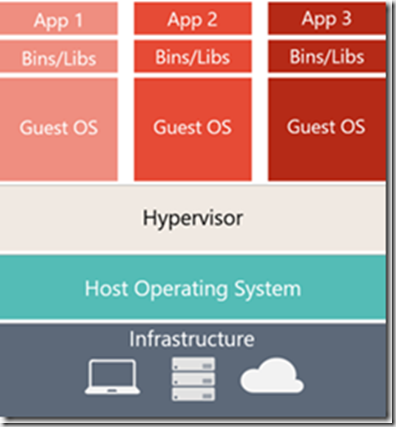
At first look containers and Virtual machines look similar because both uses the hardware and the host operating system. You can run applications on the host operating system, and we can have virtual machines and Containers on the host as well.

Virtual machine has its own operating system and separate application on it. On another hand still have the hardware and, of course, the host operating system interact with the kernel which is responsible for interacting with the hardware handling scheduling of different processes and managing resources like virtual management and CPU cycles.

Containers let us to run our application by sharing the operating system kernel. This kernel has edit capabilities to create isolation between the different containers and never share anything else between the containers. Although Virtual machine provide isolation but using Hypervisor. Virtual machine has its own operating system and applications.

Setting up the Virtual machine operating system and application is a long task but setting up the containers using the images is a faster process. It just requires an image and configure your application on container using these predefined container images.

Container provide faster bootup time rather than the virtual machine. They are up and running within few seconds.

Containers

Virtual Machines

clip_image002

clip_image003

Source: Run Windows Containers

Containerise a .NET application

To create custom image for your application, we require docker tools. In this article, you will know that how to push your containerized application to the docker repository and to Azure App Service.

You can also deploy your application’s container from Visual Studio to Azure Container Registry, and then run it in App Service.

Now it is time to start creating a container image for ASP.NET MVC application using the windows containers.

Prerequisites

To create a .NET application container image, we require below prerequisites tools:

o Install the latest updates in Visual Studio by clicking Help > Check for Updates.

o Add the workloads in Visual Studio by clicking Tools > Get Tools and Features

Note: In this article, Visual Studio 2019 Preview is used to create to the ASP.NET MVC application.

Create/Open an ASP.NET web app


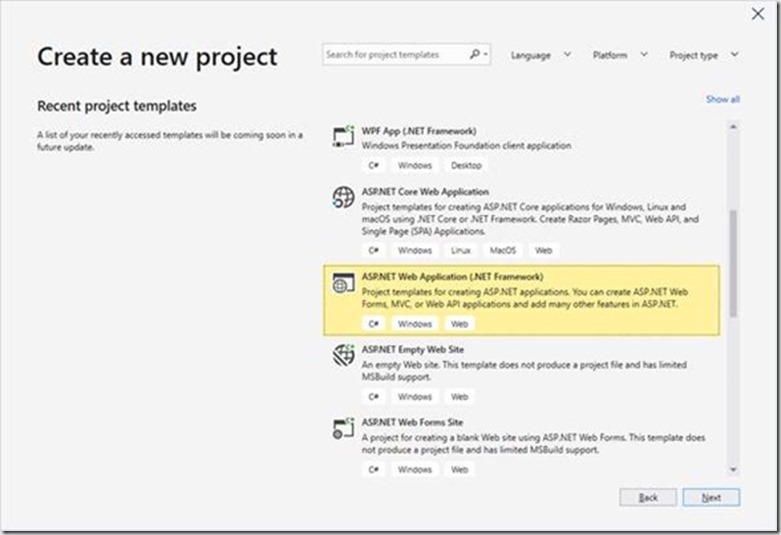
In Visual Studio, create a ASP.NET MVC project by selecting File > New > Project.

In the New Project dialog, select the template Visual C# > Web > ASP.NET Web Application (.NET Framework).
clip_image005

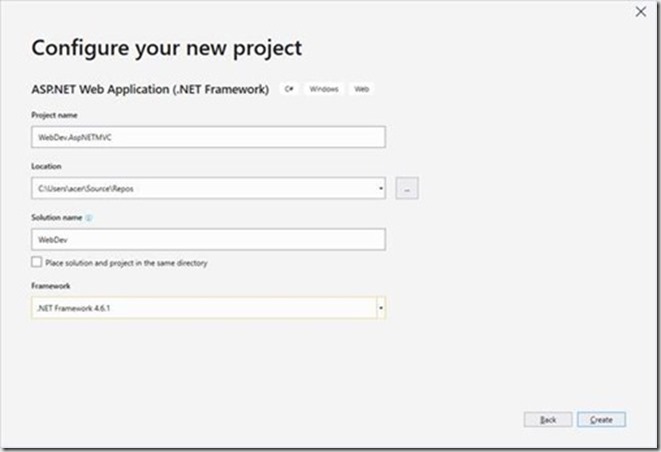
Define the solution and the project name then press create.
clip_image006

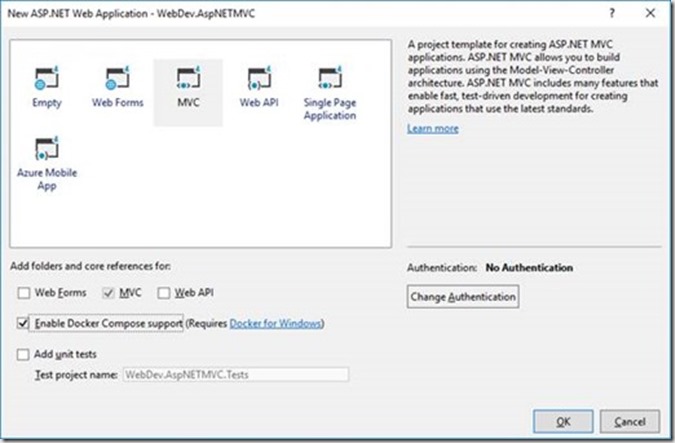
select the MVC template and do not forgot to select Enable Docker Compose support.

Select OK to continue.
clip_image007

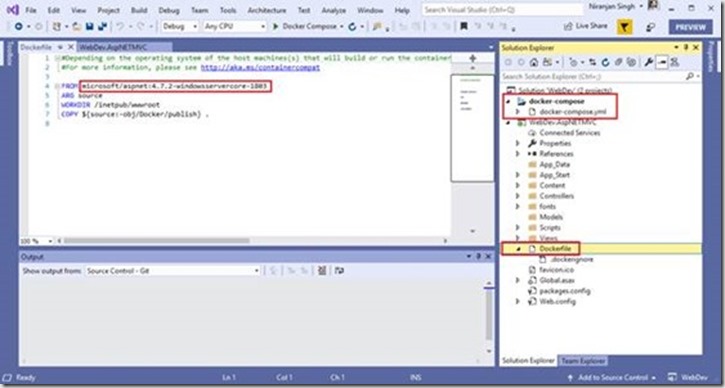
Once the project is setup then you will find Dockerfile under the project. It defines the structure of the container and which base image will be used to host your application.
clip_image008

Update the docker file with Azure App Server supported base image so the update docker file would be as below:

FROM microsoft/aspnet:4.7.1
ARG source
WORKDIR /inetpub/wwwroot

COPY ${source:-obj/Docker/publish} .

Here is the list of  supported base image.

Create and Publish to Docker Hub

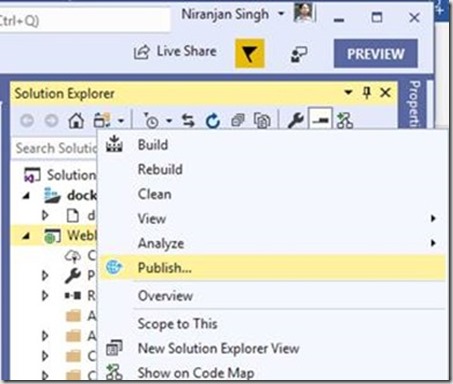
In the Solution Explorer, right-click the created project and select Publish.
clip_image009

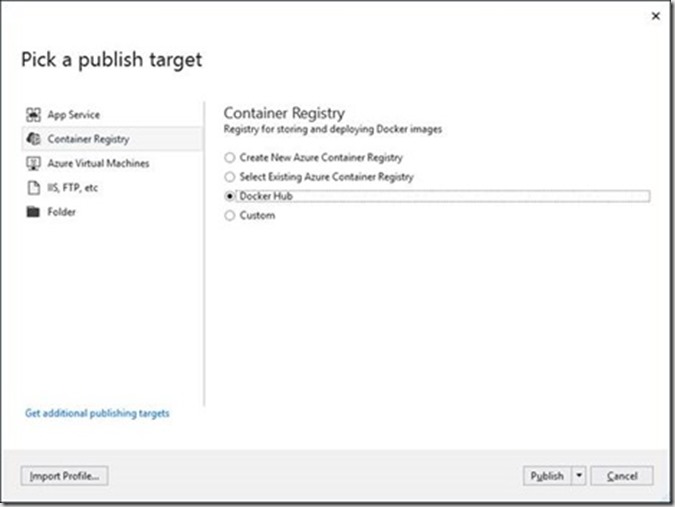
Select Container Registry > Docker Hub > Publish. There is another option also available. You can directly publish this application to Azure App Server or Azure Container registry. Although, we took the publish path from docker registry to Azure App service.
clip_image010

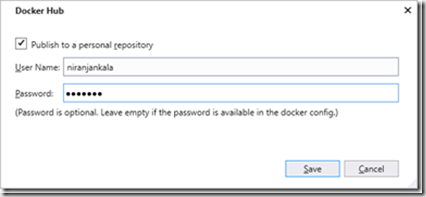
Enter your docker credentials:

clip_image011

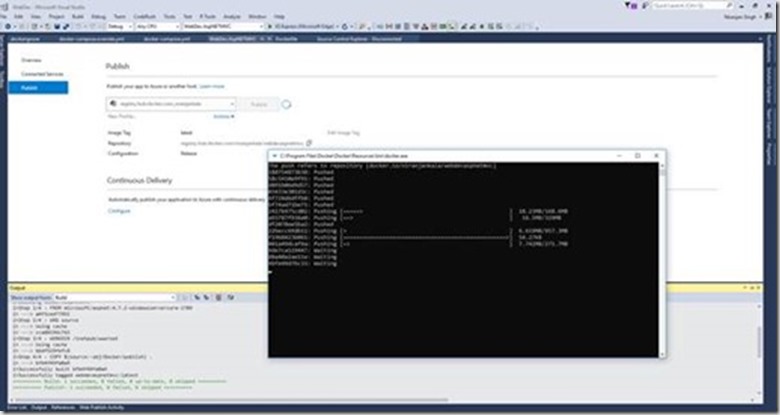
Now publish process create the docker image using the base image and bundle your application in to the image.
clip_image012

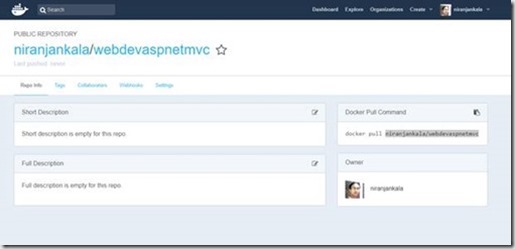
When process complete you will be able to see the pushed docker image in the docker registry at docker hub.
clip_image013

Now setup the Azure Container service to use this docker image.

Create a Windows container app

Sign in to the Azure portal at https://portal.azure.com with your account.

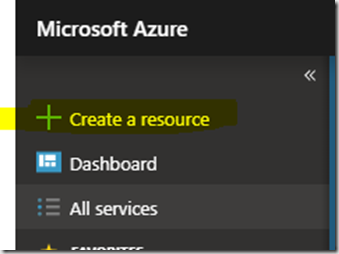
  1. Choose Create a resource in the upper left-hand corner of the Azure portal.
    clip_image014
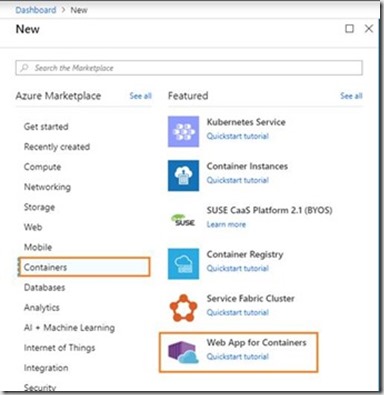
  2. In the search box above the list of Azure Marketplace resources, search Containers and then select Web App for Containers.
    clip_image015
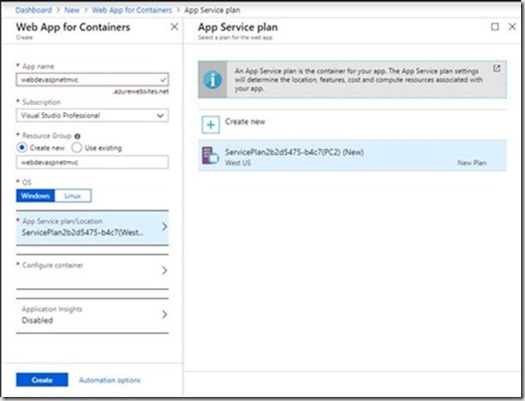
  3. Provide an app name and let the default option create a new resource group selected, and click Windows in the OS box.
    clip_image016
  4. By default, wizard Create an App Service plan but you can create your custom by clicking App Service plan/Location > Create new. Give the new plan a name, accept the defaults, and click OK.
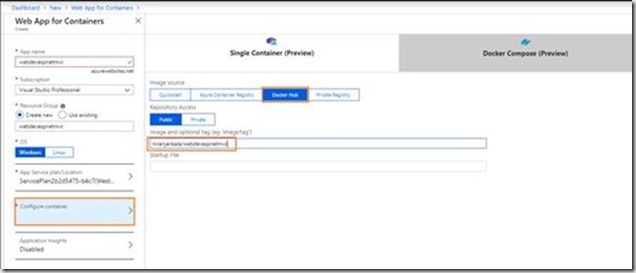
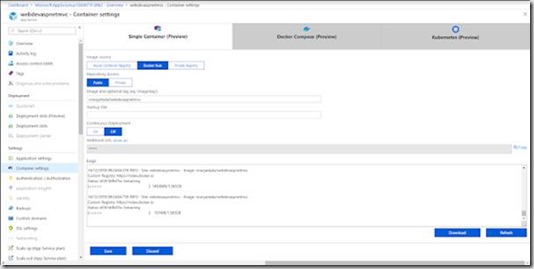
  5. Now you will configure the container and provide the detail of the create docker image in the step. Click Configure container. In Image and optional tag, use the repository name you created in Publish to Docker Hub step, then click OK. In previous step I have create repository with name “niranjankala\webdevaspnetmvc” as you can see in above docker hub image.clip_image017
    There is an option for the Kubernetes but Kubernetes is only supported on Linux operating system-based applications.
  6. Click Create and wait for Azure to create the required resources.

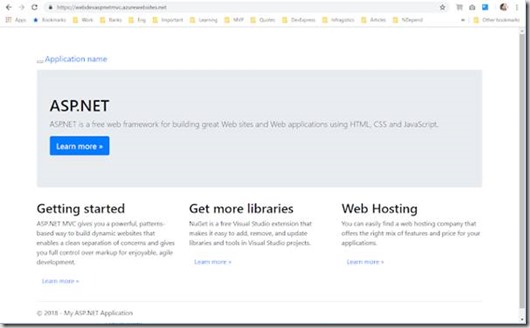
Once the deployment complete you are ready to browse your containerized application. Now browse “webdevaspnetmvc.azuresites.net” or whatever application name you chosen during the web app service setup process.
clip_image019

clip_image021

Now your containerized application is up and running.

Visual Studio 2019 with more developer productive features

Microsoft announced the availability of Visual Studio 2019 Preview 1 in the Microsoft Connect(); 2018  keynote. Download is now available for both Windows and Mac platform.

What New Features bring with Visual Studio 2019

Visual Studio 2019 launched with faster tooling, enhanced collaboration and productivity improvements. The public preview 1 includes a new start window experience to get developers into their code faster, a new search experience, increased coding space smarter debugging, AI-powered assistance with IntelliCode, increased refactoring capabilities, and built-in access to Visual Studio Live Share.

clip_image002

Below the list of improved features

Source: Visual Studio 2019 Preview

Intellicode and One-click Code Cleanup

Drive code maintainability and fix warnings and suggestions with one-click code clean up, and use more refactoring capabilities than ever.
clip_image004

Live Share and PR Experience

you can collaborate in real-time whether your team members are working from home or across the world. Live Share installs by default and supports all projects, app types, and languages.

clip_image006

When you’re ready to check in your code, try the new pull request (PR) experience. It lets you and your team quickly review code (even run the app and debug!) from Azure Repos directly in the IDE.

Search Window and Snapshot Debugger

Improved stepping performance and support for large C++ apps enhance your debugging experience. New search capabilities in Autos, Locals, and Watch windows help you find objects or values, or visualize Collections.

clip_image008

With new app targets for Snapshot Debugger, you can debug issues in a production environment without impacting performance or stability. It takes a snapshot of the environment so you can inspect objects and call stacks.

clip_image009

Connected Services and Azure App Services

Configure your applications to use Azure services with just a few clicks. You can create new instances of Azure Storage, Key Vault, Cognitive Services, and more without ever leaving the IDE.

clip_image010

Start developing your code locally and offline until you are ready to deploy. Then publish directly to Azure in minutes, not hours, targeting virtual machines, containers, or Azure App Service.

clip_image012

.NET Core 3 and C++ Improvements

Visual Studio 2019 gives your current projects the full-fledged support they need across any platform including desktop, web, mobile, and games. It also supports .NET Core 3, one of the fastest frameworks on the planet.

clip_image013

With support for Linux targeting, and CMake and ClangFormat support, Visual Studio 2019 is the most complete IDE for C++ developers. C# and F# developers can build native cross-platform apps with Xamarin.


clip_image015

Happy Coding

AI-Assisted development with IntelliCode in Visual Studio Code

Recently, I come across the MSDN magazine article “Java Gets AI-Assisted IntelliCode in Visual Studio Code Editor”. It is great that the Microsoft Visual Code, light weight open source editor is now enabled with features which was part of the Visual Studio 2017.

It is not alone support Microsoft support languages e.g. C#, VB.NET also the Java and Python too.

What is IntelliCode?

Definition from: Introducing Visual Studio IntelliCode

IntelliCode is a set of AI-assisted capabilities that improve developer productivity with features like contextual IntelliSense, inference and enforcement for code styles, and focused reviews for your pull requests (PRs.)

Visual Studio IntelliCode – extension is in Preview and the Visual Studio IntelliCode extension provides AI-assisted productivity features for Python, TypeScript/JavaScript and Java developers in Visual Studio Code, with insights based on understanding your code context combined with machine learning. It can be installed directly in Visual Studio code:

clip_image001

Little demo from MSDN article:

clip_image002

Happy Coding!

Enable code preview with the Visual Studio enhanced scroll bar

Introduction

This is the first time that I saw code preview through scrollbar in Visual Studio. I have use most of the Visual Studio IDE starting from Visual Studio 2002 and scrolling of code files done using the classic scrollbar.

Starting from Visual Studio 2013, an enhanced scrollbar feature is enabled but I was not aware of it till now. Recently I saw below code preview features through a wide scrollbar:

Enabling Visual Studio scrollbar code preview mode

By default, this feature is not enabled so that I have not used this cool feature before. Actually, it requires to switch the scrollbar mode and below are the steps to switch scrollbar mode:

  1. Open option using Tools menu and select “Options”
  2. In the options dialog select the Text Editor | All Languages | Scroll Bars node from left side menu
  3. Now change the scrollbar behavior to map mode and check the “Show Preview Tooltip” checkbox as shown in below image.

I found it a cool feature which enables the developer to view the see the code in tooltip by hovering on the scrollbar without scrolling down to the bottom of the code file.

You can find detailed information at Visual Studio scroll bar customization documentation.

Create/Update an offline installation of Visual Studio 2017

Introduction

In this article we learn that how to create an offline installer for Visual Studio 2017. Recently Visual Studio 2017 version 15.8 Released and then i have updated Visual Studio 2017 on my laptop. I have another machine which does not connect with high speed internet so I need to install Visual Studio through offline installer (ISO).

Microsoft designed Visual Studio 2017 installer to install specific modules (workload-based model) and allows to install minimal set of features to start development using Visual Studio.

Create Visual Studio 2017 offline installation media

Step 1 – Download the Visual Studio installer setup

It is recommended to use Visual Studio web installer because it will always install/ update to the latest version of the Visual Studio 2017.

Download the latest version of Visual Studio 2017 Web installer by clicking below links
Visual Studio Community 2017 | Visual Studio Professional 2017 | Visual Studio Enterprise 2017


Step 2 – Create/ Download installation setup files

To create updated version installation for Visual Studio, use the below command create or update the existing installation layout to a newer version. You don't have to specify any additional command-line parameters.

vs_enterprise.exe --layout d:\vs2017ent

It will create a complete local installation media for Visual Studio 2017 with all features and definitely it will take lots of time to download all the work loads.

You can also specify the language at the Visual Studio to download so that it will download installation files for the specified set of languages only

vs_enterprise.exe --layout d:\vs2017ent --lang en-US

In my case, I have already downloaded Visual Studio 2017 installation files earlier. This time I need to update this installation layout to transfer update on my offline computers.

Once the offline installation files saved at the specified location then transfer it on another computer and ready to install the Visual Studio 2017.

Click the vs_setup.exe file to start the installer then install the Visual Studio after selecting the required development environment features you want to install.

Clean up previous version obsolete package


During the update process of existing Visual Studio installation files, my computer drive gets full and some of the packages failed to download. I checked the installation layout folder and found that there are previous version packages also exists. I have removed few of them manually to complete the download process.

Visual Studio installations files folder size incrementally increase whenever we update the existing installation files. Visual Studio installation folder may have some obsolete packages that are no longer needed by the latest Visual Studio installation.

You can use the --clean option to remove obsolete packages from an offline cache folder.

Source of information: How to remove older versions from a layout

Step 1 – Find file path(s) to catalog manifest(s) that contain those obsolete packages

You can find the catalog manifests in an "Archive" folder in the offline layout cache. They are saved there when you update a layout. In the "Archive" folder, there is one or more "GUID" named folders, each of which contains an obsolete catalog manifest. The number of "GUID" folders should be the same as the number of updates made to your offline cache.

Step 2 - Run the “—clean” command by supplying the files paths to these catalogs

vs_enterprise.exe --layout d:\vs2017ent --lang en-US --clean d:\vs2017ent\Archive\d88a0497-7bee-42ad-8ea5-3361cd52e075\catalog.json


References:

Create an offline installation of Visual Studio 2017
Install Visual Studio 2017 on low bandwidth or unreliable network environments
Update a network-based installation of Visual Studio

SignalR – Create a simple application

SignalR is addition to the ASP.NET. It is started as an opensource project by some members of ASP.NET team. Due to its features and usability it is incorporated in the ASP.NET and officially become the part of the Microsoft ASP.NET.

SignalR enables you to do real-time communications between your browsers and server so that you push real-time updates to the browsers. Signal usage the technology that each browser support to enable real-time communication for example. If you are using the Internet Explorer 6 then used web pooling but in case of the current updated browser it used WebSocket.

Web pooling

clip_image002

In case of latest and updated clients, WebSocket make the real-time communication easy

clip_image004

clip_image006

Image create from - https://www.pubnub.com/learn/glossary/what-is-websocket/

SignalR does a quite bit more for the real-time communication. It is capable of communicating with multiple mobile and desktop clients.

It supports both ASP.NET and OWIN for open web interface for .NET. It can work with different Backplanes and using these Backplanes you can have multiple webserver which can in sync with each other. All of these keep real-time communication with different type of clients.

SignalR Components

clip_image008

For example, a client pushes a update to one of your webserver and that webserver communicates over the Backplanes to another web server which sends information down to a client using jQuery and html it is all setup for you through SignalR.

Let’s create a small SignalR example: This example is just for showing the functionality. In this example we just create static variable to know the active connections.

Open Visual studio and create an empty ASP.NET application

clip_image010

Then add a SignalR Hub Class, but there is another option is available “SignalR Persistent Connection Class” which something low level connection. SignalR Hub Class is high level implementation use. Now right click on the project in Solution Explorer and select New -> New Item to add a Hub Class named “ActiveConnectionCounter”.

clip_image012

clip_image014

Once you add this class file to the project then required references automatically added to the project e.g. jQuery and react JavaScript libraries.

clip_image015

Now the add static variable to keep the active connections and rename default create method name to “NotifyNewUser”. After that notify the all clients about the active connections change by specifying a dynamic method as shown in the below code snippet.

namespace WebDev.AspNetReact
{
    public class ActiveConnectionCounter : Hub
    {
        static int activeConnections = 0;
        public void NotifyNewUser()
        {
            activeConnections += 1;
            //Notify all users about the active users by passing value to a dynamic method
            Clients.All.onAtiveConnectionChanged(activeConnections);
        }
    }
}

Now time to trap the disconnected event so that we can notify about the disconnection of the any user. To do so override the OnDisconnected method and notify the all clients after decreasing the active connections.

public override Task OnDisconnected(bool stopCalled)
{
    activeConnections -= 1;
    //Notify all users about the active users by passing value to a dynamic method
    Clients.All.onAtiveConnectionChanged(activeConnections);
    return base.OnDisconnected(stopCalled);
} 

Now in implementation client call the method NotifyNewUser to notify the new user active on the website and client notified using the “onAtiveConnectionChanged” callback.

To complete the example, add a html page to the project using Project->Add New Item menu or by right click on project.

Add a <div> to show the active users count and required JavaScript libraries e.g. jQuery, jquery.singalR.

<!DOCTYPE html>
<html>
<head>
    <meta charset="utf-8" />
    <title></title>
</head>
<body>
    <script src="Scripts/jquery-3.3.1.min.js"></script>
    <script src="Scripts/jquery.signalR-2.2.2.min.js"></script>
    <div id="activeUserCount"></div>
 
</body>
</html>

After that add script to initiate the communication.

<script type="text/javascript">
    $(function () {
        var cn = $.hubConnection();
        
        var hub = cn.createHubProxy('activeConnectionCounter');
        hub.on('onAtiveConnectionChanged', function (i) {
            $('#activeUserCount').text(i);
        });
        cn.start(function () {
            //Invoke Server method name
            hub.invoke('NotifyNewUser');
        });
    });
</script>

Though we have created an empty ASP.NET project so we need to configure OWIN or map SignalR a startup. To do this create one Class with name Startup.cs under “App_Start” folder in the solution explorer.

using Owin;
namespace WebDev.AspNetReact
{
    public class Startup
    {
        public void Configuration(IAppBuilder app)
        {
            app.MapSignalR();
        }
    }
}

There are three way to configure the OWIN and they are described here - OWIN Startup Class Detection.

Now example is ready. Run the application and open the html page URL in different browsers.

clip_image017

Here we have created an example to start learning about the SignalR application and to know about the Visual Studio tool go through the tutorial.

Find example application code at here.

Upgrade SQL Server 2014 to SQL Server 2016/17

In previous article “SQL Server Installation Guide for Beginners” will help you do a clean install. However, it is for SQL Server 2005 but steps are most of same for the latest version of the SQL Server,

First prepare for upgrade SQL Server and check the Supported Version and Edition Upgrades for SQL Server 2017.

Along this consider to check “Hardware and Software Requirements for Installing SQL Server”.

The first would be Prepare for upgrade by running Data Migration Assistant. It will let you know that it there any obstacles in upgrade to SQL Server 2016/17. Here is an nice explanation and migration steps to SQL Server.

Mount/insert the SQL Server 2016/17 installation ISO or media. double-click Setup.exe. Now it will open the SQL Server installation center.

Upgrade SQL Server 2014 to SQL Server 2016/17

To upgrade an existing instance of SQL Server, click Installation in the left-hand navigation area, and then click “Upgrade from a previous version of SQL Server”.

clip_image002

On the next step enter product key for the SQL Sever version/edition that you have. If you have MSDN static key then the existing key will work for you.

clip_image004

At “Accept License terms” page select the I accept the license terms check box, and then click Next.

clip_image006

Now setup checks for the installation files and any update available.

clip_image008

After setup files validation it checks for the Upgrade Rules

clip_image010

if there are no rule errors then at the next step, select the instance to upgrade.

clip_image012

Select features that you want to install/remove. By default the features to upgrade will be preselected on the Select Features page.

clip_image014

On the “Instance Configuration” page, you need to specify the Instance ID for the instance of SQL
Server.
clip_image016

On next step, the” Server Configuration” page the default service accounts are displayed for SQL Server services.

clip_image018

Press next to proceed to the “Full-text upgrade” page. There are three options – Import, Rebuild, and Reset. Specify the upgrade options for the databases being upgraded. For more information, see Full-Text Search Upgrade Options. For my case I was upgrading from SQL Server 2014 so I decided to import the existing one.
clip_image020

Now it will check the "Feature Rules" in the next step and display the summary after validation.

clip_image022

In my case, there was an error related SQL Server analysis service.
clip_image024

To Resolve the issue, we need to start the analysis services. Follow this step by step article to resolve this SQL Server Analysis Services start issue.

clip_image026

Now setup wizard advances to the upgrade page which displays a tree view of installation options that were specified during Setup. Click Install to continue.

At this step required prerequisites installed for the selected features to upgrade.

clip_image028

Click on “Upgrade” button to start the upgrade process and It will show the progress information.

clip_image030

When the upgrade process completes then you will see the installed features status. Pressing OK button on the “Computer restart required” dialog to disappear it.

clip_image032

Press “Close” button to finish the upgrade process.

Now we have done with SQL Server upgrade process to SQL Server 2016 and 2017.

Fix SQL Server Analysis Services start issue

Today I was upgrading an instance of SQL Server to SQL Server 2016. During the installation, I got below error at Feature Rules validation step.

SQL Server Analysis Service

From the error message I found that SQL Server Analysis Service is up. So below are the steps to resolve the SQL Server Analysis Service start issue:

Step 1: Press Win+R keys and type “compmgmt.msc” to open the component management console

SQL Server Analysis Service

Step 2: Expand the SQL Server Configuration node and then select SQL Server Services. On the right panel you will find the SQL Server Analysis Service and the state would be Stopped.

Step 3: Now right click on Start SQL Server Analysis Service if fails the solution is the go to logon and change the SQL Server Analysis Service and select start from the menu.

SQL Server Analysis Service

If everything is correct on your system then this service gets start on your system and Hope this way work for you in first attempt. But this not happened with me easily and I got error message “Windows could not start the SQL Server Analysis Services (MSSQLSERVER) service on Local Computer”:

clip_image007

In my case, after investigation on the system I come to know that the account which had permission on the Network account was by mistake deleted and I followed the below steps to start the service with different user account on the system:

  1. Right clicked on the SQL Server Analysis Service and select “Properties”
    clip_image009
  2. On the Logon tab, browse the local administer account or another user account that has enough privilege to impersonate the service:
    clip_image010

Now attempt to start the service. If provided account has permission and privilege then it will get start immediately.

I was not able to make it work after providing the administrator account credentials. The above image was after the service get start and to make it work I tried to search about the error message and found some reference about this message here.

I found information to get the further steps to fix the issue that when an SQL Server Analysis Services instance starts, it’s actually looking for a file called msmdsrv.exe located in $InstallDir\Microsoft SQL Server\MSAS12.MSSQLSERVER\OLAP\bin. So, to correct the things to start the service follow these steps:

  1. Open File Explorer and go to this SQL Server Analysis Service installation folder.
  2. Right click on bin folder and go to Security tab in properties window.SQL Server Analysis Service
  3. Click on Edit… and add the service impersonation account if you add another account as I did earlier. Otherwise provide permission to the user which is associated with Network service or added user account.

Now again attempt to start the service in component management window. This time it starts as like charm for me.

Hope this help to resolve issue for others. Cheers!

Introduction to Angular 4 and TypeScript- Structure of Angular Projects and Webpack


In this article, you are going to learn about the structure of Angular project and Webpack.
TABLE OF CONTENT
  • Introduction
    • What is Angular?
    • Why do we need Angular?
    • Architecture and Building Blocks of Angular Apps
  • Setting Up the Development Environment
  • Your First Angular App
  • =>Structure of Angular Projects
  • =>Webpack
  • TypeScript Fundamentals
    • What is TypeScript?
    • Creating First TypeScript Program
    • Declaring Variables
    • Types
    • Type Assertions
    • Arrow Functions
    • Interfaces
    • Classes
    • Objects
    • Constructors
    • Access Modifiers
    • Access Modifiers in Constructor Parameters
    • Properties
    • Modules
  • Angular Fundamentals
    • Creating Components
    • Generating Components Using Angular CLI
    • Templates
    • Directives
    • Services
    • Dependency Injection
    • Generating Services Using Angular CLI
  • Exercise
Introduction

This tutorial on angular 4 project directory structure and webpack. Before start working with Angular project we should know about the structure of the project and where are different functional files resides in the directory structure. Along this what compile these project file in background to reflect changes in browser in real time.
webpack is a module bundler. Its main purpose is to bundle JavaScript files for usage in a browser, yet it is also capable of transforming, bundling, or packaging just about any resource or asset.
Project directory structure

According to the documentation, all our source files are under a folder and app lives in the src folder. All Angular components, templates, styles, images, and anything else your app needs go here. Any files outside of this folder are meant to support building your app.
 
Under that folder is an app folder that contains the source files specific for our application. For each major feature in the application we create subfolders under the app folder.
 
File
Purpose
app/app.component.{ts,html,css,spec.ts}
Defines the AppComponent along with an HTML template, CSS stylesheet, and a unit test. It is the root component of what will become a tree of nested components as the application evolves.
app/app.module.ts
Defines AppModule, the root module that tells Angular how to assemble the application. Right now it declares only the AppComponent. Soon there will be more components to declare.
assets/*
A folder where you can put images and anything else to be copied wholesale when you build your application.
environments/*
This folder contains one file for each of your destination environments, each exporting simple configuration variables to use in your application. The files are replaced on-the-fly when you build your app. You might use a different API endpoint for development than you do for production or maybe different analytics tokens. You might even use some mock services. Either way, the CLI has you covered.
favicon.ico
Every site wants to look good on the bookmark bar. Get started with your very own Angular icon.
index.html
The main HTML page that is served when someone visits your site. Most of the time you'll never need to edit it. The CLI automatically adds all js and cssfiles when building your app so you never need to add any <script> or <link> tags here manually.
main.ts
The main entry point for your app. Compiles the application with the JIT compiler and bootstraps the application's root module (AppModule) to run in the browser. You can also use the AOT compiler without changing any code by appending the--aot flag to the ng build and ng serve commands.
polyfills.ts
Different browsers have different levels of support of the web standards. Polyfills help normalize those differences. You should be pretty safe with core-js and zone.js, but be sure to check out the Browser Support guide for more information.
styles.css
Your global styles go here. Most of the time you'll want to have local styles in your components for easier maintenance, but styles that affect all of your app need to be in a central place.
test.ts
This is the main entry point for your unit tests. It has some custom configuration that might be unfamiliar, but it's not something you'll need to edit.
tsconfig.{app|spec}.json
TypeScript compiler configuration for the Angular app (tsconfig.app.json) and for the unit tests (tsconfig.spec.json).


package.json

The other files here are configuration and setup files, often called boilerplate files. To get us going quickly, In the package.json file, we define that   what  libraries need to install to develop and run our application. This file contains a list of all the application's dependencies. The entries start with @angular are Angular system libraries.
If we use the “npm install” on the terminal for the project, then it will check all the dependencies defined in this file and install in the “node_modules” folder.

Note: “node modules” folder contains all of our libraries for application which is installed by npm. This folder is large, so we may want to exclude it when we check-in our files into a source control system.


File/Folder
Purpose
e2e/
Inside e2e/ live the end-to-end tests. They shouldn't be inside src/ because e2e tests are really a separate app that just so happens to test your main app. That's also why they have their own tsconfig.e2e.json.
node_modules/
Node.js creates this folder and puts all third party modules listed inpackage.json inside of it.
.angular-cli.json
Configuration for Angular CLI. In this file you can set several defaults and also configure what files are included when your project is built. Check out the official documentation if you want to know more.
.editorconfig
Simple configuration for your editor to make sure everyone that uses your project has the same basic configuration. Most editors support an .editorconfig file. See http://editorconfig.org for more information.
.gitignore
Git configuration to make sure autogenerated files are not commited to source control.
karma.conf.js
Unit test configuration for the Karma test runner, used when running ng test.
package.json
npm configuration listing the third party packages your project uses. You can also add your own custom scripts here.
protractor.conf.js
End-to-end test configuration for Protractor, used when running ng e2e.
README.md
Basic documentation for your project, pre-filled with CLI command information. Make sure to enhance it with project documentation so that anyone checking out the repo can build your app!
tsconfig.json
TypeScript compiler configuration for your IDE to pick up and give you helpful tooling.
tslint.json
Linting configuration for TSLint together with Codelyzer, used when running ng lint. Linting helps keep your code style consistent.

This is all about the folder structure and now we see the webpack in action.
webpack

Now we going to make changes in the application along site application is already running on “localhost:4200”.
Now open the “app.components.ts” file under the folder src\app. Change the title from ‘app’ to ‘My First Angular App’ and as you change this text it will automatically reflect in the browser.


Web view:
When we change the title and save the file, you see in the command prompt we see the “compiling”.  After completion of the compilation you will see the changes reflect in the browser.
Angular CLI user the tool “webpack” which is a build automation tool.it bundle all out stylesheets, code file and minifies them for optimization. webpack automatically recompile our application and refreshes bundles.
It is the webpack feature “Hot Module Replacement” (HMR). When any source file modifies webpack automatically refreshes the browser to reflect the changes. webpack injects all the bundles in the startup index.html page at runtime.
Conclusion
In this article you have seen through the project folder structure Angular project and webpack for automated compilation


How to include DevExpress references in ASP.NET projects using NuGet?

Introduction:

DevExpress introduced NuGet packages for some subscriptions and it been a long time that I have not yet tried rather installing full package of DevExpress controls. Now it is much easy to include references through NuGet Package Manager.

Using DevExpress NuGet packages for DevExpress Controls

The brief information about the DevExpress NuGet Packages is described on Mehual Harry’s blog post -
DevExpress NuGet Packages - Now Available

An excellent step-by-step guide to setup Visual Studio for DevExpress NuGet packages available in below QA thread:
DevExpress NuGet Packages: T466415

Setup DevExpress NuGet Feed to Visual Studio

  1. In Visual Studio, select Tools | Options. Under NuGet Package Manager, locate the Package Sources item.
  2. Add new package source using a string in the following format: “https://nuget.devexpress.com/{feed-authorization-key}/api”. This feed-authorization-key is available in your DevExpress account's Download Manager and just replace the copied authorization key in the source url.

    IncludeDevExpressNuGetPackages

Using NuGet Packages in Projects

Right-click a solution and select Manage NuGet Packages for Solution and then Select the newly added package source:

Using DevExpress NuGet Packages

Select the package you want to add to your project and all linked references will be added automatically.

Intall DevExpress Packages to Projects

updated references after adding DevExpress Packages to Projects

Now time to test the project after updating references.

Note: If you face problem with editor controls then follow the documentation of ASP.NET MVC Extensions for Integration into an ASP.NET MVC Project and we are doing Manual Integration into an Existing Project.

Conclusion:

We have added DevExpress references to the projects from Using DevExpress NuGet packages and after that you will be able to configure your project to run the ASP.NET controls.