How to download and install PostgreSQL?

Introduction

This article will teach you how to download and install PostgreSQL on your system.

Downloading and Installing PostgreSQL

To get started working with Postgres, you need two components.

  1. Postgres Server
    It houses your data 
    and manages connections, security, and data maintenance. 

  2. Management Application
    You need a way to communicate with a server 
    to work with and view the data it contains. For this, you'll need a management application or what is sometimes referred to as a front-end client. There are lots of different clients that you can use to interface with a Postgres Server. 


The easiest way to get started is to use an installer that gives us both components in one step. Follow the below step to download and install PostgreSQL:

Step 1

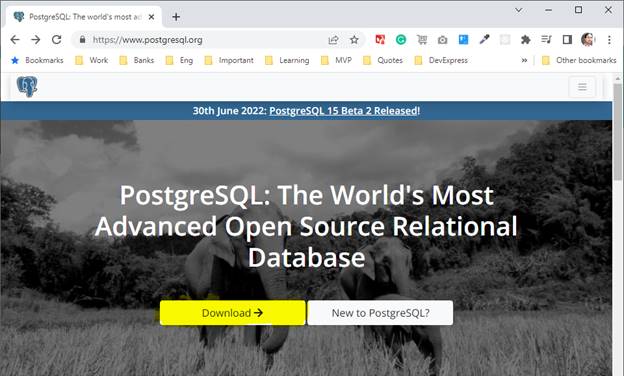
You'll start the installation at the URL postgressql.orgIt is the official site for Postgres, and you will find a big download button on the top and click on it.
 

 Step 2

Now a new page will open, with several different application installers available depending on what operating system you're working on.
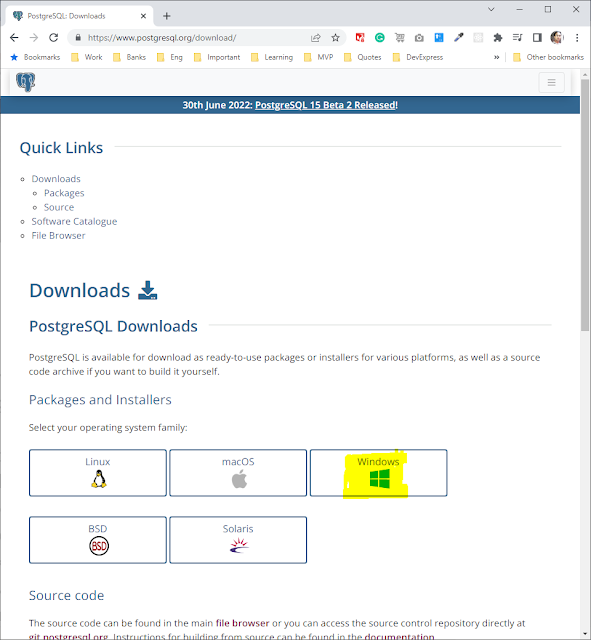
If you're working on a Linux machine, you will likely already have a version of Postgres since it comes pre-installed with the OS. 

The instructions you'll find at these links will help you install an alternate version if you need to. The installation for your macOS and Windows is almost identical. I'm working on a Windows computer, so I will click on the Windows button highlighted with the yellow color. 

Step 3

That takes me to a page that describes what versions of Postgres are available on each platform, either a 64-bit or 32-bit. 
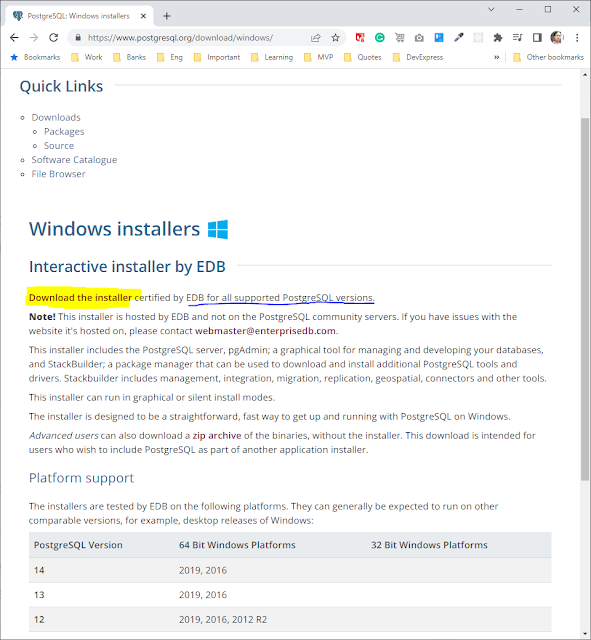
 

After viewing the platform support information, you can click on the link up here that says download the installer. It takes you to a page maintained by a company called EnterpriseDB. 

Step 4

Finally, here you can choose which version of Postgres you want. 
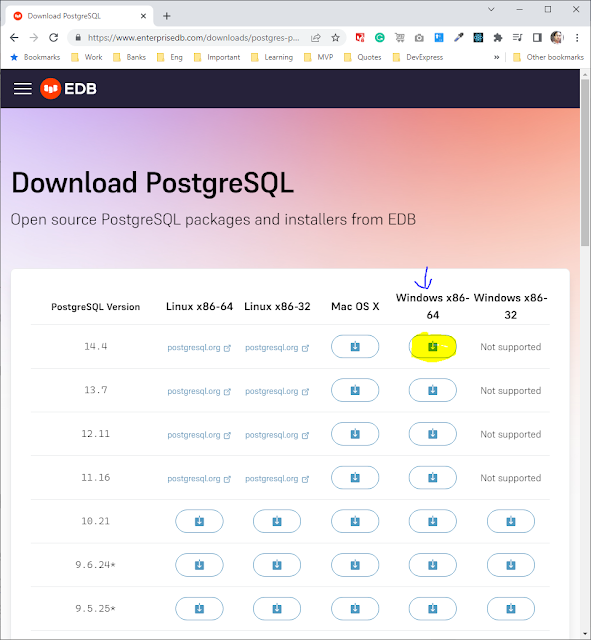
 

I'll select the downloader for your Postgres by clicking on the download link underneath Windows. 

Step 5

It will start the installation package download, and once the download is completed, as I can see my screen's download progress, you can close the web browser and start the installation process. 
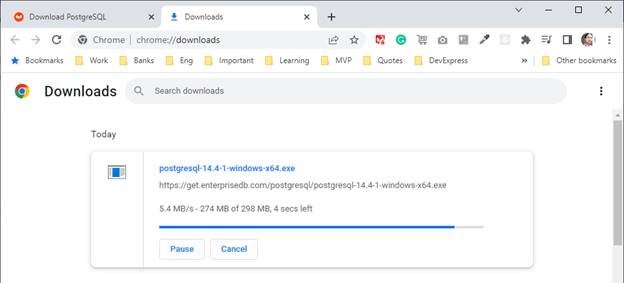
 

You should find the file inside the downloads folder for your computer. Go ahead and double-click on it to start it up. I'll allow it to make changes to my computer. 

Step 6

So that starts the setup wizard. Let's press the next button on this screen. 
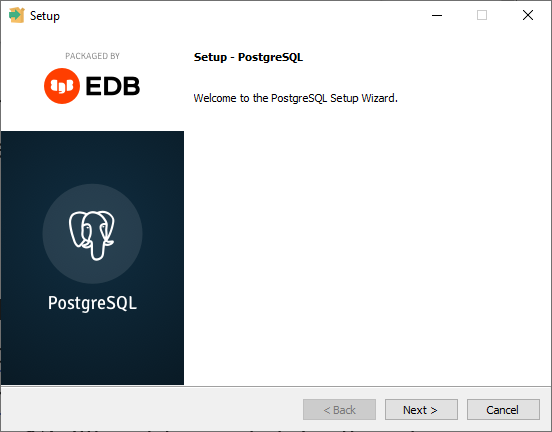
 Step 7

The default installation directory will be on my computer, inside the program files folder, a new folder for PostgreSQL, and then the version. I'll leave it to default and press next. 
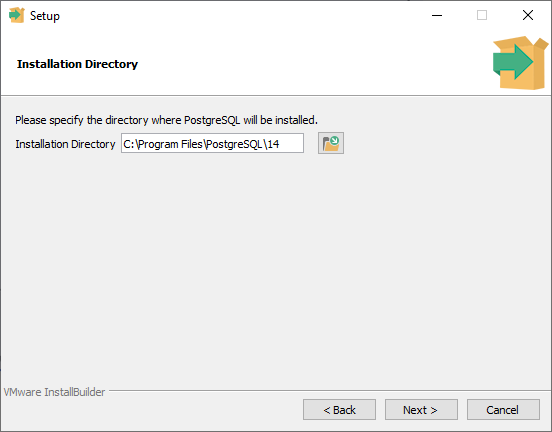
 Step 8

Here, you have four different components that you can install. 
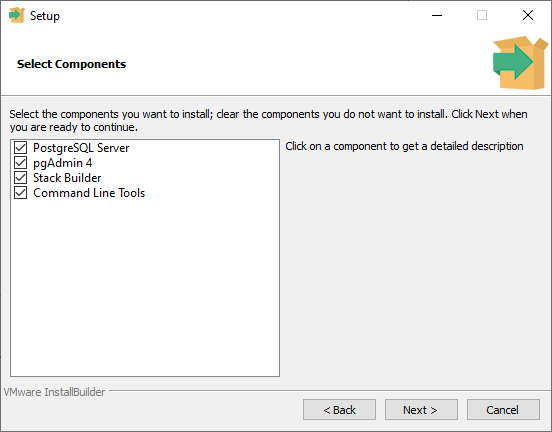
The PostgreSQL Server is the main component, so I want to make sure that that's turned on. 

You have two interface clients that are coming along, pgAdmin 4 is a graphical user interface, and I'll leave that on, as well as the command line tools, and I'll leave those on as well. 

Stack Builder is a tool that will help you install additional add-on packages if you're interested in extending Postgres' capabilities. You can turn this off if you'd like. I'll leave it on here to install everything, and I'll go ahead and press the next button. 

Step 9

Next, it sets up a default data directory. And once again, on my computer, as in program files, PostgreSQL version, and then a new folder called data.
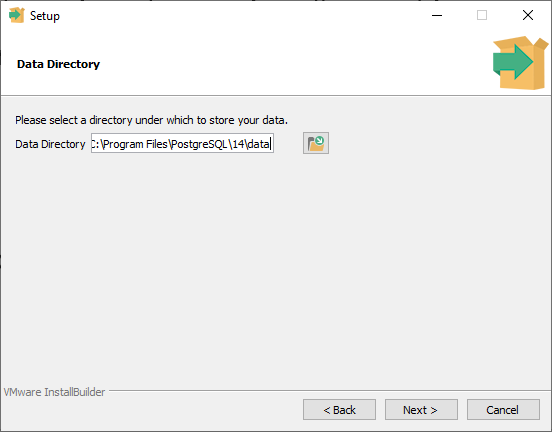
 I'll choose that default and press next. 

Step 10

You'll need to have a user account to connect to the server. Here, the installer is creating a default user that's named Postgres. And you need to create a password for this user. 
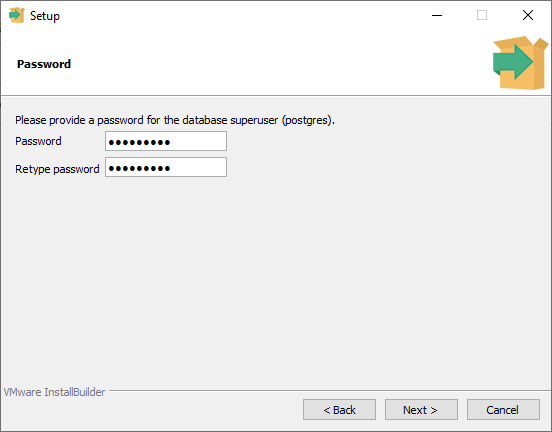
You can type in whatever password you'd like. Just make sure that you remember it moving forward. This user account is going to be an administrator-level account. So this user will have permission to do anything on the server.

Using this, you can create additional user accounts to control access to the stored data in Postgres. Once you've typed in the password and retyped the same password, press the next button. 

Step 11

The default port that Postgres will communicate on is 5432. 
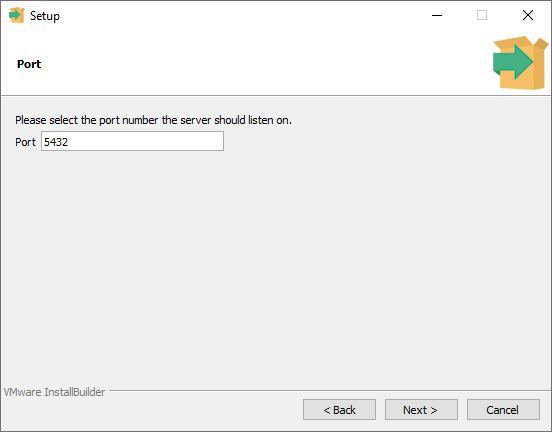
You'll just leave that there and press next. 

Step 12

On this screen, you get to choose a default location. Once again, I'll leave this as the default locale and press next. 
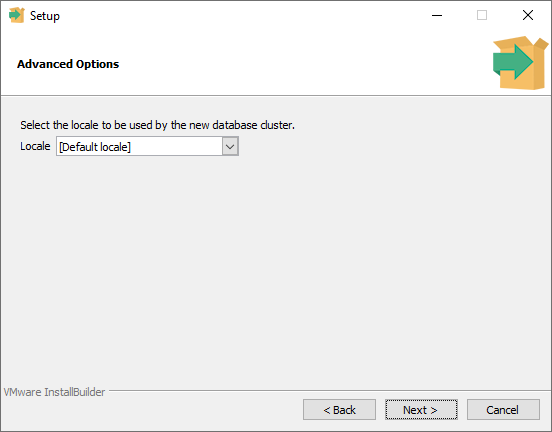
Step 13

Now the installer will give me an installation summary. 
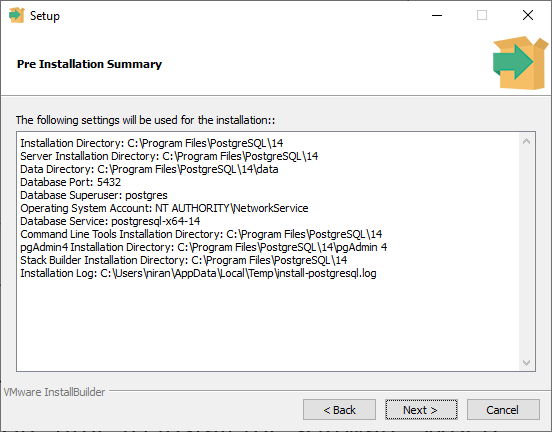
I'll press the next button and the next one more time to install the software. 
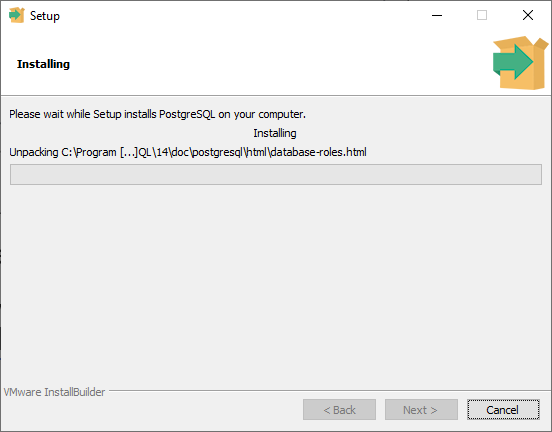

Step 14

When that finishes, the database server and client applications have been installed. 
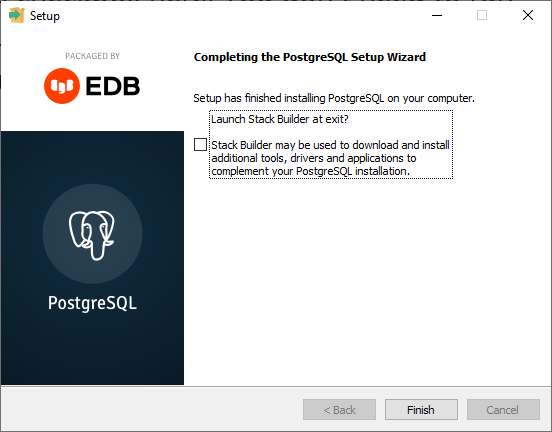
Now, if you can also choose to install the Stack Builder application, you can turn off this checkbox here. You don't need to run Stack Builder when you finish out of this wizard, and I'll uncheck this checkbox and press the finish button. 


All done. It is time to test the installation, and you will find the management application to connect with the server.

Now you can go into my start menu, and I'm going to scroll down and find the new folder that was just added for PostgreSQL <version>. Inside of here, you have a couple of applications.
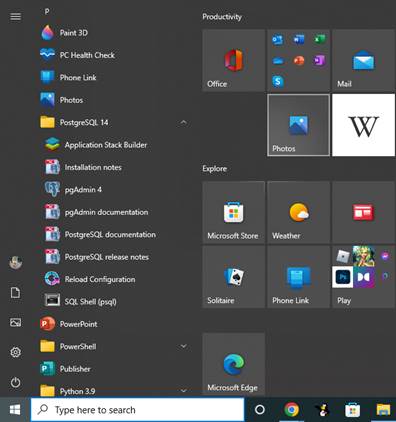


 I am only interested in below two applications:

  1. pgAdmin 4 - This is a graphical user interface for Postgres that'll run inside your web browser. 
  2. SQL Shell or PSQL - This is a command line tool popular with programmers. 

    You'll find the PostgreSQL <version> folder on macOS inside your applications folder. And inside, there will be the same pgAdmin and PSQL applications. So now you have Postgres Server and a couple of client applications for us to work with.

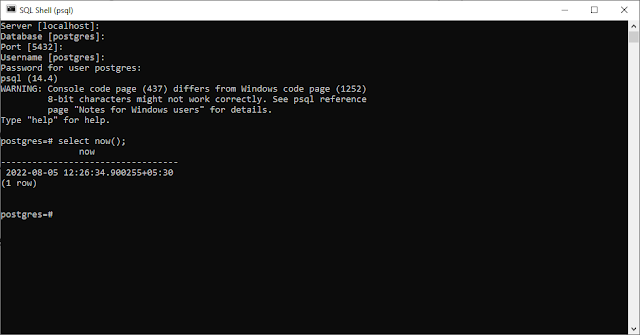
 Open the SQL Shell, a command-line window, and start the login process.

You need to know some connection details to log into a Postgres server.

Server IP:

First, it asks for the server location. If you're in a typical office environment where the Postgres server is running on a centralized computer, then you'll need the IP address of that machine. In our case, we're running the server and client on the same physical machine. So we can use the word localhost instead.

You can either type that in or press Enter, and localhost, the default indicated by the text in square brackets, will be used instead. I'll leave this blank and press Enter to enter in localhost.

Database:

Next, it asks you which database you want to connect to. Each Postgres server can hold many different databases. If you have just installed the server, it is brand new, and there's just one database called Postgres, so I'll log into that one. Again, you can press Enter to accept the default value of Postgres.

Communication port:

Next, we need the communication port that the server is listening on. This was set up during the installation step but is typically left at the default of 5432. I'll press Enter to accept that value.

User Name:

Then we need to provide the user account credentials. Again, during the installation, we created a superuser account named Postgres. So we'll use that. You will supply that username here if you've been assigned your own personal user account for your server.

Password:

Finally, you have to enter the user's password. Again, we gave the Postgres user account a password during setup. So I hope that you remember what you filled in during that step. Go ahead and type it in now. When you type, it will not appear on the screen, so just type it out and press Enter when you're done.

If everything was filled in correctly, you should be connected to the Postgres server, and the command prompt will change. Now we can start sending commands to the server.
Conclusion

We have successfully installed PostgreSQL with these simple steps.


How to Create a JavaScript Library/Framework

Introduction

This article will teach you how to Create a Javascript Library or Framework.

Creating a JavaScript library

Library Name: Greeter

  • When given a first name, last name, and options language, it generates formal and informal greetings.
  • Supports English and Spanish languages.
  • Reusable library/framework.
  • Easy to type ‘G$()’ structure. -Support jQuery
Structure Safe code

HTML

<html>
  <head>      
  </head>
  <body>
      <script src="scripts/jquery-3.6.0.js"></script>
      <script src="scripts/greetr.js"></script>
      <script src="scripts/app.js"></script>
    </body>
</html>

Include jQuery first to enable the jQuery support.

greetr.js

We require a global variable window and jQuery. Set up an IIFE function by passing the windows and the jQuery function.

Now create an IIFE function to start with.


(function(global, $) {
}(window, jQuery));

Now, this is safe to use in any of the applications and ready to use.

The next step is to set up the greeter object and the alias similar to jQuery $. You can review code the code of the jQuery library understands the safe entry method to work with any library.


(function (global, $) {

  var Greetr = function (firstname, lastName, language) {
    return new Greetr.init(firstName, lastName, language);
  };

  // You can create your properties and function here
  Greetr.prototype = {};

  Greetr.init = function (firstName, lastName, language) {
    var self = this;
    self.firstName = firstName || "";
    self.lastName = lastName || "";
    self.language = language || "en";
  };

  Greetr.init.prototype = Greetr.prototype;

  //Set the alias
  global.Greetr = global.G$ = Greetr;
}(window, jQuery));


Adding Language support

Now we set up the language support for English and Spanish. Along with this

(function (global, $) {
  var Greetr = function (firstname, lastName, language) {
    return new Greetr.init(firstName, lastName, language);
  };

  var supportedLanguages = ["en", "es"];

  var greetings = {
    en: "Hello",
    es: "Hola",
  };

  var formalGreetings = {
    en: "Greetings",
    es: "Saludos",
  };

  var logMessages = {
    en: "Logged In",
    es: "iniciar la sesión",
  };

  // You can create your properties and function here
  Greetr.prototype = {
    fullName: function () {
      return this.firstName + " " + this.lastName;
    },
    validate: function () {
      if (supportedLanguages.indexOf(this.language) === -1) {
        throw "Invalid language";
      }
    },
    greeting: function () {
      return greetings[this.language] + " " + this.firstName + "!";
    },

    formalGreetings: function () {
      return formalGreetings[this.language] + " " + this.fullName() + "!";
    },
    greet: function (formal) {
      var msg;
      //if undefined or null, it will be coerced to 'false.'
      if (formal) {
        msg = this.formalGreetings();
      } else {
        msg = this.greeting();
      }

      if (console) {
        console.log(msg);
      }

      //'this' refers to the calling object at the execution time
      // makes the method chainable
      return this;
    },
    log: function () {
      if (console) {
        console.log(logMessages[this.language] + ": " + this.fullName());
      }
      return this;
    },
    setLanguage: function (lang) {
      this.language = lang;
      this.validate();
      return this;
    },
  };

  Greetr.init = function (firstName, lastName, language) {
    var self = this;
    self.firstName = firstName || "";
    self.lastName = lastName || "";
    self.language = language || "en";
  };

  Greetr.init.prototype = Greetr.prototype;

  //Set the alias
  global.Greetr = global.G$ = Greetr;
}(window, jQuery));


Calling the library in the application

var g = G$("Niranjan", "Singh");
//Chained behavior and call to display greetings
g.greet().greet(true);
//Change the language and then greet
g.greet().setLang('es').greet(true);


Adding jQuery support

We need to add jQuery support and provide the functionality to give the id to Greetr library for updating the element text.

Update the HTML page with the below text to enable/demonstrate the jQuery incorporation.


<html>

<head>
</head>

<body>
  <div id="logindiv">
    <select id="lang" div>
      <option value="en">English</option>
      <option value="es">Spanish</option>
    </select>
    <input type="button" name="login" id="login" value="Login">
  </div>
  <h1 id="greeting"></h1>
  <script src="scripts/jquery-3.6.0.js"></script>
  <script src="scripts/greetr.js"></script>
  <script src="scripts/app.js"></script>
</body>

</html>

It requires changes in the Greetr library also. So add a new method called HTMLGreeting with a selector parameter.


    HTMLGreeting: function (selector, formal) {
      if (!$) {
        throw "jQuery not loaded";
      }
      if (!selector) {
        throw "Missing jQuery selector ";
      }

      var msg;
      //if undefined or null, it will be coerced to 'false.'
      if (formal) {
        msg = this.formalGreetings();
      } else {
        msg = this.greeting();
      }

      $(selector).html(msg);

      return this;
    },

Below is the simple library/framework which we have developed. It could be referred to and used to create a library.

(function (global, $) {
  // 'new' an object
  var Greetr = function (firstName, lastName, language) {
    return new Greetr.init(firstName, lastName, language);
  };
  // hidden within the scope of the IIFE and never directly accessible
  var supportedLanguages = ["en", "es"];
  // informal greetings
  var greetings = {
    en: "Hello",
    es: "Hola",
  };
  // formal greetings
  var formalGreetings = {
    en: "Greetings",
    es: "Saludos",
  };
  // logger messages
  var logMessages = {
    en: "Logged In",
    es: "iniciar la sesión",
  };

  // You can create your properties and function here
  Greetr.prototype = {
    fullName: function () {
      return this.firstName + " " + this.lastName;
    },
    validate: function () {
      if (supportedLanguages.indexOf(this.language) === -1) {
        throw "Invalid language";
      }
    },
    greeting: function () {
      return greetings[this.language] + " " + this.firstName + "!";
    },

    formalGreetings: function () {
      return formalGreetings[this.language] + " " + this.fullName() + "!";
    },
    greet: function (formal) {
      var msg;
      //if undefined or null, it will be coerced to 'false.'
      if (formal) {
        msg = this.formalGreetings();
      } else {
        msg = this.greeting();
      }

      if (console) {
        console.log(msg);
      }

      //'this' refers to the calling object at the execution time
      // makes the method chainable
      return this;
    },
    log: function () {
      if (console) {
        console.log(logMessages[this.language] + ": " + this.fullName());
      }
      return this;
    },
    setLanguage: function (lang) {
      this.language = lang;
      this.validate();
      return this;
    },
    HTMLGreeting: function (selector, formal) {
      if (!$) {
        throw "jQuery not loaded";
      }
      if (!selector) {
        throw "Missing jQuery selector ";
      }

      var msg;
      //if undefined or null it will be coerced to 'false'
      if (formal) {
        msg = this.formalGreetings();
      } else {
        msg = this.greeting();
      }

      $(selector).html(msg);

      return this;
    },
  };
  // the actual object is created here, allowing us to 'new' an object without calling 'new'
  Greetr.init = function (firstName, lastName, language) {
    var self = this;
    self.firstName = firstName || "";
    self.lastName = lastName || "";
    self.language = language || "en";
    self.validate();
  };
  // trick borrowed from jQuery so we don't have to use the 'new' keyword
  Greetr.init.prototype = Greetr.prototype;

  //Set the alias, attach the Greetr to the global object and provide a shorthand '$G' for the ease our poor fingers
  global.Greetr = global.G$ = Greetr;
}(window, jQuery));

Conclusion

We have created a small library that supports the jQuery framework also. We can create an extensive library or framework by following the same pattern. The best way to learn this is by reviewing the existing open source libraries and frameworks, e.g., jQuery.

How to resolve Global Exception Logger with Dependency Injection in ASP.NET Web API?

Introduction

In this article, you will learn how to resolve Global Exception Logger with dependency injection in ASP.NET Web API using Autofac.

How to resolve Global Exception Logger with dependency injection

Step 1: Create the custom exception logger by inheriting the IExceptionLogger interface to write your custom logging logic.

/// 
/// The main class GlobalExceptionLogger.
/// Handles the exception logging requests.
/// 
public class GlobalExceptionLogger : IExceptionLogger
{
    /// 
    /// 
    /// 
    public ILogger Logger { get; set; }
    /// 
    /// Initializes a new instance of the  class.
    /// 
    public GlobalExceptionLogger()
    {
        Logger = NullLogger.Instance;
    }
    /// 
    /// Logs the exception.
    /// 
    ///The exception context.
    ///
    /// 
    public async Task LogAsync(ExceptionLoggerContext context, CancellationToken cancellationToken)
    {
        var ex = context.Exception;
        string message = $"{ex.Message}--{ex.Source}\n{ex.StackTrace}\n{ex.TargetSite}\n";
        await Task.Run(() =>
        {
            Logger.Error(ex, message);
        });
    }

}

Step 2: Register your custom exception logger class in the Autofac container to resolve it through dependency injection.

/// 
/// The main class AutofacConfig.
/// Provides Autofac DI configuration of the API.
/// 
public static class AutofacConfig
{

    #region Autofac Container
    private static Lazy builder =
      new Lazy(() =>
      {
          var autofacbuilder = new ContainerBuilder();
          RegisterTypes(autofacbuilder);
          return autofacbuilder.Build();
      });

    /// 
    /// Configured Autofac Container.
    /// 
    public static IContainer Container => builder.Value;
    #endregion

    /// 
    /// Registers the type mappings with the autofac container builder.
    /// 
    ///The autofac container builder to configure.
    /// 
    /// 
    public static void RegisterTypes(ContainerBuilder builder)
    {
       string baseDirectoryPath = AppDomain.CurrentDomain.BaseDirectory + "bin";
        if (!Directory.Exists(baseDirectoryPath))
            baseDirectoryPath = AppDomain.CurrentDomain.BaseDirectory;

        builder.RegisterModule(new LoggingModule());
        builder.RegisterModule(new FileStoreModule());
        //builder.RegisterModule(new CloudJobManager.CloudJobManagerModule());
        builder.RegisterApiControllers(Assembly.GetExecutingAssembly()).InstancePerRequest();
        //builder.RegisterType().InstancePerLifetimeScope();

        var assemblies = Directory.EnumerateFiles(baseDirectoryPath, "*.dll", SearchOption.TopDirectoryOnly)
            .Where(filePath => Path.GetFileName(filePath).StartsWith("MyApp"))
            .Select(Assembly.LoadFrom).Where(assemblyType =>
            (assemblyType.FullName.StartsWith("MyApp") && !assemblyType.FullName.Contains("MyApp.Framework") &&
            !assemblyType.FullName.Contains("MyApp.Reporting.API")
            )).ToArray();

        builder.RegisterAssemblyTypes(assemblies)
        .AsImplementedInterfaces().InstancePerLifetimeScope();

        builder.RegisterType().AsSelf().AsImplementedInterfaces();
        builder.RegisterType().AsSelf().AsImplementedInterfaces();

        builder.RegisterType<ReportService>().As<IReportService>().InstancePerRequest();

    }
}

Step 3: Replace the custom exception logger in the HttpConfiguration services to use it in the place of the default ASP.NET exception logger.

public static class WebApiConfig
{
    public static void Register(HttpConfiguration config)
    {
        // Web API configuration and services
        config.DependencyResolver = new AutofacWebApiDependencyResolver(AutofacConfig.Container);

        // Web API configuration and services
        //config.Services.Replace(typeof(IExceptionLogger), new  GlobalExceptionLogger());
        //config.Services.Replace(typeof(IExceptionHandler), new GenericExceptionHandler());

        // Inject our exception logger and handler
        config.Services.Replace(typeof(IExceptionHandler), config.DependencyResolver.GetService(typeof(GenericExceptionHandler)));
        config.Services.Replace(typeof(IExceptionLogger), config.DependencyResolver.GetService(typeof(GlobalExceptionLogger)));

        // Web API routes
        config.MapHttpAttributeRoutes();

        config.Routes.MapHttpRoute(
            name: "DefaultApi",
            routeTemplate: "api/{controller}/{id}",
            defaults: new { id = RouteParameter.Optional }
        );
    }
}
Conclusion

Whenever an unhandled error occurs then you have a chance to log it. The information regarding the can be stored somewhere for review. There you can write the issue to a log or write custom logic.

Azure DevOps Server - How to fix indexing isn't working issue?

Introduction

In this article, you will learn how to fix the Azure DevOps Server indexing issues.

How to fix indexing isn't working, or is in progress issue

In our scenario, the Search was not working and was completely broken. Nobody was able to search in the code and work items.

To fix this, we have referenced the Microsoft documentation - Manage Search indexing to create the search index again.

Below is the step to fix the search indexing:

  • Download the scripts from the Code-Search GitHub repository on the server.
  • Extract the zip somewhere and open the Powershell in Administrative mode.
  • Change the directory to your Azure DevOps Server version. I have to reindex the entire collection.
  • Now execute the script TriggerCollectionIndexing.ps1 to reindex the collection but first, you need to change the policy to execute the command
Set-ExecutionPolicy -Scope Process -ExecutionPolicy Bypass
  • After that run the TriggerCollectionIndexing.ps1 file. You need to enter the SQL server instance name of the Azure DevOps Server, Collection database name, Configuration database name, and the entities to reindex.

Conclusion

Search indexing is an important feature in the Azure DevOps Server, use the scripts to get the status of the search indexing and fix the issues.

SQLite- Check If Table Exists

Introduction

In this article, you will learn to check if a table exists in the SQLite database or not.

How to check if a table exists in the database

You execute the below command to check whether a table exists or not in the SQLite database:

SELECT count(*) FROM sqlite_master WHERE type='table' AND name='tableName';

It will return a value of either 0 or greater than 0. If the table doesn’t exist then the result will be 0 otherwise 1.

You can use this query in any programming language to the existence of the table in the database. For an example below .NET code block will check the existence of the table in the SQLite database:

string sqliteDBFile = string.Format("{0}\\{1}", "D:\\Logs", "Log.db");
string tableName = "LogTable";
string columnName = "CreatedOn";
if (!File.Exists(sqliteLogDBFile))
{
    using (SQLiteConnection con = new SQLiteConnection(string.Format("data source={0}", sqliteLogDBFile)))
    {
       if (CheckIfTableExists(con, Constants.SQLiteLogTableName))
       {
            if (!CheckIfColumnExists(con, tableName, columnName))
            {
                        
            }
        }
    }
}

private bool CheckIfTableExists(SQLiteConnection conn, string tableName)
{
    if (conn.State == System.Data.ConnectionState.Closed)
        conn.Open();

    using (SQLiteCommand cmd = new SQLiteCommand(conn))
    {
        cmd.CommandText = $"SELECT count(*) FROM sqlite_master WHERE type='table' AND name='{tableName}';";
        object result = cmd.ExecuteScalar();
        int resultCount = Convert.ToInt32(result);
        if (resultCount > 0)
            return true;

    }
    return false;
}

You can also check that that if a column exists in the table or not using the below line of code which uses the table metadata and then check the column name for the match.

private bool CheckIfColumnExists(SQLiteConnection conn, string tableName, string columnName)
{
    if (conn.State == System.Data.ConnectionState.Closed)
        conn.Open();

    using (SQLiteCommand cmd = new SQLiteCommand(conn))
    {
        cmd.CommandText = string.Format("PRAGMA table_info({0})", tableName);

        var reader = cmd.ExecuteReader();
        int nameIndex = reader.GetOrdinal("Name");
        while (reader.Read())
        {
            if (reader.GetString(nameIndex).Equals(columnName))
            {
                return true;
            }
        }
    }
    return false;
}

Checking a table exists or not before creating a new table

Checking a table before creating or dropping a table is the common use case. To run the query without failing it with a fail-safe check. In SQLite, you can be sure that a table should be created in the database if it does not exist using the below query:

CREATE TABLE IF NOT EXISTS <table_name> (column1_name <datatype>,....)

Conclusion

You have learned how can check the existence of the database base objects in an SQLite database.

NDepend - Dependency Graph Navigating - Coupling Graph

Introduction

This is another post followed by NDepend - Improved Dependency Graph Feature. In this article, you will discover more about the Dependency Graph features e.g. focus on a node (double click a node in graph) or coupling graph (double click an edge in the graph).

Again, we going to use the same OrchardCore project used in the previous article on NDepend Dependency Graph. Open the project and then navigate to the Dependency Graph Zoom in a bit either using the mouse wheel or button in the toolbar. 

Focusing on a node

Select a node in the graph and double click on it. Now you will see that node will be in the center of the diagram and it is in the view of focus. Now you can see the element and paths of the selected node.

Transitioning to coupling graph

Coupling is related to the dependency between the modules. You can see the Dependency Graph by double click an edge in the graph. It is a great feature to go through the different dependencies path for the module node, you selected.

Here is the visualization of the navigation in the Dependency Graph

Conclusion

NDepend Dependency Graph has a smooth transition between the different dependencies and it is good that it is navigating to the coupling graph just by clicking on the edges.

NDepend - Improved Dependency Graph Feature

Introduction

This is another post related to the NDepend tool and Code Quality for .NET Core application follow by this

NDepend makes .NET code beautiful by measuring quality with metrics, generate diagrams, and enforce decisions with code rules, right in Visual Studio.

I have used this tool for analyzing the .NET Core project and it is a great and intuitive tool to work with. The new version NDepend  v2020.1.0 is available with the latest features e.g.  Dependency Graph Completely Rebuilt

What is new with the Dependency Graph

I have also used the Dependency Graph in the previous version of the NDepend. It was much useful to identify the dependency between the different assemblies in the solution.

This time the NDepend team improvise this feature and restructured to analyze large project architecture. Below features make it easy to analyze using the dependency graph.

New navigation system

You can drag and drop from Visual Studio solution explorer, Expand/Collapse parent elements, Search elements in graphs by name with the search windows, also provided Undo / Redo feature.

New layout options

  • Group-By Assemblies, Namespaces, Types, Clusters Filters to show or hide
  • Box size proportional to element size, Edge width proportional to the coupling strength
  • Color conventions instantly identify caller/callee elements
  • Complex graph simplified with Clusters
  • Export to SVG vector format or PNG bitmap format.

Let's explorer that how can we generate Dependency Graph by taking an example of the OrchardCore application which contains more than 143 projects. 

Open the application in the Visual Studio and create an NDepend project by attached to the Visual Studio solution.

Filter and select the project that you want to analyze.

Now a dialog box will open with options, View NDepend Dashboard, Show NDepend Interactive Dependency Graph. Click on the "Show NDepend Interactive Dependency Graph" button to see the dependency graph.

After a few seconds windows will open which is shown in the image below. It has the relationship between the projects and their dependencies.

You can also zoom in or out of the dependency graph to see a group of objects. See the below screenshot to know the zoom feature. you can move and see the project elements.

Conclusion

I genuinely think NDepend is very powerful and very easy to use for analyzing application architecture. The NDepend team and Patrick are very active and we can expect a lot of good improvements in future versions which help to create quality software.

How to deploy an Angular app to GitHub Pages

Introduction

In this article, you will learn to deploy an Angular application to GitHub Pages using npm angular-cli-ghpages package to easily.

Prerequisites:

This command has the following prerequisites for Installation & Setup:

  • Node.js 8.2.0 or higher which brings you npm 5.2.0 which brings you npx
  • Git 1.7.6 or higher
  • optional: Angular project created via angular-cli

  • An Angular 5 or above version application, which is working and ready to host. If it is not ready then follow the instructions specified in the below link for adding an existing angular project to GitHub. Adding an existing project to GitHub using the command line

References:

Deploy to GitHub Pages angular-cli-ghpages 
Deploying Angular Apps with GitHub Pages

Steps to deploy to GitHub pages

To install the command run the following:

npm install -g angular-cli-ghpages

It is just two command to publish your Angular application to GitHub pages.

ng build --prod --base-href https://[username].github.io/[repo]/
ngh --dir=dist/

Deploying using the Angular npm scripts

You can also automatically publish an application using npm by setting script in package.json. The build and deploy command in one go by following the below approach:

To install the command as your project dependencies run the following:

npm i angular-cli-ghpages --save-dev

Open your package.json and then, in your script section add the following script to deploy an Angular 7 application.

{
  "name": "ng-webgl",
  "version": "0.0.0",
  "scripts": {
    "ng": "ng",
    "start": "ng serve",
    "build": "ng build",
    "test": "ng test",
    "lint": "ng lint",
    "e2e": "ng e2e",
    "deploy:gh": "ng b --prod --base-href https://niranjankala.github.io/ng-webgl/ && npx ngh --dir=dist/"
  },

To execute this deploy script. Run npm run deploy:gh on the root of your project directory.

Publish Github-pages

Note: In order to compile images correctly use the relative path './assets/images/image.png'

Conclusion

There are the steps to publish Angular application the GitHub pages.

How to remove TFS workspace mapping for a user

Introduction

In this article, you will know how to remove TFS workspace mapping for a different user. In a remote environment, multiple users log in to a remote machine and create their workspaces that cause an access conflict for the mapped workspace folder.

Scenario

Today I faced an issue while trying to update a mapped TFS workspace in Visual Studio 2017. Visual Studio stops responding if I try to open “Source Control Explorer” and found that some different TFS user connects to TFS and mapped some folders on my local drive. Now I need to access that mapped workspace folder because I do not want to create another folder for myself.

I tried mapping same remote folder to my existing local folder and I got the following error:

“The working folder ‘Workspace_Folder_Local_Path’ is already in use by the workspace WORKSPACE_NAME:USER_NAME on computer ‘MACHINE_NAME’”


Remove TFS workspace user mapping

Prerequisites:
  • You should have administrative rights to the collection.
  • TF command. ( it is located at “C:\Program Files (x86)\Microsoft Visual Studio\2017\Professional\Common7\IDE” depend upon your Visual Studio version.

Steps to remove user workspace mapping
  • Run “Developer Command Prompt for VS 2017” from the Start menu.
  • List the workspaces associated with the user using the below command:
      TF workspaces /collection:"http://tfsserver:8080/tfs/collection_name" /owner:owner_id
    

    This will return the list of workspaces owned by the user and computer they are associated with. For owner_id, you use the user name e.g. Niranjan Singh

  • To remove user workspace mapping, run the below command:
      tf workspace /delete workspacename;owner_id 
    

    Now it will confirm you to delete the user mapping. Enter 'y' to initiate the process.

    Remove TFS Workspace Mapping for a user

Conclusion

These are the steps to delete the TFS workspace mapping for a user.

Create Ionic 4 release build for Android

Introduction

In this article, you will learn how to create ionic 4 release build for the Android platform.

What is Ionic?

Ionic framework is the free, open-source toolkit for developing high-quality cross-platform apps for native iOS, Android, and the web—all from a single codebase. It allows us to develop UI using the famous frameworks e.g Angular, Vue.js, React, etc.

Setting up release build for Android platform

Steps 1 - Run “npm install” on the root directory

Steps 2 - Add android platform with the CLI:

ionic platform add android

Steps 3 - If you are working in a distributed development environment then make sure to install the required files. Run ionic cordova prepare command. it will Install platforms and plugins listed in “config.xml”.

ionic cordova prepare android

Steps 4 - Now navigate to platforms/android with the CLI :

cd platforms/android

Create/Copy release signing key store file under platforms/android folder Copy the created Key store file for android application if you already have one otherwise generate a key.store file with the CLI and answer all the questions:

keytool -genkey -v -keystore YourApp.keystore -alias YourApp -keyalg RSA -keysize 2048 -validity 10000

Follow the steps suggested in the documentation for Deploying to a Device.

Create/Specify release signing information

Steps 1 - Create a file with name “release-signing.properties” under “platforms\android” folder.

Steps 2 - Add below information to this file:

key.store=YourApp.keystore
key.store.password=<YourApp keystore password>
key.alias=YourApp
key.alias.password=<YourApp alias password>

Create build for application

Now go back to the root of your Ionic project with the CLI and build a release version:

ionic cordova build android --prod --release

If command run successfully then you will find release APK under – APP_Root_Folder\platforms\android\app\build\outputs\apk\release

Reset plugins and platforms

To install Or reinstall all cordova plugins In Package.json with Ionic, Run this command on windows command prompt with administrator privilege

rd  plugins /d/s && rd platforms /d/s  && ionic cordova prepare

Conclusion

There are the steps to create a build for ionic 4 application and then you can host your application on the Android store.