How to open DateTime picker C# control programmatically on Button Click

You have to use interop to to send request to windows that show DataTimePicker 
on click of the button
//include namespace section 
using System.Runtime.InteropServices;

//declares
[DllImport("user32.dll")]
private static extern bool PostMessageForCalender(
IntPtr hWnd, // handle to destination window
Int32 msg, // message
Int32 wParam, // first message parameter
Int32 lParam // second message parameter
);

const Int32 WM_LBUTTONDOWN = 0x0201;

//method to call  calender dropdown
private void button1_Click(object sender, EventArgs e)
{
    Int32 x = dateTimePicker1.Width - 10;
    Int32 y = dateTimePicker1.Height / 2;
    Int32 lParam = x + y * 0x00010000;

    PostMessageForCalender(dateTimePicker1.Handle, WM_LBUTTONDOWN, 1,lParam);

}

Configuring ASP.NET for sending Email

How ASP.NET Sends Mail

One of the most common uses of forms in a website is to send email. Sending email from a website used to be a complex and difficult task, but as with so many other tasks that used to be complex, ASP.NET makes sending email easy.

In this chapter you'll see two different classes from the .NET Framework used to send email with ASP.NET; the System.Net.SmtpClient class and the System.Net.MailMessage class.

The System.Net.SmtpClient Class

The SmtpClient class facilitates the sending of email with the Simple Mail Transfer Protocol or SMTP. The SmtpClient class is used to connect your ASP.NET application to the network (either the Internet or another network) and to authenticate you (if necessary) to the SMTP mail server.

We will use a few properties of the SmtpClient class to connect to the SMTP server on the network:

  • Host Property— The Host property is used to specify the name of the SMTP server to which you are connecting.

  • Port Property— Every connection on a network takes place over a specific channel on the network called a port. SMTP communication takes place on port 25 by default. The Port property defaults to a value of 25, but if your SMTP server requires a different port, you can specify that by using the Port property.

    Tip: It's uncommon for an SMTP server to not use port 25. Ask your network administrator, ISP, or hosting company if you're not sure what port your SMTP server uses.

  • Credentials Property— Most SMTP servers require that you provide a username and password or otherwise authenticate yourself before you can send email.

    Some SMTP servers (usually on corporate networks) allow you to use the credentials of the account running your ASP.NET code. In those cases, you can specify to use the default credentials, but in this web application, we'll specify a username and password.

The System.Net.MailMessage Class

The MailMessage class (as you've likely guessed) represents the actual message that is sent. The following list shows some of the properties of the MailMessage class, all of which should be self-explanatory:

  • To— The destination email address(es) for the message.

  • From— The email address of the sender.

  • Cc— The email address(es) that appear on the CC line.

  • Bcc— The email address(es) that appear on the BCC line.

  • Subject— The email's subject.

  • Attachments— A list of file attachments included with the email.

  • IsBodyHtml— A Boolean property that specifies whether or not the Body property uses HTML code.

  • Body The body of the email being sent. This is the actual text of the email message.

After you set the properties of the MailMessage class, you call the Send method and the SmtpClient class is used to send the message.

Modifying the Configuration File for internal Email Settings

In a real-world ASP.NET application, you may be sending email from many pages in your application. If the SMTP properties (such as server name, username, password, and so on) change, it's not efficient to have to make changes on each page that sends email.

Fortunately, many of the properties of the SmtpClient class can be specified in the configuration file for your ASP.NET application. If you specify properties in the configuration file, you have to modify only the configuration file if any of those properties change, and all pages that send email will automatically use the new settings.

Tip: If you specify a setting in your server-side code that's already been specified in your configuration file, the setting that you specify in code overrides the setting in the configuration file.

Adding Email Configuration to the web.config File

Mail configuration is specified in the <system.net> section of the web.config file. The web.config file doesn't contain a <system.net> section by default, so you need to add one.

Open the web application and then open the web.config file in Visual Web Developer. Add the following code to the web.config file directly before the opening <system.web> element:

<system.net>
    <mailSettings>
        <smtp>
            <network host="smtp.yourServer.com"
                     password="yourPassword"
                     userName="yourUsername" />
        </smtp>
    </mailSettings>
</system.net>

Tip: The settings you specify for your SMTP server are often the same settings you use in your email client for the outgoing mail server for your domain. Your hosting company probably has instructions for setting up email clients on their website that you can use to find settings for your configuration file.

Using the Web Site Administration Tool

You can also use the Web Site Administration Tool to configure your SMTP settings. The Web Site Administration Tool enables you to add and edit SMTP settings while minimizing the possibility of errors due to incorrect configuration or typographical errors.

Tip: When using the Web Site Administration Tool to configure SMTP settings, all entries are optional. If you don't provide a value for a required property in the configuration file, you need to provide it in your ASP.NET server-side code.

To use the Web Site Administration Tool to configure your SMTP settings, follow these steps:

1. Open your website and click the ASP.NET Configuration button at the top of the Solution Explorer window

2. Click the Application tab or the Application Configuration link in the Web Site Administration Tool.

3. Click the Configure SMTP Email Settings link on the Application page of the Web Site Administration Tool.

4. Enter your SMTP server name, as shown in Figure 1.

Figure 1. SMTP configuration can be modified on the Application tab of the Web Site Administration Tool.


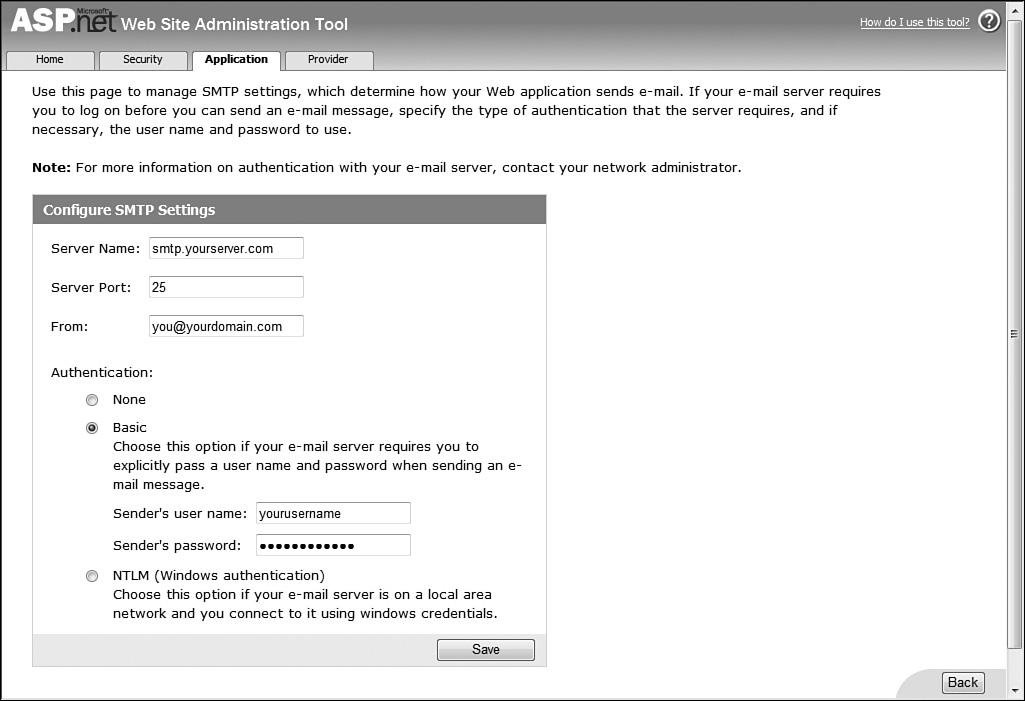
5. Enter the port if necessary. In most cases, the default value of 25 should not be changed.

6. Enter an email address in the From text box if desired. The email address you enter here will show up as the sender of the email that ASP.NET sends.

7. Select an authentication method. Choose None if your SMTP server doesn't require authentication. Choose Basic if your SMTP server requires authentication that differs from the credentials of the account that your ASP.NET code is using. Choose NTLM if you want to use the credentials of the account running your ASP.NET code.

8. Click Save to save the configuration settings to the web.config file in your application.

After you click Save, the Web Site Administration Tool automatically updates your web.config file with the changes, and they take effect immediately.

What Happens When a Configuration File Is Saved

Every ASP.NET application runs inside a special area set aside in memory called an application domain. The purpose of the application domain is to provide isolation between different ASP.NET applications. The application domain ensures that one ASP.NET application doesn't access protected areas of another ASP.NET application.

When an application domain starts up, ASP.NET reads the information in the configuration file to set up the application domain. It then begins monitoring certain folders and files within the application for any changes. If a change is detected, ASP.NET shuts down the application domain and restarts it again so that any changes will take effect.

When you make a modification to the application's web.config file (whether by directly modifying the file or by modifying it indirectly with a tool such as the Web Site Administration Tool), ASP.NET immediately recycles the application pool so that the new configuration applies immediately to the application.


Sample Code to send Email in Asp.net without ASP.net web.config settings:

try
        {
            MailMessage msg = new MailMessage();

            msg.To.Add(toId);
            MailAddress frmAdd = new MailAddress(frmyahoo);
            msg.From = frmAdd;

            //Check user enter CC address or not
            if (ccId != "")
            {
                msg.CC.Add(ccId);
            }
            //Check user enter BCC address or not
            if (bccId != "")
            {
                msg.Bcc.Add(bccId);
            }
            msg.Subject = msgsubject;
            //Check for attachment is there
            if (FileUpload1.HasFile)
            {
                msg.Attachments.Add(new Attachment(FileUpload1.PostedFile.InputStream, FileUpload1.FileName));
            }
            msg.IsBodyHtml = true;
            msg.Body = mailContent;

            SmtpClient mailClient = new SmtpClient("smtp.mail.yahoo.com", 25);
            NetworkCredential NetCrd = new NetworkCredential(frmyahoo, frmpwd);
            mailClient.UseDefaultCredentials = false;
            mailClient.Credentials = NetCrd;
            mailClient.EnableSsl = false;
            mailClient.DeliveryMethod = SmtpDeliveryMethod.Network;
            mailClient.Send(msg);

            clear();
            Label1.Text = "Mail Sent Successfully";
        }
        catch (Exception ex)
        {
            Label1.Text = "Unable to send Mail Please try again later";
        }
    }

Sample Code to send email in ASP.net with web.config with <mailsettings>

try
            {
                MailMessage mailMessage = new System.Net.Mail.MailMessage();
                mailMessage.To.Add(userEmailAddress);
                mailMessage.Subject = "Subject";
                mailMessage.Body = "Body Text";
                var smtpClient = new SmtpClient();
                smtpClient.Send(mailMessage);
                return "Mail send successfully";
            }
            catch (SmtpException ex)
            {
                return "Mail send failed:" + ex.Message;
            }

manual MailSettings for web.config

<system.net>
    <mailSettings>
      <smtp deliveryMethod="Network" from="from@yourdomain.com">
        <network host="smtp server addresss" userName="username" password="password" 
          defaultCredentials="false" port="xxx" enableSsl="true"  />
      </smtp>
    </mailSettings>
  </system.net>

Displaying ASP GridView row index number

You can achieve this through two way:

Method 1

Step 1. Add this your GridView:

<asp:GridView ID="GridView1" runat="server" AutoGenerateColumns="False" DataKeyNames="id"
            DataSourceID="SqlDataSource1" OnRowCreated="GridView1_RowCreated" >

  <Columns>
            <asp:TemplateField HeaderText="RowId">
            <ItemTemplate><asp:Label runat="server" />                      
            </ItemTemplate>            
            </asp:TemplateField> 
...
</Columns>

Step 2: Add following GridView Event code snippet to your code – behind file (.cs)

protected void GridView1_RowCreated(object sender, 
			System.Web.UI.WebControls.GridViewRowEventArgs e)
{ 
    if (e.Row.RowType == DataControlRowType.DataRow) {
        // Retrieve the Label from the first column.
        Label myLabel = (Label)e.Row.Cells[0].Controls[0]; 

        // Set Label text equal to the rowIndex +1
        myLabel.Text = e.Row.RowIndex.ToString() + 1; 
    }
}

Method 2
The another way to do it is this one in the Columns section of your GridView control:
<asp:GridView ID="GridView1" runat="server" AllowPaging="True" AllowSorting="True"
        AutoGenerateColumns="False" DataSourceID="SqlDataSource1" PageSize="5">
        <Columns>
            <asp:TemplateField>
                <ItemTemplate>
                    <%# Container.DataItemIndex + 1 %>
                </ItemTemplate>
            </asp:TemplateField>
            <asp:BoundField DataField="CategoryName" HeaderText="CategoryName" SortExpression="CategoryName" />
            <asp:BoundField DataField="Description" HeaderText="Description" SortExpression="Description" />
        </Columns>
    </asp:GridView>

Inline ASP.Net Tags, Code Render Blocks... (<%$, <%=, <%, <%#, etc.)

Code render blocks define inline code or inline expressions that execute when the page is rendered. There are two styles of code render blocks: inline code and inline expressions.
Use inline expressions as a shortcut for calling the Write method.

<% inline code %>
<%=inline expression %>

thee tags are evaluated during the Render portion of the page load cycle.

<% ... %>

The most basic inline tag, basically runs normal code:

<% if (User.IsInRole("admin")) { %> 
  You can see this 
<% } else { %> 
  You are no admin fool! 
<%} %>

http://msdn2.microsoft.com/en-us/library/ms178135(vs.80).aspx


<%= ... %>

Used for small chunks of information, usually from objects and single pieces of information like a single string or int variable:

The Date is now <%= DateTime.Now.ToShortDateString() %>
The value of string1 is <%= string1 %>

http://msdn2.microsoft.com/en-us/library/6dwsdcf5(VS.71).aspx

*note: <%= is the equivalent of Response.Write() .


<%# .. %>

Used for Binding Expressions; such as Eval and Bind, most often found in data controls like GridView, Repeater, etc.:

<asp:Repeater ID="rptMeetings" DataSourceID="meetings" runat="server"> 
    <ItemTemplate> 
        <%# Eval("MeetingName") %> 
    </ItemTemplate> 
</asp:Repeater>


http://msdn2.microsoft.com/en-us/library/ms178366.aspx


<%$ ... %>

Used for expressions, not code; often seen with DataSources:

<asp:SqlDataSource ID="party" runat="server" ConnectionString="<%$ ConnectionStrings:letsParty %>" SelectCommand="SELECT * FROM [table]" />

http://msdn2.microsoft.com/en-us/library/d5bd1tad.aspx


<%@ ... %>

This is for directive syntax; basically the stuff you see at the top your your aspx pages like control registration and page declaration:

<%@ Page Language="C#" MasterPageFile="~/MasterPage.master"
AutoEventWireup="true" CodeFile="Default.aspx.cs" Inherits="_Default" Title="Untitled Page" %> 
<%@ Register TagPrefix="wp" Namespace="CustomWebParts" %>

http://msdn2.microsoft.com/en-us/library/xz702w3e(VS.80).aspx


<%-- ... --%>

This is a server side comment, stuff you don't want anyone without code access to see:

    <asp:Label ID="lblAwesome" runat="server" /> 
    <%-- sometimes end users make me angry --%> 
    <asp:LinkButton ID="lbEdit" Text="Edit" OnClick="Edit_Click" runat="server" />

http://msdn2.microsoft.com/en-us/library/4acf8afk.aspx

ASPxGridView Hyperlink NavigateUrl at Runtime

In the ASPxHyperLink.Init handler, you can use the ASPxGridView.GetDetailRowKeyValue method with ASPxHyperLink.NamingContainer property as a parameter, to get the main grid row key value.

[C#]

protected void ASPxHyperLink1_Init(object sender, EventArgs e) {
ASPxHyperLink myLink =(ASPxHyperLink)sender;
int key = Convert.ToInt32(ASPxGridView.GetDetailRowKeyValue(myLink.NamingContainer));
}

It would be better to use a binding-expression for the ASPxHyperLink.NavigateUrl property in the .ASPX file.

[ASPx]

<EmptyDataRow>
<dx:ASPxHyperLink ID="ASPxHyperLink1" runat="server" Text="ASPxHyperLink"
NavigateUrl="<%# ASPxGridView.GetDetailRowKeyValue(Container) %>" />
</EmptyDataRow>

How to refresh a ASPxGridView summary value on the client side

The ASPxGridView is a server side control, so it renders on the server side.

If you know how the summary value should be changed using the client side code, you need to do the following:

1) add the ASPxLabel to the column's FooterTemplate container and set its ClientInstanceName to a some value, for example, lblFooter;
2) use the lblFooter.SetText('some text') to change the displayed summary value.

Here is some sample code:

[ASPx]

<dx:GridViewDataTextColumn FieldName="CategoryID" ReadOnly="True" VisibleIndex="1">
<EditFormSettings Visible="False" />
<FooterTemplate>
<dx:ASPxLabel ID="ASPxLabel1" ClientInstanceName ="lblFooter" runat="server"
Text="<%# GetSummaryValue(Container)%>">
</dx:ASPxLabel>
</FooterTemplate>
</dx:GridViewDataTextColumn>
....

[C#]

protected string GetSummaryValue(GridViewFooterCellTemplateContainer container) {
ASPxGridView gridView = container.Grid;
GridViewDataColumn column = container.Column as GridViewDataColumn;
if(column == null)
return string.Empty;
for(int i = 0; i < gridView.TotalSummary.Count; i ++)
if(gridView.TotalSummary[i].FieldName == column.FieldName) {
return gridView.GetTotalSummaryValue(gridView.TotalSummary[i]).ToString();
}
return string.Empty;
}

Creating Arrary in JavaScript

Create an Array

An array can be defined in three ways.

The following code creates an Array object called myCars:

Listing 1:

var myCars=new Array(); // regular array (add an optional integer
myCars[0]="Saab";       // argument to control array's size)
myCars[1]="Volvo";
myCars[2]="BMW";

Listing 2:

var myCars=new Array("Saab","Volvo","BMW"); // condensed array

Listing 3:

var myCars=["Saab","Volvo","BMW"]; // literal array

Note: If you specify numbers or true/false values inside the array then the variable type will be Number or Boolean, instead of String.


Access an Array

You can refer to a particular element in an array by referring to the name of the array and the index number. The index number starts at 0.

The following code line:

document.write(myCars[0]);

will result in the following output:

Saab

Modify Values in an Array

To modify a value in an existing array, just add a new value to the array with a specified index number:

myCars[0]="Opel";

Now, the following code line:

document.write(myCars[0]);

will result in the following output:

Opel

How User Controls Are Processed

The HTML portion of ASP.NET Web pages can contain a mix of Web controls, user controls, and HTML syntax. When an ASP.NET Web page is visited for the first time, or for the first time after a change has been made to the HTML portion of the Web page, a class is automatically created from the HTML portion. This class, which is derived from the Web page's code-behind class, constructs the Web page's control hierarchy based on the declarative syntax in the HTML portion.

For example, imagine that a Web page had the following markup in its HTML portion:

<html>
<body>
<form runat="server">

Name: <asp:TextBox runat="server" id="name"></asp:TextBox>
<br />
<asp:Button runat="server" Text="Submit"></asp:Button>

</form>
</body>
</html>


This would generate the following control hierarchy:


Figure 2. Controls hierarchy on page

Notice that the HTML markup is converted into LiteralControl instances, the Web Form into an HtmlForm object, and the TextBox and Button Web controls into their respective classes.

Once this control hierarchy is created, the ASP.NET Web page can be rendered by recursively invoking the RenderControl(HtmlTextWriter) method of each of the controls in the hierarchy. When a control's RenderControl(HtmlTextWriter) method is invoked, the control generates its HTML markup and appends it to the HtmlTextWriter object. Realize that each time an ASP.NET Web page is requested, the page's corresponding class is invoked causing the control hierarchy to be created and rendered.

User controls work in a similar fashion to ASP.NET Web pages. When a user control is visited for the first time, or for the first time after the HTML portion has been changed, the user control is compiled into a class that is derived from the user control's code-behind class. Like the ASP.NET Web page's autogenerated class, the user control's autogenerated class constructs a control hierarchy based on the HTML portion of the user control. In essence, a user control has its own control hierarchy.

Imagine, then, that we had a user control with the following HTML markup:

<asp:Label runat="server" id="lblCategoryName"></asp:Label>

<br />

<asp:Label runat="server" id="Description"></asp:Label>

The user control's control hierarchy, then, would look like the following:


Figure 3. Control Hierarchy for user control

Recall that an ASP.NET Web page's HTML portion can contain not only Web controls and HTML syntax, but user controls as well. user controls are entered into the control hierarchy as an instance of the user control's auto generated class. So, imagine we augmented our previous ASP.NET Web page example so that after the Button Web control was an instance of the user control whose declarative syntax we just discussed. This would cause the Web page's control hierarchy to look like the following:

Figure 4. Updated control hierarchy for page

After the user control class is added to the control hierarchy, the class's InitializeAsUserControl(Page) method is invoked. The InitializeAsUserControl(Page) method is defined in the System.Web.UI.UserControl class, which the autogenerated user control class is derived from indirectly. (Recall that the autogenerated user control class is derived from the user control's code-behind class; this code-behind class is derived from System.Web.UI.UserControl, similar to how an ASP.NET Web page's code-behind class is derived from System.Web.UI.Page.) The InitializeAsUserControl(Page) method generates the user control's class hierarchy and assigns the user control's Page property to the passed in Page instance, thereby allowing the user control to programmatically reference the Page to which it belongs. After InitializeAsUserControl(Page) runs, the Web page's control hierarchy looks like:


Figure 5. Updated page hierarchy after initializing the user control

Notice that once the user control is affixed to the control hierarchy and builds up its own control hierarchy, the page's control hierarchy appears just as it would if a user control hadn't been used, but instead had its HTML portion entered directly into the page's HTML portion. With this complete hierarchy, the Web page can be rendered by recursively calling the RenderControl(HtmlTextWriter) method of each control in the hierarchy.

Now that we've seen how a user control is handled underneath the covers, let's take a look at some of the more advanced concepts of user controls, starting with how to respond to events raised by Web controls in a user control.


Failed to access IIS metabase.

Scenario:-
I have windows XP Professional installed on my machine and I got this error after
configuration of my virtual directory on IIS.

Server Error in '/myweb' Application.


Failed to access IIS metabase.

Description: An unhandled exception occurred during the execution of the current web request. Please review
the stack trace for more information about the error and where it originated in the code.
Exception Details: System.Web.Hosting.HostingEnvironmentException: Failed to access IIS metabase.
The process account used to run ASP.NET must have read access to the IIS metabase
(e.g. IIS://servername/W3SVC). For information on modifying metabase permissions,
please see http://support.microsoft.com/?kbid=267904.

Source Error:

An unhandled exception was generated during the execution of the current
web request. Information regarding the origin and location of the exception
can be identified using the exception stack trace below.

Stack Trace:

[HostingEnvironmentException: Failed to access IIS metabase.]   
System.Web.Configuration.MetabaseServerConfig.MapPathCaching(String siteID, VirtualPath path) +1076   
System.Web.Configuration.MetabaseServerConfig.System.Web.Configuration.IConfigMapPath2.MapPath(String siteID, VirtualPath vpath) +9  
System.Web.Hosting.HostingEnvironment.MapPathActual(VirtualPath virtualPath, Boolean permitNull) +301   System.Web.Hosting.HostingEnvironment.MapPathInternal(VirtualPath virtualPath, Boolean permitNull) +51   
System.Web.CachedPathData.GetPhysicalPath(VirtualPath virtualPath) +39 
System.Web.CachedPathData.GetConfigPathData(String configPath) +704 
System.Web.CachedPathData.GetConfigPathData(String configPath) +583
System.Web.CachedPathData.GetApplicationPathData() +38  
System.Web.CachedPathData.GetVirtualPathData(VirtualPath virtualPath, Boolean permitPathsOutsideApp) 8778063
System.Web.Configuration.RuntimeConfig.GetConfig(VirtualPath path) +46   
System.Web.Configuration.RuntimeConfig.GetLKGRuntimeConfig(VirtualPath path) +96

Version Information: Microsoft .NET Framework Version:4.0.30319; ASP.NET Version:4.0.30319.1

Solution :-

This Error Caused Because You Not Have Register ASP.Net with IIS.
Please Follow Following Step to Regiser ASP.Net With IIS.

-> Go to Start - >  Run -> Cmd.

-> GO to Your System Drive Mostly C Drive.

-> Type C:\WINDOWS\Microsoft.NET\Framework\<your framework version directory>\aspnet_regiis -i

Just wait And Message comes Successfully Register.

Or you go to your visual studio command prompt in visual studio tools and run the same command

aspnet_regiis –i


clip_image002

A potentially dangerous Request.Form value was detected from the client

Server Error in '/' Application.


A potentially dangerous Request.Form value was detected from the client (txtCode="<br/>").

Description: Request Validation has detected a potentially dangerous client input value, and processing of
the request has been aborted. This value may indicate an attempt to compromise the security of your application,
such as a cross-site scripting attack. To allow pages to override application request validation settings, set the
requestValidationMode attribute in the httpRuntime configuration section to requestValidationMode="2.0".

Example: <httpRuntime requestValidationMode="2.0" />. After setting this value, you can then disable request
validation by setting validateRequest="false" in the Page directive or in the <pages> configuration section.
However, it is strongly recommended that your application explicitly check all inputs in this case. For more
information, see http://go.microsoft.com/fwlink/?LinkId=153133.

Exception Details:System.Web.HttpRequestValidationException: A potentially dangerous Request.Form
value was detected from the client (txtCode="<br/>").
 
You have to do little modification to you application to get this fixed.

  1. Add <httpRuntime requestValidationMode="2.0" /> in your application web.config
       under <system.web>.
       <system.web>
        <httpRuntime  requestValidationMode="2.0"/>
  2. Add RequestValidation="false" on your page or in web.config <pages>
       attribute.
    <%@ Page Language="C#" AutoEventWireup="true" ValidateRequest = "false"
     
    or
    to work this for whole application do in web.config as:
    <system.web>
        <httpRuntime  requestValidationMode="2.0"/>
        <pages validateRequest ="false"></pages>