Introduction to Angular 4 and TypeScript

clip_image001
This tutorial led you to learn the fundamentals of Angular and TypeScript.

TABLE OF CONTENT

  • =>Introduction
    • What is Angular?
    • Why do we need Angular?
    • Architecture and Building Blocks of Angular Apps
  • Setting Up the Development Environment
  • Your First Angular App
  • Structure of Angular Projects
  • Webpack
  • TypeScript Fundamentals
    • What is TypeScript?
    • Creating First TypeScript Program
    • Declaring Variables
    • Types
    • Type Assertions
    • Arrow Functions
    • Interfaces
    • Classes
    • Objects
    • Constructors
    • Access Modifiers
    • Access Modifiers in Constructor Parameters
    • Properties
    • Modules
  • Angular Fundamentals
    • Creating Components
    • Generating Components Using Angular CLI
    • Templates
    • Directives
    • Services
    • Dependency Injection
    • Generating Services Using Angular CLI
  • Exercise

Introduction

What is Angular?
Angular is a JavaScript framework for building client-side applications using HTML, CSS, and a programming language such as JavaScript. It is an open-source front-end web application platform based on TypeScript.

clip_image002

Before start using something new framework; everybody has lots of questions in his mind that What is it and Where does it fit in requirement? At which place it benefits and Why to use if there are lots of JavaScript frameworks out there.

Why do we need Angular? Why to use Angular and not some other JavaScript framework?
clip_image004
Angular makes HTML more expressive. It powers up HTML with language related features such as local variables, for loops, and if conditions.

clip_image006
Angular has powerful data binding. Application can easily display fields from data model, track changes, and process updates from the user so fast. It is built for providing speed. It has faster initial loads, faster change detections, and improved rendering times than other JavaScript frameworks.

clip_image008

Angular encourages modularity in application by design. It led us to create Applications as a set of building blocks, making it easier to create and reuse content. There most of the application build with JavaScript/ jQuery but as far the application gets more complex it is not easy to maintain the JavaScript and jQuery code.
It requires to properly structure the application. There are some JavaScript patterns out there e.g. Revealing Module Pattern, Prototype Pattern but these are must easy to lots beginners for JavaScript.

clip_image010

Angular has built-in support for making communication with a backend service. This makes it easy for web applications to integrate with a back-end service. It is preloaded with set to features to get and post data or execute server-side business logic.

Easily Testable

clip_image011

Picture credit from..

There are most the applications build with JavaScript or jQuery. Over the years various frameworks are build and evolved to make web applications development easier. Angular makes applications with clean structure that easy to understand and easy to maintain loosely coupled code. It makes applications more testable to write automated test to test the various part of the application.

Architecture and Building Blocks of Angular Apps
clip_image013

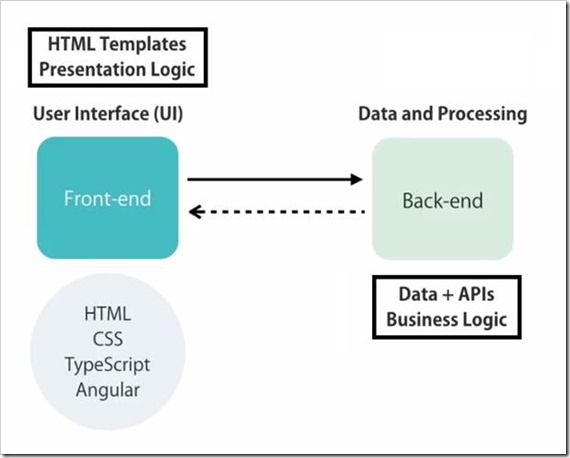
In modern web application, there are at least two parts a Front-end and Back-end. The Front-end is called client, it is the part of the web browser that user sees and interacts with. It includes user interface or UI for the application. It uses HTML, CSS, JavaScript/ TypeScript, Angular to create the Front-end. Front-end contains the HTML Templates and presentation logic to display the data and responding to the user e.g. navigation, listing data.

The Back-end consist of web servers or cloud which responsible for storing the data and doing any kind of processing. Back-end may one or more databases and APIs to make the data available to the client. For a large enterprise level application, it may also implement the business logic of the application like calculating the tax, shipping on various parameters

The Front-end or Client app talks to the Backend-end to get or save the data. At Back-end we create one or multiple HTTP Services / API to make data available to the client. These HTTP Services/ APIs are endpoint that are accessible via HTTP protocol so we call them to through HTTP request to get or save the data.

If we talk about Angular Building Blocks At the heart of every Angular App, we have one or more components. Application developed with Angular is comprised of a set of components and services which facilitates operations/functionality across those angular components.

clip_image015

Angular component

clip_image017
Angular component is comprised of a template which is the HTML for the user interface fragment defining a view for the application. component encapsulates the Data, HTML mark-up and logic for a view.

Along this, a class for the code associated with the view. The class contains the data or properties for use in the view and methods, which perform actions button for the associated view e.g. responding to a button click.

clip_image019

Metadata

A component also has metadata, which provides additional information about the component to Angular. It is this metadata that identifies the class as an Angular component.

Modules

Every Angular application has at least one Angular module which called the application's root Angular module. As Application grows it can have any number of additional Angular modules including feature modules that consolidate the components for a specific application feature to make code maintainable. It is a container for groups of components.

clip_image021

For an example, in real world scenario If we go to a grocery store then it has few shelf's to maintain their products/items to sell but in a big mall we found lots of I/0 to manage different categories of the products. Similarly, to maintain different type of components we can create multiple modules to organize the components.

If we see in Training web application, there are following modules can be created to manage the application:

clip_image023

Each module will manage their specific group of components, sub components to break the application in smaller and maintainable to facilitate a specific area of the application.

Conclusion:
In this section we have learned about the Angular and what/why Angular. Along this we have also tried to know the basic building blocks of the Angular to develop a web application

Next: Setting Up the Development Environment

How to run Node.js and Npm with web proxy

Recently I needed to install npm on my workplace computer and it always showing below connection timeout error message every time when I run any command.


clip_image002

I have faced such issue with VS Code when trying to install extensions and updates. After going through documentation, I found that here is the same issue with proxy settings and I got information by running ‘npm help config’ command. It redirected me to the npm config documentation and I found this:

clip_image004


To authenticate my corporate proxy, I set the environment variables HTTP_PROXY and HTTPS_PROXY but npm did not recognized these environment variables.
After doing search on internet and from my previous experience with vscode issue, I found the following same way to configure the proxy for npm.


npm config set proxy http://proxy.company.com:8080
npm config set https-proxy http://proxy.company.com:8080

If you need to specify credentials, they can be passed in the url using the following syntax.
http://user_name:password@proxy.company.com:8080

You can also set the proxy configuration as a command line argument or environment variable. Configuration parameters can be specified using -- when executing npm. So the proxy could also be specified as follows.
npm --https-proxy=http://niranjansingh:MyPass@172.29.01.01:8080 -g install yo

I have tried command line configuration to make it work and I have done my job.
Hope this help others also... Happy Coding!

How to create Node.js development environment in Visual Studio?

Now Visual studio is enriched with the tools that turn Visual Studio into a powerful Node.js development environment. Node.js Tools for Visual Studio is free and open source plug-in built on top of Visual Studio 2012, 2013, or 2015. This tool has enable following feature for Node.js development:

  • Intelligent code completion
  • Advanced debugging and profiling
  • Integration with other Visual Studio features and 3rd party tools
  • Node.js, io.js, JavaScript, Typescript, HTML, CSS, and JSON support

Installation:
To create Node.js development environment in Visual Studio follow the below steps:

  1. Install Visual Studio
    Node.js Tools for Visual Studio supports Visual Studio 2012 Update 4, Visual Studio 2013 Update 4 and higher. It also support community version of Visual Studio. Visual Studio Community is a free, fully featured, and extensible IDE for individual developers, open source projects, academic research, education, and small professional teams. Create applications for Windows, Android, and iOS as well as web applications and cloud services. Build apps for any platform. Use designers, editors, debuggers, and profilers in a single tool. Access thousands of extensions and more. Go to Visual Studio download page and download which flavor of Visual Studio application you want to use.
  2. Install Node.js Tools for Visual Studio
    Node.js Tools for Visual Studio installs via msi installer and takes few minutes. Just download the appropriate version of the tools according to the Visual studio that you have installed. The latest release of tools is Node.js Tools 1.1.1 and if you have installed Visual Studio 2012 or 2013 then download tools that relevant to your Visual Studio installation.
    clip_image002_thumb[2]
    After downloading the tools follow the installation wizard to complete the installation. Currently I am using Visual Studio 2013 so I am using tools compatible with Visual Studio 2013.

    clip_image003_thumb[1]
    Click next and then accept License agreement to complete the installation.
  3. Install Node.js and Get Started with Node Tools for VS
    in last step, we need to install Node.js interpreter and Azure tools (for deployment). Actually Node.js Tools for Visual Studio requires a Node.js interpreter to be installed to work with Node.js. Node.js is built for 32-bit and 64-bit architectures.
    Node.js (x86): https://nodejs.org/dist/v0.12.7/node-v0.12.7-x86.msi
    Node.js (x64): https://nodejs.org/dist/v0.12.7/x64/node-v0.12.7-x64.msi
    Azure Tools:
    Azure Tools for VS 2015: http://go.microsoft.com/fwlink/?LinkId=534216
    Azure Tools for VS 2013: http://go.microsoft.com/fwlink/p/?linkid=323510
    Azure Tools for VS 2012: http://go.microsoft.com/fwlink/p/?linkid=323511

Now we are ready to start working with Node.js in Visual Studio and going to see the installed temples for the Node.js projects.
To create a project, Select New Project from File menu. You will find Node.js templates in Installed Templates under JavaScript section. Click on Node.js and you will find several template to create Node.js projects.

clip_image005_thumb[2]

Select “Blank Node.js Web Application”. Enter a project name “NodejsWebAppTest” and location and click OK.

Once Visual Studio completes the process to create the project then it opens “server.js” file in the editor. It is just like a program which prints “Hello world” on the console.

var http = require('http');
var port = process.env.port || 1337;
http.createServer(function (req, res) {
    res.writeHead(200, { 'Content-Type': 'text/plain' });
    res.end('Hello World\n');
}).listen(port);

Now press F5 to run the application in browser. In my case what happened, I missed the step 3 – Installing Node.js. Due to this reason an Information dialog appear on my screen telling that you have not installed Node.js.
clip_image006_thumb[1]

Then I have to download Node.js and install it before running this application again. Here are the steps to install Node.js:

  1. Run the downloaded application and it will popup below welcome screen. Click Next.
    clip_image007_thumb[1]
  2. Accept License agreement to complete this step and then click Next.
    clip_image009_thumb[1]
  3. After this step it will ask you to specify the destination folder where it should be installed.
    clip_image011_thumb[1]
    This is global installation of Node.js which is referenced in the projects. We can specify the path to a local interpreter in each of your Node.js projects.
  4. After that click next and at last step, click install to start installation process.
    clip_image013_thumb[1]

When this process complete then again try to run the application. Just press F5 and you will see the results in the browser.

clip_image015_thumb[1]

Conclusion:
Now we have a Node.js development environment up and running in Visual Studio. There are lots features included in the IDE for development of Node.js as we are debugging a C# code. E.g. Debugging, IntelliSense, Profiling and Interactive windows also.